> For the complete documentation index, see [llms.txt](https://docs.bluekeys.org/guide/llms.txt). Markdown versions of documentation pages are available by appending `.md` to page URLs; this page is available as [Markdown](https://docs.bluekeys.org/guide/virtualisation/dockerize-angular-9-app-with-nginx.md).
# 🇬🇧 Dockerize Angular 9 App With Nginx
### Set up your Angular 9 app in a Docker environment and deploy it in no time
[](https://devbyrayray.medium.com/?source=post_page-----915f0f5acac--------------------------------)[Dev by RayRay](https://devbyrayray.medium.com/?source=post_page-----915f0f5acac--------------------------------)Follow[Feb 17](https://medium.com/better-programming/7-steps-to-dockerize-your-angular-9-app-with-nginx-915f0f5acac?source=post_page-----915f0f5acac--------------------------------) · 8 min reading
In this tutorial, I want to show you how you can dockerize your Angular 9 application and put it online in no time!
It will be useful to have some basic knowledge of Angular and Docker, since I won’t go into the nitty-gritty details of Docker and Angular 9.
I will show you a practical way to dockerize your Angular 9 application so you can deploy it on your web hosting of choice.
## Tooling
In this tutorial, we are going to use the following tools. If you haven’t installed them, I will walk you through it, but it will be faster if you have them already on your machine.
1. Node.js
2. npm or [Yarn](https://yarnpkg.com/)
3. Angular CLI
4. Code editor of your choice. (I favor Visual Studio Code.)
5. Docker
## 1. Install Angular CLI
If you haven’t installed the Angular CLI, I would recommend doing so.
Open your terminal and run `npm install -g @angular/cli` or if you use Yarn, run `yarn global add @angular/cli`.
## 2. Create a New Angular Project With CLI
If you’ve already created an Angular project, you can skip this step.
Run the `ng new` command to create a new Angular 9 project. Make sure you answer all the questions you get in the terminal because this is going to make the setup very easy.
### Commands
* npm: `ng new project-name`
* Yarn: `ng new project-name --packageManager=yarn`
To test if everything works, navigate in the terminal to your `project-name` folder and run `ng serve`. When everything works as expected, you can open your browser with [localhost:4200](http://localhost:4200/).
Of course, you’re going to build an awesome Angular application that is very useful for its users. But you can do that later.
## 3. Install Docker
When we want to use Docker to build our Docker image and run our container, we have to install Docker.
If you have Docker already installed, you can continue to the next step.
[Download the installer](https://docs.docker.com/install/) for your platform and run the installation. It should be straightforward.
To test if the installation succeeds, run the command `docker -version`. If you see a version number, everything is good to go to the next step.
## 4. Create a Multi-Stage Docker Image
If you have a bit of experience with Docker, you know what a Docker image is and what you can do with it. For those who don’t know it, let me explain it in short.
### What is a Docker image?
A Docker image is the blueprint for the application you want to run in a Docker container. In the blueprint, you have to decide what kind of steps Docker needs to take to build your application, get dependencies, and copy the needed files.
With the Docker image, you can spin up a Docker container to run it and make it visible in the browser, for example.
### What is a Docker container?
A Docker container is a sort of virtual (mini) server that you can start, stop, or remove with a single command. A Docker container makes it easy to spin up multiple instances of that container so you can divide the traffic between them.
### Let’s build the first part of the Docker image
Create a file, `Dockerfile`, notice there is no file extension. (That's correct.)
First, we are going to tell it on which image we want our image to be based on. This image will install all the dependencies for Node.js automatically to build our Angular 9 application on it.
```
FROM node:13.3.0 AS compile-image
```
We are using `node:13.3.0`, if you want to use another version or smaller base image, check the [Node.js Docker page](https://hub.docker.com/_/node/). We call that image `compile-image`, this will become handy later on.
```
RUN npm install -g yarn
```
Next step, we install Yarn for the people who are using Yarn. If you want to use npm, you can skip this step.
```
WORKDIR /opt/ng COPY .npmrc package.json yarn.lock ./
```
We set our `WORKDIR` to `/opt/ng` so we know the directory where everything will be copied to with the `COPY` line.
For Yarn, we run the `yarn` command as you would do on your local computer.
```
RUN npm install
```
When using npm, you run the `npm install` command to install all the dependencies.
```
COPY . ./ RUN ng build --prod
```
Copy all the other Angular files to be able to run the `ng build --prod`. It is recommended to run this command on your computer before creating a Docker image, this will save you from constantly building a Docker image that is failing.
Most Docker images will stop here. But this will make your Docker image bigger than needed.
### Build the second part of the Docker image
To run our Angular app, we don’t need to run it with Node.js, we can choose a more lightweight variant to run it.
The second phase of the Docker image starts with the `FROM` statement where we specify we want to use `nginx`.
```
COPY docker/nginx/default.conf /etc/nginx/conf.d/default.conf
COPY --from=compile-image /opt/ng/dist/app-name /usr/share/nginx/html
```
The first `COPY` statement copies the `default.conf` file from the `nginx` base image to the Docker image we are building.
The second `COPY` statement tells it that we want some files from the `compile-image`. So, underwater, it has built the first part of the image in a separate Docker image.
We copy the built Angular app from the `/dist` folder in the `compile-image` to the `html` folder of [NGINX](https://www.nginx.com/).
The reason for using NGINX is that it will make it possible to run the Angular app without the need for the big `node_modules` folder. We only use the files of our application. This will save some bytes on the Docker image.
### Final Docker image
```
FROM node:13.3.0 AS compile-image
RUN npm install -g yarn
WORKDIR /opt/ng
COPY .npmrc package.json yarn.lock ./
RUN yarn install
ENV PATH="./node_modules/.bin:$PATH"
COPY . ./
RUN ng build --prod
FROM nginx
COPY docker/nginx/default.conf /etc/nginx/conf.d/default.conf
COPY --from=compile-image /opt/ng/dist/app-name /usr/share/nginx/html
```
This is how the final Docker image should look.
## 5. Build a Docker Image
Now we have created the `Dockerimage` file. We are ready to run the command to build our image.
```
docker build -t angular-9-app .
```
When running this command, Docker will create your image. This can take a while, depending on the power of your computer. So, be patient.
When the command hasn’t gotten any errors, it is successfully built when it ends with something like this.
```
Successfully built 1c40cf9e92e3
Successfully tagged angular-9-app:latest
```
If you want to see all the Docker images you have on your computer, run this command:
```
docker image ls
```
The result should be something similar to this. On the top, you will find your newly created Docker image with a tag, image ID, date, and size.
```
REPOSITORY TAG IMAGE ID CREATED SIZE
angular-9-app latest 1c40cf9e92e3 About a minute ago 130MB
```
## 6. Run Docker Container With Docker Image
To get our Angular app running, we have to start a Docker container that uses our Docker image.
```
docker run --name ng-app-container -d -p 8080:80 angular-9-app
```
When running the command above, the terminal will respond with an ID.
```
8ef42069eaaf0e70aceebddcd0131c3b670464dd62cf8a78c19cb074e84ad750
```
This ID corresponds with your Docker container.
Let’s open the browser and fire up [http://localhost:8080](http://localhost:8080/) to see our Angular app running.
If you made changes to your Angular app, you need to create a new Docker image.
```
docker container stop 8ef42
docker container rm 8ef42
```
Use this command to stop and remove your Docker container. (If you don’t know your Docker container ID, run `docker container ls`.) You don't need the long ID, just type the first three or four characters, that will be enough.
When the new Docker image is created, you can start a new Docker container with the `docker run` command above.
## 7. Add Docker Image to GitHub
Now that we have created a Docker image and used it to run in a Docker container on your local computer, we have tested that this worked.
If you want to use this app on your hosting (it has to be a hosting platform that supports Docker, I recommend [DigitalOcean](https://www.digitalocean.com/)) you have to store this Docker image in a Docker registry.
A Docker registry is a storage provider for Docker images. GitHub is a great way to store private and public Docker images.
### Login to GitHub Docker Registry
Before we can push our images, we need to login to the Github Docker Registry on your computer.
```
docker login -u USERNAME -p TOKEN docker.pkg.github.com
```
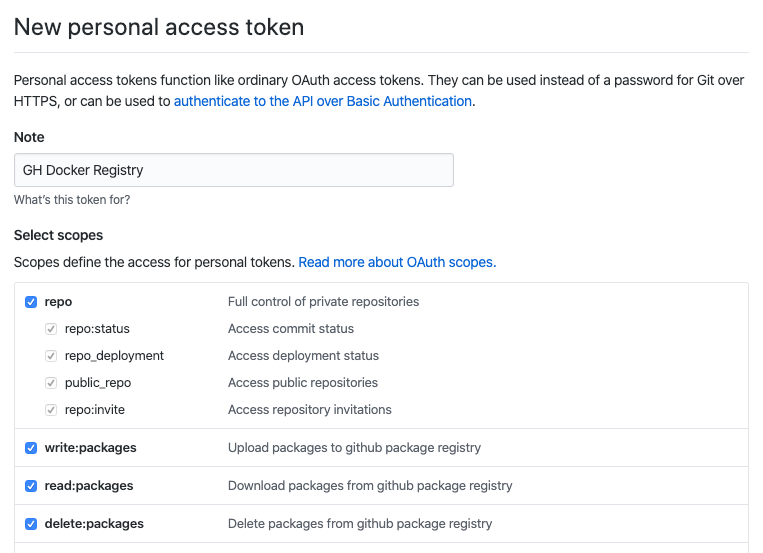
Replace the `USERNAME` with your username and `TOKEN` with the token you have created via the [GitHub website](https://github.com/settings/tokens). Give the token a name and select the repo, `write:packages`, `read:packages`, and `delete:packages`.
Copy the token and past it in the command.
To push a Docker image, you have to create a GitHub repo. If you host your code on GitHub, you have probably done that already. If you haven’t, do that first.
### Publish Docker Image
The Docker image we created from our Angular app is going to be published to the registry.
```
docker image ls
```
To publish, we need to know the Docker image ID, you can find this with the command above.
Now that you know your Docker image ID, you can replace `IMAGE_ID` with your image ID. Next, replace everything in the URL with your information. For `VERSION`, you can start with `0.0.1` or anything else that makes sense for you.
When everything went great, go to your GitHub repo in the browser. You should see that there is a package next to the number of branches.

Click the link and choose your image. This will navigate to your Docker image page. On this page, you will see the link to your image.
Now you can use the Docker image on your web hosting. I’m not going to explain how you install Docker on your hosting (because there are a million possibilities). If you are using Digital Ocean, you can install it manually or use the [Docker installer in the marketplace](https://marketplace.digitalocean.com/apps/docker).
With this command, you can pull the image you just published to the GitHub Docker Registry.
```
docker run --name ng-app-container -d -p 8080:80 angular-9-app
```
When you want to run it in a container, you can run the same command as before.
## Thanks
Hopefully, this tutorial helped you create a Docker image with Angular 9, run it inside a Docker container, and publish it in the GitHub Docker registry.
> For this post I would like to thank [Frank Spijkerman](https://github.com/fspijkerman/) who helped me creating this fast Docker image setup. 🙏
If you have any questions about it, please let me know in the comments. If not, happy coding!
> I’ve gathered a couple of [aspiring developers around the world on a Discord server](https://mailchi.mp/fb82491d03f8/dev-by-rayray-discord-community), feel free if you like to join in.
Source :