Le guide est en cours d'écriture soyez indulgent, ( repris de nos salons Discord )
Technologies
Qui sommes-nous ?
Une association qui fait de l'orientation numérique une priorité
Bluekeys est une association de février 2021 en Gironde. Elle se propose d'être un pont entre les jeunes usagers du numérique (12-30 ans) et ceux moins familiers avec ces pratiques, pour une meilleure compréhension des informations et comportements à risques numériques, dans la suite des solutions sont proposées.
Orienter et accompagner les usagers pour ne plus être seul derrière les écrans soit en individuel à NumITe, à domicile et dans les établissements publics.
Chaque équipement donné par NumITe s'inscrit dans notre pôle de recyclage numérique pour en faire une seconde vie et l'offrir 🎁
Le présent guide est réalisé pour donner plusieurs orientations suivant un contexte avec certaines ressources, afin d'apporter une information sur des questions auxquelles nous répondons souvent depuis 6 mois en 2020 sur nos différents réseaux.
Tous les articles du présent guide écrits pas nos différents contributeurs (bénévoles, amateurs, étudiants dans le supérieur, CEO ...) sont sous la licence Attribution 4.0 International (CC BY 4.0), disponible sur notre dépôt numérique pour votre usage soit en clonant le projet ou préférer télécharger la version final trimestriel au format markdown :
à Saint-andre-de-cubzac en gironde 33, anciennement depuis 2004 Dom'Micro dans le dépannage et le service informatique aux particuliers et entreprises.
En 2022, vers une croissance pour définir ce qu'est l'artisanat numérique en gironde correspond à de nombreux domaines, nous ne savons pas votre problématique à l'avance et nous irons ensemble vers une solution. Nous détaillerons prochainement nos pôles d'activités.
”Le radium ne doit enrichir personne. C'est un élément; c'est pour tout le monde. ”
”Vous ne pouvez pas espérer construire un monde meilleur sans améliorer les individus.”
”Pensez à être moins curieux des personnes que de leurs idées.”
”Dans la vie, rien n’est à craindre, tout est à comprendre.”
Marie Curie 💕
“Je n’ai pas échoué. J’ai simplement trouvé 10.000 solutions qui ne fonctionnent pas.”
Thomas Edison 💕
📲
✍🏻
📍
Les dangers des réseaux sociaux
A notre époque, nous utilisons tous des réseaux sociaux mais connaissons-nous réellement ses dangers ?
Introduction
Nous allons voir dans cet article, ce qu’est un réseau social, lesquels sont les plus utilisée, les dangers et quelque scandale dont les réseaux sociaux doivent faire face
Une alternative ?
AlternativeTo est un service gratuit qui vous aide à trouver de meilleures alternatives aux produits que vous aimez et détestez dans l'informatique.
Le site est réalisé par Ola et Markus en Suède, avec l'aide de nos amis et collègues en Italie, Finlande, USA, Colombie, Philippines, France et des contributeurs du monde entier. C'est vrai, toutes les listes de produits de substitution proviennent d'un grand nombre de sources, et c'est ce qui rend les données puissantes et pertinentes.
Par contre, il faut quand même prendre du recul cela reste à votre appréciation, il arrive que vous tombiez sur de mauvaise proposition, c'est comme tout faut voir, mais ça reste un service plutôt intéressant.
Infrastructure Faults are a set of faults that target IAAS components where developers host and run their applications. For eg: this might be a virtual machine or an AWS EC2 instance where the application runs as a service or a Docker host where the application containers are hosted or a K8s cluster where the pods host the application. These components are usually shared with multiple applications running on the same infrastructure and are referred to as endpoints in Mangle. So faults against these components will impact multiple applications unless they have different levels of fault tolerance.
Application Faults are a set of faults that target specific applications running within a given infrastructure component or endpoint. For eg: this could be a specific tomcat application running within a virtual machine or an AWS EC2 instance or JAVA applications running within containers on a Docker host or K8s pods. Faults against applications typically will impact just that application and ideally should not bring down any other applications running on the same infrastructure or is dependent on the affected service. If it does, your system is prone to cascading failures and should be examined in great detail to improve fault tolerance levels.
HTML
Ressources en cours d'écriture à titre informatif
Voici une petite ressource pour commencer HTML (ça vient de mes cours de licence Informatique, ne faites pas attention à la partie "serveurs pédagogiques") :
Un réseau social est une plateforme web (voir logiciel web) et/ou une application mobile permettant l’échange, partage, mise en contact et découverte de contenu.
2. Les réseaux sociaux les plus utilisées
D’après, un sondage de Satista datant de 2022, les 5 réseaux sociaux les plus utilisées dans le monde sont :
Classement des réseaux sociaux les plus populaires dans le monde en janvier 2022, selon le nombre d'utilisateurs actifs(en millions)
3. Les dangers des réseaux sociaux
Dans nos échanges du plus jeune âge à plus, il est nécessaire d'avoir un smartphone et un profil de réseau social, nous sommes exclus d'un groupe dans le cas inverse si nous ne pouvons satisfaire cet aspect social numérique.
Déjà à 11-12 ans, certain collégiens crées des groupes de classe WhatsApp (messagerie instantané) isolés des réseaux, seul, avec par exemple la personne la plus populaire comme administrateur du groupe.
Beaucoup de jeune personne sont très mal équipé face à cette façon de consommer le numérique et d'échanger, il arrive très souvent que la malveillance de la sphère public arrive à atteindre la sphère privée beaucoup plus facilement qu'a une autre époque.
La plateforme cybermalveillance.gouv.fr à enregistré 2,5 millions de visiteurs, une fréquentation record principalement centrée sur l’assistance, qui traduit un besoin en cybersécurité grandissant des populations.
Parmi les actes de cybermalveillance les plus fréquemment rencontrés par les différents publics :
L’hameçonnage ou phishing en anglais (voir article c'est quoi le phising);
Le piratage de compte en ligne ;
Les rançongiciels ou ransomwares en anglais (rédaction d'un article ransomware ) ;
Le piratage de compte en ligne.
Il y a plusieurs facteurs néfaste pour les usagés des réseaux différents tels que :
Le contenu insultant, homophobe, raciste et malveillant ;
Contenu pornographique ;
Fausses informations ( ex : fausse annonce de décès,...)
La liste est plutôt longue ...
Un autre danger des réseaux sociaux concerne l’utilisation de nos données personnelles, en effet, vous avez tous reçu à une période un mail pour dire que les plateformes faisaient une mise à jour des conditions d'utilisations, ils vendent nos données personnelles, où s'en servent pour afficher des publicités pertinentes à l’utilisateur et tant d'autres choses que nous ne détaillerons pas ici.
Les données deviennent un sujet de plus en plus en vogue depuis le GDPR (RGPD en français) de juin 2018 et encore davantage depuis la création de l'association européen GAIA-X afin de créer un label de confiance pour les données souveraines localiser sur notre continent plutôt qu'a l'étranger.
4. Quelques scandales mêlant les réseaux sociaux :
De nombreux scandale mêlant les réseaux sociaux sont apparus ces 5 dernières années. L'un des scandale les plus important est l'affaire Facebook-cambridge Analytica.
Cambridge Analytica a utilisé nos données personnelles que Facebook à données (ou vendu) a la société pour influencer les votes en faveur des personnalités politiques, et principalement l'élection présidentielle américaine de novembre 2016 qui a permis l'élection de Donald Trump aux états-unis.
Comme on l'as vu dans l'article nous passons énormément de temps sur les réseaux sociaux tant par nos usage personnel que professionnel, mais de nombreuse activités malveillantes ont lieux aux travers des réseaux sociaux.
5. Quelle solutions pour se protéger des réseaux sociaux.
Pourquoi se protéger
Avec l’avènement des réseaux sociaux, il devient très facile de nous stalker, c'est-à-dire quelqu'un pratiquant la traque furtive. Le stalking est une forme de harcèlement cela peut être n'importe qui pour nous espionner, nous surveiller au travers des réseaux sociaux. Il y'as justement une série sur le stalk qui est actuellement diffusée sur france tv.
C'est pourquoi pour lutter contre ses espions d'un nouveau genre, je vous recommande de mettre vos comptes en privées en utilisant les fonctionnalités disponibles sur toutes les plateformes et application tablette/mobile (paramètre et confidentialité), cela permettra que toute personne ne faisant pas partie de vos amis ne voie pas ce que vous postez ou vous chercher avec votre numéro de téléphone.
Mettre en privé ses comptes
Il faut bien sûr faire attention à ce que le poste sur les réseaux sociaux ne donne pas trop d'informations sur vos photos, vidéos et autres informations.
Pour lutter contre la fausse information aussi appelée hoax, je vous recommande de vérifier sur le web sur les nombreuses plateformes qui lutte contre la désinformation notamment :
Où trouver d'autres conseils
Vous pourrez trouver de nombreux conseils pour vous prôteger des réseaux sociaux sur différentes plateforme comme :
Lutter contre la fausse information
Lutter contre le piratage
Pour lutter contre le piratage de compte en ligne, je vous conseille d'activer la double authentifications ( code reçu par sms le plus souvent ou avec une applications tierce comme microsoft authentificator).
Le pirate même avec votre identifiant et mot de passe ne pourra pas se connecter tant qu'il n'a pas le code temporaire de la double authentification.
6. Conclusion
Comme on l’a vu, dans cet article, les réseaux sociaux sont un vrai danger tant au niveau de donnée personnelles et de tout ce que on peut y trouver, il vous appartient de savoir mieux les utilisés. C’est pourquoi, Avec bluekeys nous allons vous proposer des temps d’écoute sur ces dangers et essayer de vous apporter des solutions.
Vous pouvez nous laisser un pourboire directement sur nos sites web depuis le navigateur Brave.
Dernier poste
Twitter nous permet de suivre les derniers articles publiés !
Sauvegarder sous toutes les formes
Est un programme en ligne de commande pour gérer les fichiers sur le stockage en Cloud, avec une très bonne documentation. C'est une alternative riche en fonctionnalités aux interfaces de stockage web des fournisseurs de cloud computing. Plus de 40 produits de stockage dans le cloud prennent en charge Rclone, notamment les magasins d'objets S3, les services de stockage de fichiers pour les entreprises et les particuliers, ainsi que les protocoles de transfert standard.
Rclone dispose de puissants équivalents de cloud aux commandes unix rsync, cp, mv, mount, ls, ncdu, tree, rm et cat. La syntaxe de l'outil familière inclut le support du pipeline shell et la protection contre les exécutions à sec. Il est utilisé en ligne de commande, dans des scripts ou via son API.
Nous sommes dessus en ce moment pour Blue-Keys
Pour les personnes moins avancé, il existe le logiciel Veeam Agent pour Microsoft Windows FREE. Notez qu'il existe également une version Linux (avec une interface en ligne de commande uniquement)
CSS, SASS
Ressources en cours d'écriture à titre informatif
@Azales : Pour ceux qui veulent une introduction un peu plus simple pour débuter :
Bienvenue dans ce nouveau cours traitant de Sass, un préprocesseur CSS parmi les plus célèbres. Dans ce nouveau cours, nous allons apprendre à utiliser les différentes fonctionnalités de Sass (variables, fonctions, imbrication, héritage, structures conditionnelles…) et comprendre en quoi Sass peut nous aider à créer un meilleur code CSS. En effet, une utilisation raisonnée de Sass peut aujourd’hui encore permettre de créer du code CSS à la fois plus facilement maintenable et plus puissant puisque Sass transforme le CSS en un quasi langage de programmation avec l’utilisation intensive de variables notamment.
@Azales HTML & CSS :
La famille C
Ressources en cours d'écriture à titre informatif, on sait que le C, C++ et C# son différent, on regroupe ici le temps de vider nos salons Discord.
Débutant : attention, c'est vraiment très avancé niveau des connaissances, faut comprendre plusieurs domaines et avoir de l'expérience.
Je partage une Introduction (guichet fermé que j'ai reçu dans mes mails) à la technologie Redis (par l'équipe Redis France), qui offre des rapidités et de la résilience, on parle de la modernité app cloud native. On parle de DBaaS Database As Service, dans le cloud aujourd'hui, c'est une technologie très utilisé, pour différentes raisons. Mais attention ! Il faut savoir des choses avant de partir à l'aventure des bases de données ! Refaire un SI, ou moderniser une entreprise ça à un coût ! Surtout faut éviter de se tromper de stratégie.
J'ajoute aussi le webinar vidéo qui va avec le PDF en Français, d'une durée de 1h (guichet fermé).
🇬🇧 Introduction Mangle enables you to run chaos engineering experiments
The Mangle Documentation provides information about how to install, configure, and use Mangle™.
This information is intended for the following audiences:
Copyright (c) 2019 VMware, Inc. All rights reserved. . Any feedback you provide to VMware is subject to the terms at .
VMware, Inc. 3401 Hillview Ave. Palo Alto, CA 94304
Source :
Overview
Mangle enables you to run chaos engineering experiments seamlessly against applications and infrastructure components to assess resiliency and fault tolerance. It is designed to introduce faults with very little pre-configuration and can support any infrastructure that you might have including K8S, Docker, vCenter or any Remote Machine with ssh enabled. With it's powerful plugin model, you can define a custom fault of your choice and run it without actually building your code from scratch.
The solution is delivered both as an appliance and as containers. It has the following major components:
Mangle Cassandra Database Container forms the persistence layer for the application and is shared across all the nodes in a multi node instance of Mangle. It is preferable to use an external mount point/persistent volumes for the Cassandra DB so that there is no data loss if the container restarts.
Mangle Application Container runs the core fault injection and scheduling engine. It retrieves and stores information from the database, controls the connections to an endpoint and runs faults using a robust task framework.
Mangle vSphere Adapter is a separate container that manages connections and run faults against the vCenter endpoints. It is not included as part of the core application in-order to make it as light weight as possible.
Copyright (c) 2019 VMware, Inc. All rights reserved. . Any feedback you provide to VMware is subject to the terms at .
VMware, Inc. 3401 Hillview Ave. Palo Alto, CA 94304
Mangle Users Guide
Mangle Users Guide provides information about how to add endpoints, run faults and view reports.
Product version: 2.0.1
Intended Audience
This information is intended for SRE, Developers and Chaos engineers who would like to run chaos experiments against infrastructure or applications to assess the resilience of their applications when subjected to unexpected failures.
Copyright (c) 2019 VMware, Inc. All rights reserved. . Any feedback you provide to VMware is subject to the terms at .
VMware, Inc. 3401 Hillview Ave. Palo Alto, CA 94304
Deployment Stage
Deployment involves deploying the Mangle appliance OVA or the containers.
During Deployment, the user provides customization such as configuring the root password and other optional configurations such as providing TLS certificates.
Deployment Failures
We have not experienced many failures during Deployment. If any issues occur, provide the Support Information from below.
Support Information
Provide the following information to support if encountering Deployment Stage failures:
Hash (MD5, SHA-1, or SHA-256) of the OVA/container images you deployed
Deployment method:
Deployment environment
Par où commencer ?
Vous voulez apprendre à développer mais vous ne savez pas par où commencer ? Laissez-nous vous dire que vous êtes tombés sur le bon article !
Avant tout
Pour commencer dans l'univers du développement, il est vivement recommandé de faire ce qu'on appelle de l’algorithmique, afin de comprendre certain verbe, terme et apprendre à utiliser la logique avec les bases nécessaire à la compréhension, puis utiliser sa tête plutôt qu'un programme avec une simple feuille de papier, un crayon et une gomme, cela va favoriser la construction d'une pensée axée sur la conceptualisation de votre programme, afin d'obtenir une logique plus claire hors d'un langage.
POO (Programmation Orienté Objet)
Ressources en cours d'écriture à titre informatif
Souvent en tant que débutant, vous faites du code procédural.
La solution procédural
le Afin de traiter les données, on appréhende le problème en raisonnant de façon logique, d'un état initial vers un état final. Les données entrent dans l'algorithme, on applique les actions définies, et on termine. La programmation procédurale tend à une capitalisation dans l'écriture du programme. On tente de trouver des parties qui se répetent, identiques, de trouver des comportements types. Ce seront des procédures et fonctions, qu'on pourra stocker dans des bibliothéques, puis réutiliser.
Les défauts du procédural
Principe de Wirth (inventeur du langage Pascal) : Programme = algorithme + structure de données =>Forte dépendance du programme aux données => Peu de réutilisabilité => Peu d'interfaçage entre applications => Collaboration difficile entre programmeurs... => Evolution difficile, effet de bords, régressions...
L'algorithmique
Ressources en cours d'écriture à titre informatif
Grafikart
est une ressource web déjà éprouvé qui propose une formation vidéo sur le sujet, il accompagne par exemple un néophyte (débutant ou même de 0) de façon très compréhensible.
La famille JS, TS
Ressources en cours d'écriture à titre informatif
@flov220 :
єtђгค๓ :
@Léolios : La suite sera ici pour apprendre le TypeScript :
@Thomas :Certains ont peut-être déjà vu ce site mais je le poste tout de même. C'est un article regroupant les notions avancées de Typescript (ça peut vite être hardcore, une bonne maîtrise du langage est donc nécessaire à la compréhension de ces différentes notions) :
@Léolios : Node ressemble à ça :
Python
Ressources en cours d'écriture à titre informatif
Le langage python est un langage de programmation interpreté orienté objet. Il a été crée en 1991 par Guido va Rossum. Python possède aujourd'hui une très grande communauté et donc il y a énormément de choses qui sont possibles avec ce langage. Pour vous donner une idée voici un lien qui regroupe beaucoup de bibliothèque et de frameworks:
Python dans le monde professionnel est beaucoup utilisé dans la science des données, l'intelligence artificielle et aussi dans les maths. Python est aussi souvent utilisé pour créer des serveurs web et faire du scripting.
Les ressources :
@flov220 :
C'est petite playlist sur le langage python ^^ par @BlindEyes
Ruby
Ressources en cours d'écriture à titre informatif
@r00t Hi, tu veux apprendre le Ruby ? Alors cette Playlist est faite pour toi ! Voici une Playlist sur les bases du langage Ruby ainsi que la POO (Programmation Orienté Objet) en Ruby créé par Opcode.
En voici une autre avec un peut de POO :
Encore une autre !
Et une autre :
Maintenant je vais vous présenter des Playlist sur Ruby On Rails. (Ruby On Rails est un Framework Web)
SQL
Ressources en cours d'écriture à titre informatif
La meilleur ressource pour apprendre depuis des années c'est :
C'est ma référence par excellence, en plus en Français chose rare dans le milieu, très sincèrement commencer par cette ressource c'est idéal.
Il y a des cours pour chaque échelon franchit :
Pour le logiciel prennez celui que Dr black Wolf ma recommandé, que j'ai éprouvé qui est vraiment dans mon top 10 le meilleur !
Beekper Studio est cross plateforme il sera un atout très fort dans votre avancer dans le SQL pure ! Sachez bien une chose, après quelques années d'expérience s'il y a bien un truc que j'ai retenu avec le SQL, c'est qu'il sera toujours plus rapide, efficace et productif de savoir et d'utiliser le SQL plutôt que se reposer sur des outils qui font tout à votre place !
RUST
Petite introduction au langage de programmation Rust suivit de plusieurs ressources permettant de commencer/continuer l'apprentissage de ce langage
Le langage Rust est un langage vraiment prometteur, ayant pour objectif d'être aussi performant et rapide que du C/C++ tout en offrant une bien meilleure sécurité au niveau de la gestion de la mémoire, c'est un langage compilé et bas niveau qui permet pour autant d'utiliser et de travailler sur des concepts plus haut niveau, aussi utile pour de la programmation système que pour de la programmation web, si ce langage vous intéresse je vous invite fortement à commencer à l'apprendre, voici juste en dessous quelques ressources qui pourraient vous intéresser pour découvrir ce langage (Mon préféré je l'admets):
Ma chaîne youtube où j'ai commencer à faire des cours de Rust pour essayer de palier au manque de ressources françaises 🇫🇷 :
Ressources anglaises 🇬🇧 :
Cargo est un outil fournit en même temps que Rust, les deux vont de pairs, c'est un outil de gestion de projet EXTREMEMENT
Mangle Deployment and Administration Guide
Mangle Deployment and Administration Guide provides information about how to install and configure Mangle as an administrative user.
Product version: 2.0.1
Intended Audience
This information is intended for Mangle administrators who would be setting up Mangle, adding users, adding metric providers for monitoring faults, setting log levels and creating support bundles. Knowledge of and
React-native
Ressources en cours d'écriture à titre informatif
Je partage un support de cours, il est d'accord. Les slides qui suivent permettent de vous faire une introduction à React Native.
Pré-requis comprendre JS + connaissance de NPM ou Yarn
C'est une technologie en JSX qui permet de créer des applications mobile cross-plateforme (Android et iOS) avec un langage web sans savoir utiliser les langages natif.
C'est asser pousser pour utiliser la plupart des fonctionnalités du téléphone. Par contre, vous n'avez pas les commentaires verbaux de l'auteur donc il peut arriver durant la lecture qu'il vous manque des infos. Bonne découverte !
Verify that the targeted datastore has enough space
Provide details about the targeted vCenter compute, storage, and networking
Pour nos amies qui sont sur Windows et qu’ils veulent faire du web je vous recommande de supprimer WAMP ! Et d’installer un outil que j’utiliser il y a trois ans :
Pour tes pages web tu peux utiliser différentes choses.
- utiliser Laragon ^^ - avoir un ordinateur physique dédié (type rack ou serveur ou autre) que tu va utiliser en tant que serveur chez un herbergeur comme par exemple chez Scalway
- meme chose mais en machine virtuel cette fois donc pas les mêmes avantages et inconvénient de façon général
- tu peux aussi le faire avec une Freebox delta utilisant des VM pour ensuite avoir un serveur dispo et un serveur web exposant tes sites depuis l’ip chez toi sur ta box, tu peux même mettre un domaine.
- utiliser des hébergeurs près à l’emploi avec une interface pour gérer la partie technique de mise en ligne de ton site, la on appel ça de l’hébergement mutualisé, c’est à dire plusieurs personnes utilise le même serveur que toi avec les ressources; le plus souvent pour de l'hebergement WEB avec par exemple du PHP.
- lorsque tu développe ton site ou un bout de code, sans avoir besoin d’un hébergeur il existe les pages des plateformes tel que gitlab et je crois github a confirmer. (En gros tu gére ton code et les versions de celui-ci chez eux et tu peux afficher ta page web static directement depuis eux) mais pas de chose comme PHP, ou Java ou autre.
- tu peux utiliser aussi des services en ligne comme codepen qui permette d’afficher ton code source et le résultat. Tu as d’autres choses très chouette aussi avec d’autre comme lui!
-Tu peux aussi le faire sur un ordinateur ou objet connecté ou NAS moderne qui auto héberge un site chez toi que tu laisse allumé derrière ta box, ou même installé un serveur web sur un ordinateur qui est ou pas installé comme un serveur. Il existe encore plein d’autre façon... En tout cas, lorsque tu veux héberger du code source pour un site et l’utiliser tu vas avoir besoin de ce qu’on appel un serveur web : Apache et Nginx (et d'autres) sont deux serveurs web utilisable dans ce contexte la et bien plus tu peux même les additionner pour faire ce qu’on appel un reverse proxy.
@Njörd : Le cours de Gérard Swinnen, Apprendre à programmer avec Python3, une référence dans le domaine (et il est en français, que demander de plus ? )
Tu peux progresser par étape en commençant par ça, afin d'éviter d'être perdu dans toutes la montagne d'information sur le web et sur les discussions des réseaux entre des personnes en désaccord.
On appelle ça aussi le langage naturel, en gros la réalisation d’algorithme en français, on utilise cela lors de travaux de recherches dans les études supérieures. Par exemple un master et doctorat sur des sujets identifiés dans un mémoire, une thèse ou document scientifique, tout cela afin d'expliquer un algorithme de façon universelle pour l'utiliser dans n'importe quel langage.
Que voulez-vous apprendre ?
il existe de nombreux langages, ayant ont chacun leurs particularités.
Si vous voulez faire un site web, commencez par apprendre .... puis complétez avec le back-end.
La Programmation Orientée Objet, c'est la tentative de réunir les données ET les traitements en une unité cohérente et maintenable. Dans le monde réel, tout est à la fois données et traitements... Une facture contient à la fois des données, et des calculs associés... Toute chose est à la fois dotée de caractéristiques (des données, des valeurs) et des comportements (des actions, des réactions à des stimulus, des messages).
Objet et POO pour bien comprendre :
[Développeur avancé]
Requis : POO (Programmation Orienté Objet => pas orienté Prototype comme dans JS) Pour ceux qui sont avancé comme @Thomas | blind-thomas family @Axone ... Je vous recommande un site pour apprendre la suite à la POO sur les patrons de conceptions (design pattern).
Refactoring.Guru vous facilite l’accès à tout ce que vous devez savoir sur la refactorisation, les patrons de conception, les principes SOLID, et d’autres sujets intéressants de la l'architecture et de la programmation.
C'est des notions général, mais on peut retrouver les mêmes patrons dans tous les langages POO.
Le site est vraiment complet :
Il faut bien vérifier quelque fois les dates et info globalement de toutes les sources et comparer suivant les versions (même ici), il y a toujours un petit travail de vérification à faire c'est pour ça que le guide existe, pour faciliter un peu l'orientation.
Vous pouvez rapidement consulter un contenu, tutoriel par exemple avec des termes obsolètes ou un contenu avec des mauvaises informations.
L’algorithmique est un passage obligé pour les programmeurs en herbes. Avant de vouloir se lancer dans la programmation à proprement parler il est important de comprendre comment on va communiquer avec la machine. Comment on va demander à l'ordinateur d'effectuer tel ou tel opération ?
Même si l'algorithmique peut avoir une utilisation plus large, pour la résolution de problème variées, le but de cette formation est bien de voir l'algorithmique comme un premier pas vers la programmation traditionnelle.
🔗Complément si besoin :
Le moteur V8 est présent aussi dans les navigateurs pour exécuté du JS. En réalité y a pas de meilleurs langage, juste suivant le contexte il peut être plus approprié. On le retrouve aussi dans Deno.
[Développeur avancé] - POO requis.
Pour ceux qui sont avancé comme @Thomas @Axone ... Je vous recommande un site pour apprendre la suite à la POO sur les patrons de conceptions (design pattern).
Refactoring.Guru vous facilite l’accès à tout ce que vous devez savoir sur la refactorisation, les patrons de conception, les principes SOLID, et d’autres sujets intéressants de la l'architecture et de la programmation.
Le site est vraiment complet je n'ai rien à redire.
C'est en trois parties @Thomas Node vs Deno: Synopsis
Deno est un runtime simple, moderne et sécurisé pour JavaScript et TypeScript qui utilise le moteur JS V8 de Google. Deno est construit en Rust. Deno est sécurisé, fonctionne en mode "sandbox", exécute le script typographique dès sa sortie de la boîte et est livré sous la forme d'un seul fichier exécutable. En plus d'exécuter une application de type script, Deno comprend également un testeur, un formateur, un linter, un inspecteur, etc. Deno est plus qu'un simple moyen d'exécuter des applications Typescript. Deno est une chaîne d'outils complète.
Par exemple, il est arrivé sur un projet client que je dois faire une migration, après l'avoir créé avec un framwork Backend je me suis rendu compte qu'il a passer 20 minutes pour 15 000 entrées re traité, réinséré dans la base. En SQL pure, après quelques jours pour construire la requête idéale, pour un résultat exécuté en quelques secondes. À vous de voir.
Si besoin il y a un format PDF sur le site soyez attentif !
Vous êtes nombreux·euses à demander ce qu'on peut faire avec une adresse IP, souvent, il arrive que le sujet ne soit pas du tout rassurant, voire inquiétant, inspirant quelques fois carrément la peur.
Dès votre première connexion sur internet n'importe quel site, application, peut savoir différentes informations telles que votre IP, le fournisseur d'accès à internet, le moyen utilisé et bien d'autres choses.
L'adresse donnée par votre FAI (Fournisseur d'Accès à Internet) peut être fixe ou dynamique. Cela signifie que vous aurez toujours la même adresse IP si elle est fixe (vous serez donc plus facilement traçable). Par contre, si elle est dynamique (le plus souvent c'est le cas), vous aurez une nouvelle adresse IP attribuée par votre FAI à chaque connexion de votre box.
Soyez rassuré·e·s ce n'est pas comme dans les séries; une personne mal intentionnée qui récupère cette information ne peut pas faire n'importe quoi :
Spammer avec des annonces “personnalisées” (plus avancé et moins fréquent) ;
Restreindre l'accès à certains services ;
Localiser l'emplacement à un endroit approximatif – un pays, une ville ou même un quartier ;
Si le réseau est un minimum sécurisé comme la plupart des autres ça ira, par exemple avoir un pare-feu, ne pas avoir un serveur personnel ou NAS connecté avec certains ports ouverts non-sécurisés ...
Vous pouvez faire appel au FAI pour un renouvellement d'IP si celle-ci est fixe. Vous pouvez aussi prendre un proxy et/ou VPN (Virtual Private Network), afin d'avoir votre IP derrière le VPN qui ira sur le web et internet à votre place.
En résumé :
La personne peut faire des choses, trouver des détails approximatifs sur votre (pays, ville, code postal, FAI), restreindre des accès (sites Web ou serveurs de jeux..), et vous cibler avec des annonces. C'est souvent plus un moyen de pression psychologique qu'autre chose.
Mangle Troubleshooting Guide
This guide will help you to diagnose common issues with Mangle deployment and operation and determine what information to collect for further debugging.
General Support Information
This information about the environment and events that occurred leading to the failure should be included in every support request to assist in debugging.
Basic Information
REQUIRED:
Endpoint type:
Details of Fault that was injected:
Type of Deployment: OVA, Container (Single Node), Container (Multi Node), Container (Multi Node with HA Proxy)
OPTIONAL, but helpful:
IP address of Mangle:
Hostname of Mangle:
IP address of Endpoint:
Detailed Information
What operation was being performed when the failure was noticed?
Provide information from the Support Information section of the appropriate Mangle Lifecycle stage
Provide additional detail as necessary
Mangle Support Bundle
Please run /etc/vmware/support/mangle-support.sh and provide the resulting file to support. This script gathers application state and log information and is the best tool for gathering comprehensive support information. Provide this output for all support requests along with the Support Information from the corresponding stage of the Appliance Lifecycle.
The location of the resulting log bundle is shown in the script output, similar to this example:
Provide this .tar.gz file to support.
Mangle Lifecycle
It is important to determine what stage in the appliance lifecycle you are at when encountering issues so that targeted troubleshooting steps can be followed. Please use the links below to identify what stage the failure is in, to apply the appropriate troubleshooting steps, and to provide the appropriate troubleshooting information for support.
Contributing to Mangle
The Mangle project team welcomes contributions from the community. We are always thrilled to receive pull requests, and do our best to process them as fast as we can. If you wish to contribute code and you have not signed our contributor license agreement (CLA), our bot will update the issue when you open a Pull Request. For any questions about the CLA process, please refer to our FAQ.
Before you start to code, we recommend discussing your plans through a Github issue or discuss it first with the official project maintainers via Slack, especially for more ambitious contributions. This gives other contributors a chance to point you in the right direction, give you feedback on your design, and help you find out if someone else is working on the same thing.
Contribution Flow
This is a rough outline of what a contributor's workflow looks like:
Create a topic branch from where you want to base your work
Make commits of logical units
Make sure your commit messages are in the proper format (see below)
Example:
Staying In Sync With Upstream
When your branch gets out of sync with the vmware/master branch, use the following to update:
Updating pull requests
If your PR needs changes based on code review, you'll most likely want to squash these changes into existing commits.
If your pull request contains a single commit or your changes are related to the most recent commit, you can simply amend the commit.
If you need to squash changes into an earlier commit, you can use:
Be sure to add a comment to the PR indicating your new changes are ready to review, as GitHub does not generate a notification when you git push.
Code Style
Formatting Commit Messages
We follow the conventions on .
Be sure to include any related GitHub issue references in the commit message. See for referencing issues and commits.
Reporting Bugs and Creating Issues
When opening a new issue through , try to roughly follow the commit message format conventions above.
Repository Structure
Endpoint Addition Stage
Endpoint addition is the first step to starting your chaos engineering experiments. It helps you set up the targets for the experiment.
Usually you encounter failures in this stage if Mangle has some difficulty reaching the endpoint either due to network connectivity issues, blocked ports or restrictive firewalls, bad credentials or wrong IP/Hostname values.
Common Error Codes and Next Steps
FIRM01: Connection Refused
Usually affects a remote machine endpoint.
Ensure that the machine is remotely accessible by running the ping command.
Ensure that the ssh service is running and the credentials are correct.
FIRM03: Mangle requires file transfer access
Usually affects a remote machine endpoint.
Ensure that the sftp configuration on the remote machine is correct.
Ensure that the ssh service is running and the credentials are correct.
Cannot connect to adapter while adding a vCenter Endpoint
Verify if you are able to open up the vCenter adapter Swagger URL which is normally available at https://:8443/mangle-vc-adapter/swagger-ui.html
Verify if they can get the health of the vCenter adapter from the mangle container using:
Dans le monde de la cybersécurité, OWASP (Open Web Application Security Project) est incontournable. Une organisation à but non lucratif travaillant sur la sécurité des applications Web, sa philosophie est de rester open source et accessible à tous. Un de ses projets les plus connu vous sera présenté dans cet article.
Le projet OWASP Top 10 () est de fournir une liste des dix risques de sécurité les plus critiques affectant les applications web. Il est actuellement une référence dans le domaine de la sécurité informatique, il sensibilise autant les développeurs que les entreprises. La dernière mise à jour de ce classement a été faite en 2017 :
. Des failles d'injection, telles que l'injection SQL, NoSQL, OS et LDAP, se produisent lorsque des données non approuvées sont envoyées à un interpréteur dans le cadre d'une commande ou d'une requête. Les données hostiles de l'attaquant peuvent inciter l'interpréteur à exécuter des commandes involontaires ou à accéder aux données sans autorisation appropriée.
Advanced Cassandra Configuration
Open /etc/cassandra/cassandra.yaml and modify authenticator: from AllowAllAuthenticator to PasswordAuthenticator, so Cassandra will create a default user cassandra/cassandra.
To create own user : create dir /docker-entrypoint-initdb.d/ and create cql file init-query.cql with content (CREATE USER IF NOT EXISTS admin WITH PASSWORD 'vmware' SUPERUSER;) so it will create a user admin/vmware.
To execute the init-query.cql file on db startup, need to modify the docker-entrypoint.sh file, add the below content right before exec ""
for f in docker-entrypoint-initdb.d/*; do case "$f" in *.sh) echo "$0: running $f"; . "$f" ;; *.cql) echo "$0: running $f" && until cqlsh --ssl -u cassandra -p cassandra -f "$f"; do >&2 echo "Cassandra is unavailable - sleeping"; sleep 2; done & ;; *) echo "$0: ignoring $f" ;; esac echo done
Qu’est-ce que le rp ?
C'est une question de plus en plus courante !
Bonjour, bonsoir ! Vous êtes vous déjà demandé ce qu’est le "RP" ? Je suppose que oui, sinon vous ne seriez pas ici n'est-ce pas? Passons alors directement à l'explication :)
Le mot, ou plutôt l'acronyme «rp» est l’abrégé de «rpg» qui vient lui même de l’Anglais, «role playing game» soit si l'on traduit en français : « jeu de rôle ». Bon maintenant que la base est posée passons (enfin lol) à la question principale, qu’est-ce qu’un jeu de rôle ?
Faire un « jeu de rôle », c’est le fait d’incarner un personnage imaginaire dans une histoire qui se construit au fil du RP, en interaction par messagerie instantanée avec d’autres connectés. C’est complètement centré de l’écriture et de la lecture plutôt que dans un monde en 3D. Hé oui le numérique, c’est bien beau, mais beaucoup de d’jeuns jouent en écrivant, incroyable en 2021 !
Pour pouvoir RP, il vous suffit simplement de créer un personnage imaginaire avec l’aide d’une fiche, où on va donner des caractéristiques physiques, mentales, un nom et un âge à notre personnage. Cela permet de se visualiser son personnage pour pouvoir ensuite le jouer.
Exemple d’une fiche de rp basique :
If the first verification succeeds and the second fails, inter-container communication is blocker. So ensure that the port used for the vCenter adapter is open. If you have followed the mangle documentation this port is usually 8443.
If the first and second verification fails, check if the vCenter adapter container is up and running.
What stage of the Mangle lifecycle are you running into the issue?
Attach the Mangle support bundle
Hostname of Endpoint:
Push your changes to a topic branch in your fork of the repository
Here, cqlsh --ssl -u cassandra -p cassandra used to run *.cql file (if ssl is not enabled then remove --ssl option)
Modify the start_rpc: true in /etc/cassandra/cassandra.yaml file.
To enable the SSL : generate the self sign certificate(Run generateDbCert.sh file inside container) and modify the /etc/cassandra/cassandra.yaml file with below content
To login cqlsh client : need to create a cqlshrc file and copy in /root/.cassandra/ and /home/cassandra/.cassandra/ folder
Exit from the running container and restart the container.
Login : cqlsh --ssl -u cassandra -p cassandra .
See logs : /var/log/cassandra .
Attaching the required files which help to enable the authentication and ssl in Cassandra base image.
To download the Cassandra client as DevCenter from DevCenter.
server_encryption_options:internode_encryption: allkeystore: /cassandra/certs/cassandra.keystorekeystore_password: vmwaretruststore: /cassandra/certs/cassandra.truststoretruststore_password: vmware# More advanced defaults below:protocol: TLSalgorithm: SunX509store_type: JKScipher_suites: [TLS_RSA_WITH_AES_128_CBC_SHA,TLS_RSA_WITH_AES_256_CBC_SHA,TLS_DHE_RSA_WITH_AES_128_CBC_SHA,TLS_DHE_RSA_WITH_AES_256_CBC_SHA,TLS_ECDHE_RSA_WITH_AES_128_CBC_SHA,TLS_ECDHE_RSA_WITH_AES_256_CBC_SHA]require_client_auth: false# require_endpoint_verification: false# enable or disable client/server encryptionclient_encryption_options:enabled: true# If enabled and optional is set to true encrypted and unencrypted connections are handled.optional: falsekeystore: /cassandra/certs/cassandra.keystorekeystore_password: vmwarerequire_client_auth: false# Set trustore and truststore_password if require_client_auth is truetruststore: /cassandra/certs/cassandra.truststoretruststore_password: vmware# More advanced defaults below:protocol: TLSalgorithm: SunX509store_type: JKScipher_suites: [TLS_RSA_WITH_AES_128_CBC_SHA,TLS_RSA_WITH_AES_256_CBC_SHA,TLS_DHE_RSA_WITH_AES_128_CBC_SHA,TLS_DHE_RSA_WITH_AES_256_CBC_SHA,TLS_ECDHE_RSA_WITH_AES_128_CBC_SHA,TLS_ECDHE_RSA_WITH_AES_256_CBC_SHA]
Suivre tes actions en ligne pour trouver plus de renseignements personnels ;
Effectuer une attaque DoS voire DDoS qui ralentit fortement voire paralyse votre connexion pendant un jeu en ligne, surtout dans le contexte d'une mauvaise connexion ;
Il existe des services en ligne permettant, à partir d'une adresse IP, de trouver les informations liées à cette dernière ;
S'il a des contacts chez un FAI, il peut avoir le téléphone de l'abonné, mais bon ... c'est rare qu'un salarié le fasse pour ensuite perdre son travail.
Broken Authentication. Les fonctions applicatives liées à l'authentification et à la gestion de session sont souvent mal implémentées, permettant aux attaquants de compromettre les mots de passe, les clés ou les jetons de session, ou d'exploiter d'autres failles d'implémentation pour assumer temporairement ou définitivement l'identité des autres utilisateurs.
Sensitive Data Exposure. De nombreuses applications Web et API ne protègent pas correctement les données sensibles, telles que les données financières, les soins de santé et les informations personnelles. Les attaquants peuvent voler ou modifier ces données faiblement protégées pour mener une fraude par carte de crédit, un vol d'identité ou d'autres crimes. Les données sensibles peuvent être compromises sans protection supplémentaire, telle que le cryptage au repos ou en transit, et nécessitent des précautions particulières lorsqu'elles sont échangées avec le navigateur.
XML External Entities (XXE). De nombreux processeurs XML plus anciens ou mal configurés évaluent les références d'entités externes dans les documents XML. Les entités externes peuvent être utilisées pour divulguer des fichiers internes à l'aide du gestionnaire d'URI de fichier, des partages de fichiers internes, de l'analyse des ports internes, de l'exécution de code à distance et des attaques par déni de service.
Broken Access Control. Les restrictions sur ce que les utilisateurs authentifiés sont autorisés à faire ne sont souvent pas correctement appliquées. Les attaquants peuvent exploiter ces failles pour accéder à des fonctionnalités et / ou des données non autorisées, telles que l'accès aux comptes d'autres utilisateurs, afficher des fichiers sensibles, modifier les données d'autres utilisateurs, modifier les droits d'accès, etc.
Security Misconfiguration. Une mauvaise configuration de la sécurité est le problème le plus courant. Cela est généralement le résultat de configurations par défaut non sécurisées, de configurations incomplètes ou ad hoc, d'un stockage dans le cloud ouvert, d'en-têtes HTTP mal configurés et de messages d'erreur détaillés contenant des informations sensibles. Non seulement tous les systèmes d'exploitation, frameworks, bibliothèques et applications doivent être configurés en toute sécurité, mais ils doivent également être corrigés / mis à niveau en temps opportun.
Cross-Site Scripting (XSS). Des failles XSS se produisent chaque fois qu'une application inclut des données non approuvées dans une nouvelle page Web sans validation ou échappement appropriée, ou met à jour une page Web existante avec des données fournies par l'utilisateur à l'aide d'une API de navigateur qui peut créer du HTML ou du JavaScript. XSS permet aux attaquants d'exécuter des scripts dans le navigateur de la victime qui peuvent détourner les sessions des utilisateurs, dégrader des sites Web ou rediriger l'utilisateur vers des sites malveillants.
Insecure Deserialization. Une désérialisation non sécurisée conduit souvent à l'exécution de code à distance. Même si les failles de désérialisation n'entraînent pas l'exécution de code à distance, elles peuvent être utilisées pour effectuer des attaques, y compris des attaques de relecture, des attaques par injection et des attaques par élévation de privilèges.
Using Components with Known Vulnerabilities. Les composants, tels que les bibliothèques, les frameworks et d'autres modules logiciels, s'exécutent avec les mêmes privilèges que l'application. Si un composant vulnérable est exploité, une telle attaque peut faciliter de graves pertes de données ou une prise de contrôle du serveur. Les applications et les API utilisant des composants avec des vulnérabilités connues peuvent saper les défenses des applications et permettre diverses attaques et impacts.
Insufficient Logging & Monitoring. Une journalisation et une surveillance insuffisantes, associées à une intégration manquante ou inefficace avec la réponse aux incidents, permettent aux attaquants d'attaquer davantage les systèmes, de maintenir la persistance, de basculer vers plus de systèmes et de falsifier, extraire ou détruire les données. La plupart des études sur les violations montrent que le temps de détection d'une violation est supérieur à 200 jours, généralement détecté par des parties externes plutôt que par des processus ou une surveillance internes.
Ce n'est pas le seul projet d'OWASP et pourtant un des plus reconnu sur la sécurité des applications web.
Par exemple, ne pas jouer un personnage surpuissant, il a faiblesses et avantages comme tout le monde ! Ou il ne faut pas jouer le personnage de quelqu’un d’autre, sauf si cette personne donne son accord. Ce sont seulement des exemples, car les règles varient selon l’univers et le contexte des différents RP ! Le mot « RP » vous est peut être familier, en particulier si vous connaissez Discord. Oui, oui je parle bien de cette plateforme de discussions et de messageries instantanées avec plusieurs personnes en temps réel. C’est une plateforme vraiment bien pour RP surtout quand on aime raconter des histoires et faire vivre un personnage imaginaire dans un monde prédéfini. Mais, qui sait, peut être votre personnage changera toute l’histoire !
Exemple de règles d’un RP :
Un serveur Discord ?
Sur cette plateforme, on peut trouver pleins d’espaces d’échanges nommés « serveurs » que vous pouvez librement rejoindre, évidement sous certaines règles comme le savoir vivre et le savoir être avec les autres membres et surtout le respect ! C’est une chose très importante, le respect ! M’enfin, nous divaguons ! Revenons à nos moutons (ou plutôt à nos RP sur Discord ;)
Dans les serveurs RPs, il devient donc possible d’incarner un personnage (humain, animal ou sur-naturel, à vous de rejoindre les RPs qui vous plaisent !), une fois le personnage crée et validé, vous pouvez enfin l’incarner et le jouer ! Ce que je trouve vraiment merveilleux, c’est de pouvoir parfois s’échapper du monde et devenir une autre personne ou un autre être ! Nous pouvons agir comme nous l’aurions fait dans la vraie vie. Le RP n’est pas que sur Discord, il y a des jeux de rôles sur papier par exemple. Sur papier, cela se déroule autrement, car ce sont souvent des catégories à remplir pour définir les faiblesse et forces de votre OC
Trouver un serveur Discord ?
Sur DISBOARD | Liste de serveurs Discord publics vous pouvez par exemple chercher un serveur Discord RP sur le thème de La Guerre de Clans (LGDC) et commencer votre nouvelle aventure dans de nouveaux mondes !
Un petit mot pour la fin
Voilà, je pense avoir fait le tour de la question ^_^ ! J’espère que vous aurez pris plaisir à lire cet article sur le RP et, sur ce, je vous laisse enfin ! Merci d’avoir lu et bonne journée ou nuit à vous.
Qu'est ce qu'un ransomware
Les rançongiciels (ransoware), sont devenus légion et monnaie courante.
Savons-nous réellement ce que c'est et comment s'en protéger ?
Introduction
Dans cet article, nous allons aborder les ransomwares qui sont en constante augmentation.
Selon l' (Agence nationale de la sécurité des systèmes d'informations), une attaque par ransomware, est une technique d'attaque courante de la cybercriminalité, le rançongiciel ou ransomware consiste en l'envoi à la victime d'un logiciel malveillant qui chiffre l'ensemble de ses données et lui demande une rançon en échange du mot de passe de déchiffrement (Qui est rarement données à l'utilisateur après le paiement de la rançon.)
Qui est visée ?
Les entreprises ainsi que les administrations publiques (hôpitaux, mairies) sont les plus couramment visées, mais les particuliers peuvent eux aussi être touché par les ransomwares.
Selon, un paru en janvier 2021 sur le monde informatique, 2022 sera pire que 2021, en ce qui concerne les cyber-attaques, en effet, on peut remarquer que le nombre d'attaques par ransomware est en constante augmentation.
Le fonctionnement d'une attaque par ransomware
Avant que le contenu du disque et des ordinateurs du réseau soient chiffrées, il faut dans un premier temps que le ransomware arrive sur une des machines du réseau, il existe pour cela plusieurs vecteurs comme l’ingénierie sociale, les e-mails (Hameçonnage ( aussi appelée ),pièce jointe malveillante, drive by-downolad (téléchargement immédiat), la menace interne et les failles de sécurité.
Il faut différencier dans un premier temps, les types de ransomwares, ceux qui bloquent les écrans d’ordinateur, ceux qui chiffrent les données, ceux qui bloquent le démarrage du système et ceux qui visent les mobiles.
L’image ci-dessous montre le fonctionnement d’un ransomware en 3 étapes.
Les dégâts que peuvent causer les ransomwares
Les ransomwares causent de nombreux dégâts aux organisations. En effet, il paralyse le (perte de données, perte d'argents).
Deux exemples de par ransomware
, le site de la bibliothèque n'est toujours pas revenu depuis la cyberattaque de Janvier 2020.
.
La vidéo suivante de tech2tech explique le fonctionnement d'un ransomware au travers d'une démonstration et l'analyse d'un rançongiciel.
Solution pour le déchiffrement
La bataille est terminée contre certaines familles de rançongiciels. Si votre système a été infecté par l’un d'entre eux, il est possible de récupérer vos fichiers pour cela cliquez sur le lien correspondant et vous serez redirigé vers l’outil de déchiffrement de la plateforme , ajouter ensuite votre fichier chiffré :
Qui contacter en cas d'attaque par ransomware ?
Pour les entreprises, il y'a deux administrations à prévenir : l'qui lutte contre les cyber-attaques et la concernant les données ().
Pour les particuliers, il est possible de se faire aider par , un dispositif national d'aide aux victimes de cybermalveillance (ransomware,phishing,...) de prévention, de sensibilisation aux risque numérique et d'observation de la menace.
Quelques conseils pour lutter contre les ransomwares
Ne pas payer, la rançon, car le pirate ne vous donnera pas forcément la clé de déchiffrement (pour récupérer les fichier intact) et cela pourrai donner envie au pirate de recommencer.
Utiliser un antivirus permettra de détecter certain ransomware plus classique, celui intégrée par défaut à partir de Windows 10 (Windows defender) fonctionne très bien.
Ne pas brancher les clés USB ou disque dur externe trouvée au hasard, car nous ne savons ce qu'elle contient, elle pourrait contenir un ransomware ou un virus.
Couper l'ordinateur ou autre équipement du réseau, dès les moindres soupçons pour éviter que les autres équipements soient infectés par ce ransomware.
La vidéo suivante de Microsoft donne des conseils semblables pour lutter contre les ransomwares.
Autre recommandation concernant le Phishing
Vérifier l'expéditeur du mail
Ne pas cliquer sur les liens contenus dans les mails ou bien diffuser sur les réseaux sociaux, car ces liens peuvent amener vers de faux sites.
Vérifier l'orthographe, car les mails d'hameçonnage contiennent généralement de nombreuses fautes d'orthographe.
Vous pourrez trouver de nombreuses recommandations sur le site de :
Outils de Base (introduction au Pentesting et la cybersécurité)
Présentation des outils de base (introduction au Pentesting).
Salut à toi jeune hacker ! Tu souhaites sûrement te lancer dans la cybersécurité ou le pentesting mais tu ne sais pas par où commencer ? Tu es donc sur le bon article. Nous verrons le web, la cryptologie, et pour finir l'exploitation Windows. Bonne lecture !
Nmap(logo)
Nmap, un outil très utilisé et pratiquement essentiel est un scanner de ports libre et gratuit (support: https://nmap.org/). Conçu pour analyser les réseaux et hôtes uniques il peut déterminer quels services (nom et version de l'application) ces hôtes proposent, quels systèmes d'exploitation (et versions de système d'exploitation) ils exécutent, quel type de filtres de paquets/pare-feu sont en cours d'utilisation, et des dizaines d'autres caractéristiques. Ses nombreuses syntaxes font de lui un outil très complet (options summary: https://nmap.org/book/man-briefoptions.html). Il est devenu une référence dans le monde de la cybersécurité et du pentesting.
Exemple : nmap -sV (scan les ports ouverts pour déterminer les informations sur les services/versions) 127.0.0.1 (l'adresse IP qu'on souhaite scanner)
On peut également taper directement nmap adresse_ip sans options, Nmap réalisera par défaut un scan SYN du protocole TCP. Mais dans certains cas cela ne suffit pas, c'est pour ça que cet outil contient de nombreuses syntaxes.
Metasploit, un outil en relation avec la sécurité des systèmes informatiques permet de trouver, d'exploiter et de valider les vulnérabilités (support: ). Voici ses catégories et capacités :
Infiltrer
Exploitation manuelle
Évasion antivirus
Évasion IPS / IDS
Collecter des données
Importer et numériser des données
Scans de découverte
MétaModules
Remédier
Force brute
Chaînes de tâches
Flux de travail d'exploitation
L'outil étant très complet, nous ne pourrons pas décrire chaque catégorie. Ce qui va nous intéresser ici est de configurer un exploit, choisir un payload, puis d'exécuter l'exploit. C'est de cette manière que nous pourrons ici pénétrer un système tel que Windows, Unix/Linux/Mac, etc...
Gobuster, un outil utilisé pour brute force : URL (répertoires et fichiers) dans les sites Web, Sous-domaines DNS (avec prise en charge des caractères génériques), Noms d'hôte virtuel sur les serveurs Web cibles, et sert à Ouvrir des compartiments Amazon S3 (support: ). Rapide et simple d'utilisation, il est souvent conseillé (notamment par la plateforme THM ).
Suite au prochain épisode...
On dit chiffrer plutôt que crypter
Il est vrai qu'on fait très souvent la confusion
Les mots
En tant que développeurs, mathématiciens et autres, nous souhaitons que vous compreniez pourquoi on dit "chiffrer", mais pas "crypter". Partout, dans les médias classiques, dans les films, séries et sur Internet, les gens se trompent. Il est temps d'informer. D'ailleurs, merci Canal+ de parler de chaines cryptées, ça n'aide pas notre cause.
✅
La cryptologie, étymologiquement la science du secret, ne peut être vraiment considérée comme une science que depuis peu de temps. Cette science englobe la cryptographie – l’écriture secrète –, la cryptanalyse – l’analyse et l’attaque de cette dernière –, et la stéganographie – l’art de la dissimulation
✅
La cryptographie est une des disciplines de la cryptologie s’attachant à protéger des messages (assurant confidentialité, authenticité et intégrité) en s’aidant souvent de secrets ou clés
✅
Le chiffrement est un procédé de cryptographie grâce auquel on souhaite rendre la compréhension d’un document impossible à toute personne qui n’a pas la clé de (dé)chiffrement. Ce principe est généralement lié au principe d’accès conditionnel
✅
L’action de procéder à un chiffrement.
✅
En informatique et en télécommunications, déchiffrer consiste à retrouver le texte original (aussi appelé clair) d’un message chiffré dont on possède la clé de (dé)chiffrement.
✅
Décrypter consiste à retrouver le texte original à partir d’un message chiffré sans posséder la clé de (dé)chiffrement. Décrypter ne peut accepter d’antonyme : il est en effet impossible de créer un message chiffré sans posséder de clé de chiffrement.
✅
Dans le cadre de la télévision à péage, on parle quasi-exclusivement de chaînes « cryptées », ce que l’Académie Française accepte : « En résumé on chiffre les messages et on crypte les chaînes ».
❌
Le terme « cryptage » et ses dérivés viennent du grec ancien κρυπτός, kruptos, « caché, secret ». Cependant, le Référentiel Général de Sécurité de l’ANSSI qualifie d’incorrect « cryptage ». En effet, la terminologie de cryptage reviendrait à chiffrer un fichier sans en connaître la clé et donc sans pouvoir le déchiffrer ensuite. Le terme n’est par ailleurs pas reconnu par le dictionnaire de l’Académie française.
❌
Le terme « encrypter » et ses dérivés sont des anglicismes. Donc, nan, on ne les utilise pas non plus.
❌
Celui-là, c’est le pompon, la cerise sur le gâteau. Le chiffrage, c’est évaluer le coût de quelque chose. ABSOLUMENT RIEN à voir avec le chiffrement. Et pourtant, parfois, on le voit.
❌
Coder / Encoder signifie “Constituer (un message, un énoncé) selon les règles d’un système d’expression − langue naturelle ou artificielle, sous une forme accessible à un destinataire.” En informatique il s’agit d’une façon d’écrire les mêmes données, mais de manière différente (ex. en base64, en hexadécimal, avec des codes correcteurs d’erreurs etc…). Ce procédé est facilement inversible (il n’y a aucune notion de clé dans ces opérations), il n’y a aucune vocation à assurer la confidentialité, ce n’est donc pas du chiffrement.
Source copyleft :
Requests and Reports
Request & Reports page provides insight to the tasks running during fault execution, fault remediation and triggering of scheduled jobs. Mangle creates tasks that transition to one of the stages : NOT STARTED, IN_PROGRESS, COMPLETED, FAILED.
Processed Requests
It provides details of the tasks executed by Mangle.
Important fields of Mangle tasks
Task Name: Name of the task created for any fault execution, remediation or schedule.
Status: Will reflect one of the Stages : NOT STARTED, IN_PROGRESS, COMPLETED, FAILED.
Endpoint Name: Name of the targeted endpoint during fault execution.
Supported operations for Mangle tasks
Click on to understand what operations are supported for a specific task.
Primarily, the operations supported are Delete, Remediate Fault and Report.
Remediate Fault option will be enabled only if the the task type is INJECTION and status is set to COMPLETED.
Delete is not supported for tasks created through scheduled jobs.
Refreshing the Mangle task data grid
Click on refresh icon to sync Mangle task data grid with the current status.
Scheduled Jobs
Scheduled Jobs data grid lists all the schedules available on Mangle.
Important fields of schedules
ID: Contains id of the schedule.
Job Type: Type of the schedule. For eg: CRON, SIMPLE
Scheduled At: Recurrence and Time at which the schedule will be triggered. If job type is CRON, it shows a cron expression and if the job type is SIMPLE, it shows the epoch time in milliseconds.
Triggers of each schedule
Click on the ID link of each schedule to view all the triggers of that schedule.
Supported operations for Mangle schedules
Click on to understand what operations are supported for a Scheduled Job.
Primarily, the operations supported are Cancel, Pause, Resume, Reports, Delete, and Delete Schedule Only.
Refreshing the schedule data grid
Click on refresh icon to sync Mangle schedule data grid with the current status.
Logs
Click on the Logs link to open up a browser window displaying the current Mangle application log.
Relevant API Reference
For access to relevant API Swagger documentation:
Please traverse to link -----> API Documentation from the Mangle UI or access https:///mangle-services/swagger-ui.html#/scheduler-controller
Boot/Initialization Stage
Boot involves the Mangle appliance powering on and the containers being setup.
At the end of boot or initialization phase, the Mangle application should be available at URL: https:///mangle-services and the default admin user should be prompted to change password on login.
Boot Failures
Support Information
Provide the following information to support if encountering Boot Stage failures:
Is this a fresh deploy or an upgrade?
If upgrading, what version is the old Mangle application?
Were any changes made to the Mangle configuration at the time of deployment?
Network Troubleshooting
Does the VM console of the deployed Mangle appliance show an IP address? Is this address the expected
value based on DHCP or provided static IP settings?
Do you have a route to the deployed Mangle appliance's IP address?
Console Troubleshooting
The goal of this step is to be able to SSH to the Mangle appliance to allow for better debugging information to be obtained from the appliance.
Access the vSphere console for the Mangle appliance. Press ALT + F2 to access the login prompt.
Login with username root and the credentials you provided in the OVA deployment
customization. If the deployment has failed to set your credentials, the default password is
Google Admin Toolbox HAR Analyzer
HAR (HTTP Archive) est un format de fichier utilisé par plusieurs outils de session HTTP pour exporter les données capturées. Ce format correspond à un objet JSON avec une distribution de champs particulière. Notez que les champs ne sont pas tous obligatoires et qu'il arrive souvent que des informations ne soient pas enregistrées dans le fichier.
Les fichiers HAR contiennent des données sensibles :
Le contenu des pages téléchargées lors de l'enregistrement
Vos cookies, qui permettraient à toute personne ayant accès à ce fichier HAR d'usurper votre compte
Toutes les informations que vous avez envoyées lors de l'enregistrement : détails personnels, mots de passe, numéros de carte de crédit...
Vous pouvez obtenir une capture d'une session HTTP dans l'un des trois navigateurs principaux (IE, Firefox et Chrome), même si nous vous conseillons Chrome ou Firefox.
Un navigateur web peut enregistrer une session HAR, ça permet dans le développement de pouvoir comprendre ce que vous voyez et faire de l'analyse post mortum, on peut rejouer une sessions HAR depuis un outil en ligne d'HAR analyser :
Internet Explorer/Edge
Edge crée des fichiers HAR en natif. Reportez-vous aux instructions détaillées disponibles sur le
Ouvrez l'outil Réseau dans les outils pour les développeurs (F12).
Reproduisez le problème.
Exportez le trafic capturé dans un fichier HAR (CTRL+S).
Pour Internet Explorer, vous devez utiliser l'outil suivant : .
Téléchargez et installez HttpWatch.
Lancez la capture HttpWatch juste avant de reproduire le comportement que vous étudiez.
Arrêtez la capture HttpWatch juste après avoir reproduit le comportement qui vous intéresse.
Firefox
Lancez les outils de développement Web en mode Réseau dans Firefox (menu en haut à droite > Développement Web > Réseau, ou Ctrl+Maj+E).
Reproduisez le problème.
Pour enregistrer la capture, effectuez un clic droit sur la grille, puis sélectionnez Tout enregistrer en tant que HAR.
Chrome
Vous pouvez enregistrer votre session HTTP depuis l'onglet "Network" (Réseau) des outils de développement dans Chrome.
Sélectionnez "Outils de développement" dans le menu (Menu > Plus d'outils > Outils de développement), ou appuyez sur les touches Ctrl+Maj+C de votre clavier.
Cliquez sur l'onglet "Network" (Réseau).
Cherchez un bouton rond dans la partie supérieure gauche de l'onglet "Network" (Réseau). Vérifiez qu'il est rouge. S'il est gris, cliquez dessus pour commencer l'enregistrement.
Filter by HTTP status codes.
0 1xx 2xx 3xx 4xx 5xx
Infos d'urgences
Il peut arriver à des moments de grand stress d'oublier les informations qui peuvent aider voire sauver des vies.
Informations et numéros
Merci de prendre en compte pendant cette période de pandémie que les lignes ne soient pas toutes disponibles 24h/24 7j/7. Le 15, 17, 18, le 112 sont des lignes pouvant supporter cette surcharge et aptes à recevoir des appels dits urgents
TryHackMe - Retro
Premier Write-up français sur le CTF "Retro" de la plateforme TryHackMe
Le CTF "Retro" est disponible sur la plateforme TryHackMe et a la difficulté "hard" (i.e. difficile en français). Nous allons décomposer le Write-Up selon les étapes suivantes :
Enumeration ;
Exploitation ;
Inspecteur de code web
L'inspecteur sert à examiner et modifier l'HTML, le CSS et le JS d'une page web.
Il est possible d'examiner des pages ouvertes dans la plupart des navigateurs local (Chrome, Mozilla, Opera, Brave, Safari...), ou bien dans des cibles distantes, par exemple un navigateur Firefox pour Android. Voir la page pour apprendre comment connecter les outils de développement à une cible distante.
Visite guidée de l'interface utilisateur
Pour vous repérer dans l’inspecteur, voici une courte .
If no, did you provide custom TLS certificates during the Deployment Stage?
If yes and the version is 1.3.1 or less, verify the format is correct [Certificate
Reference](#additional-information)
Run journalctl -u fileserverand provide the entire resulting output to support
If no, attempt SSH debugging in the following step.
Are you able to SSH into the Mangle appliance? If no, continue with [Network
Troubleshooting](#network-troubleshooting)
Please obtain a Mangle appliance support bundle
ping
If ping is successful, but SSH is not, check network firewall settings.
If ping is not successful, check network settings and continue with [Console
Troubleshooting](#console-troubleshooting)
vmware.
Are there any startup components that failed to start?
Run docker ps. It should list two or three containers in running state; mangle or mangleWEB, mangleDB and the mangle-vsphere-adapter.
If no, continue with the next steps. If DB container is not running execute:
docker start mangleDB. Wait for 10-20 seconds and run docker start mangleWEB. Wait for a couple of seconds and see if the portal below can be reached.
Run ip addr show
Is the IP address the expected value based on DHCP or provided static IP settings?
Run ip route show
Is the default route valid?
Can you ping the default gateway? Run ping. Obtain the default gateway IP from the ip route show command output.
If no, check your network settings. Attach the Mangle appliance to a network that has a valid
route between your client and the appliance.
If yes, verify the routing configuration between the client that is unable to SSH to the mangle appliance.
If still unable to SSH to the Mangle appliance, provide the output of the following commands to
support:
docker start mangleDB
docker start mangleWEB
ip addr show
ip route show
ping
Exportez la capture au format HAR.
Exportez la capture dans un fichier HAR.
Cochez la case "Preserve log" (Conserver le journal).
Vous pouvez utiliser le bouton d'effacement (un cercle barré d'une ligne diagonale) juste avant d'essayer de reproduire le problème pour supprimer les informations d'en-tête superflues.
Reproduisez le problème.
Pour enregistrer la capture, effectuez un clic droit sur la grille et sélectionnez Save as HAR with Content (Enregistrer au format HAR avec le contenu).
Task Type: Type of the task executed. For eg: INJECTION or REMEDIATION
Task Description: You can get more details about the fault, fault parameters, endpoint targeted, targeted component within an endpoint etc form this field.
Start Time: Task trigger time
End Time: Task end time
Status: Status of the schedule. Will reflect one of the values: INITIALIZING, CANCELLED, SCHEDULED, FINISHED, PAUSED, SCHEDULE_FAILED
.
Informations et numéros d’urgences :
17 : Police, Gendarmerie
15 : SAMU
18 : Sapeurs-Pompiers
112 : Numéro d’Urgences accessibles dans toute l’Union Européenne même sans réseau
114 : Numéro d’Urgences, Accessible par fax, ou SMS uniquement toutes urgences (pour personnes malentendantes ou sourdes ou en cas de terrorisme à proximité)
115 : SAMU social, se trouver un endroit où dormir la nuit, gratuit, 24h/24
119: Service national d'accueil téléphonique pour l'enfance en danger 24h/24 : 7j/7, gratuit
197 : Alerte Enlèvement
3624 : SOS Médecin, 24h/24, 7j/7, gratuit
Pharmacie de garde : 3237
Centre antipoison : 0800 59 59 59, 24h/24, 7j/7, gratuit,
Violences Conjugales : 3919 , 24h/24, 7j/7, Anonyme et gratuit,
Suicide et écoute
Informations suicide et écoute :
SOS Amitiés : 01 42 96 26 26 Anonyme et gratuit, 24h/24
SOS Suicide Phénix : 01 40 44 46 45 Anonyme et gratuit, de 13h à 23h, 7j/7
Fil Santé Jeune (12/25 ans) : 01 44 93 30 74 Anonyme et gratuit, de 9h/23h, 7j/7
SOS homophobie : 01 48 06 42 41,
Alcool Info service : 0980 980 930, Anonyme et cgratuit, 7j/7, 8h/2h,
Drogues Info Service : 0800 23 13 13, Anonyme et gratuit, 7j/7, 8h/2h,
Fondation Le Refuge: 06 31 59 69 50, Anonyme et gratuit, 7j/7, 24h/24
Autisme Info Service : 0 800 71 40 40, Anonyme et gratuit,
Surdi Info : Contact sur le site :
Escalation de privilège .
Nous allons devoir trouver les flags sur un serveur web basé sur Windows.
MACHINE_IP représente l'IP de la machine "Retro".
1/ Enumeration
Il faut premièrement énumérer les ports ouverts via Nmap.
Deux ports sont ouverts, le port 80 et 3389. Concentrons-nous en premier sur le serveur web (port 80), voici la page principale :
Nous allons à présent utiliser Gobuster (Dirsearch et Dirbuster fonctionnent également) afin de trouver les autres pages :
Nous avons trouvé la page /retro après l'énumération. Voici à quoi ressemble la page :
On remarque que les articles du site sont tous écrits par Wade, en allant voir son profil, il est possible de voir ses derniers posts. En allant sur son post "Ready Player One" on aperçoit un commentaire écrit par lui-même contenant ce message :
En énumérant la page /retro, nous retrouvons une page permettant de se connecter à une page WordPress, vous pouvez continuer via WordPress pour la suite, nous ne verrons pas cette partie dans ce write-up. L'énumération est terminée, bravo à vous si vous avez réussi jusqu'ici !
2/ Exploitation
Revenons sur le port 3389 en utilisant les informations trouvées précédemment.
Nous savons que Wade est le seul utilisateur qui poste sur le site, nous savons qu'il a laissé "parzival" de côté pour s'en souvenir, utilisons ces informations afin de nous connecter en RDP à la machine :
$ xfreerdp /v:MACHINE_IP /u:wade /p:parzival
Bravo ! Nous avons trouvé le fichier user.txt : fbdc6d430bfb51 (incomplet)
3/ Escalation de privilège
Dans l'historique de Chrome, on s'aperçoit que la page d'une CVE a été ouverte (CVE-2019-1388). Or dans la corbeille, il y a un fichier, que vous devrez restaurer. Une fois cette étape finie, lancez-le, cette page s'affichera :
Cliquez sur "Show more details" puis sur "Show information about the publisher’s certificate.". Cette page apparaîtra :
Cliquez sur le lien de "Issued By:", puis choisissez Internet Explorer pour l'ouvrir. Vous recevrez ensuite un message d'erreur :
À présent, faites "CTRL+S" afin d'aller dans le chemin : C:\Windows\System32\Descendez dans le dossier pour trouver l'invite de commande (cmd), puis ouvrez-le. Il sera ouvert en tant d'administrateur (System32) :
Pour trouver le fichier root.txt, écrivez :
type ..\..\Users\Administrator\Desktop\root.txt
Bravo à vous, si vous avez réussi à trouver tous les flags !
Depuis Firefox 62, il est possible d'ouvrir la vue de Règles dans son propre panneau, il s'agit du mode à trois panneaux.
Comment ?
Pour savoir ce qu'il est possible de faire avec l'inspecteur, regardez les guides pratiques suivants :
Il y a deux façons principales d’ouvrir l'inspecteur sous Mozilla :
Sans élément sélectionné : cliquer sur l'option "Inspecteur" du menu "Développement", ou bien utiliser le raccourci clavier correspondant (Ctrl + Maj + C)
Avec un élément sélectionné : faire un clic droit sur un élément et sélectionner "Examiner l'élément"
L'inspecteur s’ouvrira alors dans votre navigateur :
The all-new Inspector in Firefox 57 DevTools.
Il est également possible de le faire apparaitre à gauche :
L’hameçonnage fait partie des cybermalveillances les plus connus en 2021
À l’heure où l’hameçonnage est à la hausse, les attaquants ont plus d’un tour dans leur sac pour vous avoir. Nous verrons ensemble comment ne pas tomber dans le piège !
Qu'est-ce que l'hameçonnage ?
L’hameçonnage ou phishing en anglais, est une pratique malveillante permettant à un attaquant de récupérer vos informations personnelles, en créant une copie par exemple d’un site web d'organisme ou concours ... en usurpant l’identité qui vous est communiquée par mail, sous la forme par exemple d’un formulaire en vous demandant vos coordonnées bancaires et/ou données d’identification, quoi qu'il en soit on vous demande d'envoyer des informations.
Lorsque vous faites face à une situation douteuse, plusieurs méthodes s’offrent à vous pour identifier le risque :
Posez-vous les bonnes questions :
Si vous recevez un mail concernant une chose auquel vous n'avez pas souscrit. Par exemple un abonnement chez le concurrent de votre fournisseur d'accès à internet actuel, vous pouvez être certain qu'il s'agit d'une arnaque.
Regardez l'objet du mail :
Certains courriels contient des fautes en tout genre : syntaxiques, orthographiques, grammaticales, etc. Si c’est votre cas, il est possible que le courriel que vous avez reçu soit une arnaque.
Les bons réflexes
Si vous êtes victime d'hameçonnage :
Penser à :
Un bon mot de passe doit contenir au minimum 12 caractères avec des minuscules, majuscules, chiffres et caractères spéciaux ;
Ne jamais le noter, trouver un moyen autre ;
Si vous avez la possibilité d'activer l'authentification à deux facteurs, faites-le cela permet d'avoir un code temporaire à chaque connexion, comme ça l'attaquant qui possède votre identifiant et mot de passe ne pourra jamais ce que connecter sans le code complémentaire ;
Temps estimé pour déchiffrer votre mot de passe en 2021 :
Un journaliste humoristique explique en 2 minutes
Vous le connaissez surement il s'agit de David Castello Lopes, notamment connu avec le buz de la vidéo "Je possède des thunes", il explique très bien comment avoir un bon mot de passe
Hello bank en parle :
Auteur de l'article
Valentin étudiant en étude supérieur en informatique à retrouver sur Linkedin
liens utiles cybersec
Ressources en cours d'écriture à titre informatif
WSA :
Orientations :
Merci à @0xTimD pour la roadmap pentest de HackTheBox ! Elle présente un peut pour avoir une idée non par quoi commencer et par quoi continuer.
@!comores11 : C'est vraiment une roadmap pour le "Pentest", juste le CEH à la fin c'est à discuter.
Voici une des meilleures plateformes d'apprentissage dans le domaine du hacking ( sans doute la meilleure parmi celles gratuites ) concernant les vulnérabilités liées au monde du web :
Elle est en anglais (oui, dans le monde du hacking, l'anglais est indispensable )
Créée par les fondateurs du célèbre logiciel Burp Suite
Correspond à tous types de personnes, qu'elle soit débutante ou expérimentée
Voici un site regroupant des milliers de programmes ("crackme") pour s'entraîner au Reverse Engineering. Il est accessible pour les niveaux : Voici une excellente série de vidéos abordant le domaine de la cryptographie pour les débutants :
pour apprendre la crypto avec des bons challs (scripting requis au bout d'un certain moment) pour privesc via une grande partie des binaires linux
Plusieurs chaines / sites lié principalement (mais pas que) au bug bounty (tout est en anglais)
Guide to learn hacking
Finding your first bug: bounty hunting tips from the Burp Suite community
Practice
(Certes c'est la base mais ça peut toujours servir).
Comprendre et utilisé les SSHA sous LDPA Type de fichier joint :
Je viens de recevoir mon exemplaire gratuit durant la promotion, du pdf : Mastering Linux Security and Hardening - Second Edition je le partage pour la communauté :
Tips navigateur Brave | Laisser un pourboire
Offrez des pourboires directement aux créateurs de contenu, où que ce soit sur le Web
Il existe des créateurs officiel de Brave que vous connaissez surement comme Uphold, ProtonMail, Duckduckgo, Wikipédia, comme eux notre association Bluekeys est créateur officiel, vous avez la possibilité de laisser un pourboire sur tout nos contenus et services web, depuis même un smartphone, merci
Le tutoriel vidéo
Laissez un pourboire à n’importe quel propriétaire de site via la panneau Brave Rewards
Le Web est rempli de contenu de qualité sous forme de sites Web, de blogs, de magazines en lignes et de portfolios créatifs. Vous pouvez laisser un pourboire à chacun d’eux en ouvrant le panneau Brave Rewards et en cliquant sur le bouton « Envoyer un pourboire ».
Remarque concernant les pourboires dans le navigateur Brave
Si vous êtes nouvel utilisateur il faut attendre 1 mois pour cumuler des BAT
Lorsque vous laissez un pourboire à un créateur de contenu vérifié, votre pourboire est instantanément envoyé au compte Brave Rewards de ce créateur. Si vous laissez un pourboire à un créateur n’étant pas encore passé par la procédure de vérification, votre pourboire sera conservé localement au sein de votre navigateur jusqu’à ce que ce créateur passe la procédure de vérification à l’adresse
Récompensez directement les utilisateurs de Twitter pour les tweets que vous appréciez
Lorsque vous consultez Twitter au sein du navigateur Brave pour ordinateur, vous pouvez voir un bouton spécial de pourboire pour chaque tweet. Appuyez sur un bouton de pourboire pour envoyer directement un pourboire à l’auteur du tweet. Pour ceux étant passés par la procédure de vérification à travers , les pourboires sont immédiatement envoyés et apparaîtront dans leur compte Brave Rewards sous quelques minutes.
Laissez des pourboires à vos créateurs favoris sur Youtube lorsque vous regardez leurs vidéos
Lorsque vous surfez sur Youtube, le programme Beave Rewards vous permet de laisser un pourboire directement aux créateurs en tant que récompense pour un contenu vidéo de qualité.
Laissez un pourboire à vos streamers favoris pendant que vous regardez leur chaîne
Lorsque vous surfez sur Twitch au sein du navigateur Brave pour ordinateur, vous pouvez utiliser le bouton Brave Rewards dans la barre d’adresse pour envoyer instantanément un pourboire à vos streamers favoris.
Devenir créateur :
Prêt à recevoir des pourboires ?
Passez par la procédure de vérification et commencez à recevoir des pourboires au fur et à mesure que nous lançons de nouvelles fonctionnalités pour Brave Rewards.
FAQ
Que signifie BAT et qu'est-ce que c'est ? Jeton d'attention de base. Le BAT, un jeton basé sur la technologie Ethereum, est un unité d'échange dans un nouveau système de publicité numérique basé sur une chaîne de blocs. L'attention des utilisateurs est surveillé anonymement dans le navigateur Brave et les éditeurs sont récompensés en conséquence avec les MTD. Les utilisateurs obtiennent également une part des MTD pour leur participation.
Que représentent les MTD ? Les MTD sont des jetons dans une nouvelle plate-forme publicitaire numérique basée sur la chaîne d'approvisionnement et l'attention. Elles ne sont ni remboursables, ni des titres, ni destinées à la spéculation. Il n'y a pas de promesse des performances futures. Il n'y a aucune suggestion ou promesse que les MTD ont ou auront un valeur particulière. Les MTD ne confèrent aucun droit sur l'entreprise et ne représentent pas une participation dans l'entreprise. Les MTD sont vendues comme un bien fonctionnel. Toute valeur reçue par l'entreprise peuvent être dépensés sans conditions. Les MTD sont destinées uniquement aux experts en cryptographie des jetons et des systèmes logiciels basés sur des chaînes de blocs.
Quel est le montant recueilli ? Quel est le plafond des jetons ? Y aura-t-il une offre de suivi ? Nous visons une augmentation de 24 millions de dollars US et un plafond de 1,5 milliard de jetons. Nous ne prévoyons pas d'offre complémentaire.
Quelles sont les crypto-monnaies acceptées dans la vente aux enchères ? L'ETH sera acceptée dans la vente aux enchères. Vous devrez avoir un Ethereum portefeuille pointé sur le jeton/adresse de vente pour participer à la vente. Les BAT sont Jetons dérivés d'Ethereum. Si vous détenez la CTB ou une autre crypto-monnaie, il peut s'agir échangé pour l'ETH et participait à la vente aux enchères.
L'équipe qui a créé le BAT, a écrit un document scientifique complet sur le sujet (ce qu'on appelle dans la recherche un white paper), le FAQ provient de celui-ci, j'invites chacun.e à le lire c'est très instructif sur le fonctionnement de cette cryptomonnaie et de la nouvelle manière de l'utiliser :
Vous avez aussi un second PDF sur le Token Economics provenant du même groupe
Résumé : Diverses affirmations sur l'"effet" de la vitesse symbolique sur le taux de change symbolique sont pris en compte. L'affirmation selon laquelle la vitesse symbolique est une quantité extrinsèque qui peut être pour augmenter le taux de change symbolique, ou augmentera et diminuera naturellement le taux de change symbolique Le taux de change est examiné et rejeté. Les heuristiques sont données pour le rejet futur de des idées manifestement ridicules.
Admin Settings
Managing Authentication
Adding additional Authentication sources
Mangle supports using Active Directory as an additional authentication source.
Steps to follow:
Login as an admin user to Mangle.
Navigate to -----> Auth Management -----> Auth Source .
Click on .
Relevant API List
For access to Swagger documentation, please traverse to link -----> API Documentation from the Mangle UI or access https:///mangle-services/swagger-ui.html#/auth-provider-controller
Adding/Importing Users
Mangle supports adding new local user or importing users from Active Directory sources added as additional authentication sources.
Steps to follow:
Login as an admin user to Mangle.
Navigate to -----> Auth Management -----> Users .
Click on .
Relevant API List
For access to Swagger documentation, please traverse to link -----> API Documentation from the Mangle UI or access https:///mangle-services/swagger-ui.html#/user-management-controller
Default and Custom Roles
Mangle has the following default Roles and Privileges.
Edit and Delete operations are supported only for custom roles. It is forbidden for default roles.
Mangle supports creation of custom roles from the default privileges that are available.
Steps to follow:
Login as an admin user to Mangle.
Navigate to -----> Auth Management -----> Roles.
Click on .
Relevant API List
For access to Swagger documentation, please traverse to link -----> API Documentation from the Mangle UI or access https:///mangle-services/swagger-ui.html#/role-controller
Loggers
Log Levels
Mangle supports modifying log levels for the application.
Steps to follow:
Login as an admin user to Mangle.
Navigate to -----> Loggers -----> Log Levels .
Click on .
Relevant API List
For access to Swagger documentation, please traverse to link -----> API Documentation from the Mangle UI or access https:///mangle-services/swagger-ui.html#/operation-handler
Integrations
Metric Providers
Mangle supports addition of either Wavefront or Datadog as metric providers. This enables the information about fault injection and remediation to be published to these tools as events thus making it easier to monitor them.
Steps to follow:
Login as an admin user to Mangle.
Navigate to -----> Integrations -----> Metric Providers .
Click on .
On adding a metric provider, Mangle will send events automatically to the enabled provider for every fault injected and remediated. If the requirement is to monitor Mangle as an application by looking at its metrics, then click on the button to enable sending of Mangle application metrics to the corresponding metric provider.
Relevant API List
For access to Swagger documentation, please traverse to link -----> API Documentation from the Mangle UI or access https:///mangle-services/swagger-ui.html#/operation-handler
Endpoint in Mangle refers to an infrastructure component that will be the primary target for your chaos engineering experiments.
For version 1.0, Mangle supported four types of endpoints:
Custom Faults
Task-Extension: An example is available as HelloManglePluginTaskHelper at package com.vmware.mangle.test.plugin.helpers of mangle-plugin-skeleton. This task Helper is an implementation of AbstractRemoteCommandExecutionTaskHelper. The implementation of AbstractRemoteCommandExecutionTaskHelper is only expected to provide the implementation for below methods:
public Task init(T faultSpec) throws MangleException;
Should provide the Implementation to initialize the Task Helper for executing the Fault. And the commands required for injection/remediation of the Fault are expected to be provided here. More details on the model for providing the Command Information is explained later.
HUGO
Un générateur de site statique rapide et flexible écrit en Go
A Fast and Flexible Static Site Generator built with love by , and in .
| | | | |
Tips pour fusionner des communautés Discord
Cette page donne quelque ligne d'exemple pour tenter de grossir ta communauté.
Fusion des serveurs
Dernière mise à jour le 14 août 20 à 20h45 par @.....
$ nmap -Pn -sV MACHINE_IP
PORT STATE SERVICE VERSION
80/tcp open http Microsoft IIS httpd 10.0
3389/tcp open ms-wbt-server Microsoft Terminal Services
Service Info: OS: Windows; CPE: cpe:/o:microsoft:windows
Salut à toi fondateur ou administrateur d'un serveur Discord !
Le but du document est de te proposer de nous rejoindre avec tous nos autres serveurs et partenaires, afin de former un seul grand serveur complexe.
Aujourd'hui, nous sommes plusieurs à être staff de pas mal de serveur et nous nous sommes rendus compte qu'on parlait souvent des choses de façon redondantes d'un serveur à l'autre surtout dans la sécurité et le développement par exemple donner une même source ou conseil à un débutant qui commence dans la programmation.
✅ Les avantages
Fini d'expliquer plusieurs fois la même chose.
Fini de gérer plusieurs serveurs de domaine différent, une communauté avec tout les domaines.
Ensemble nous sommes plus fort et nous pouvons être plus efficace, l'échange au centre.
Votre temps sur Discord sera divisé en deux voir en plus pour les mêmes actions.
Fini les problèmes de modération et de raid, une équipe sera présente pour gérer tout ça.
Groupe Gitlab et Github et autre commun pour tous nos projets communautaires.
Plus d'autres choses on ne va pas tout dire...( Autant garder quelques surprises 😉)
🚀 Les bonus
( Nous avons plusieurs projets terminés et en cours. Plus que je ne peux les compter sur les 9 doigts de ma main droite 👽)
Un bot de réseau social qui va permettre de faire pleinement ce qu'il faut plus de l'administration.
Un bot pour sauvegarder et restaurer le serveur en cas de raid. (il est off car on ne peux pas être raid 😂)
Un guide pour les débutant au format gitbook qui contiendra le nécessaire de base pour bien commencer dans différent langages avec un kickstart et une FAQ qui répond à la plupart des questions qu'on a sur les serveurs.
Des animations comme une vidéo énigme chaque semaine sur les technologies et qui permettra aux membres de cumuler des points et de gagner des lots régulièrement.
Une plateforme de CTF et plusieurs associations avec nos partenaires.
Une chaîne Youtube dédiée avec nos différents leviers de pub et de partage communautaire, influenceurs, pour partager nos travaux, amusement et autres...
🤜🤛 Nos promesses
Etre structuré et organisé c'est la clé !
Nous fonctionnons sur le modèle d'organisation de l'holacratie comme une entreprise. Ça veut dire que chaque fondateur sera automatiquement repris en tant que lead staff de son domaine. Le cercle principal représente la communauté et les sous cercle les domaines. Les autres membres du staff du fondateur serons rencontré au cas par cas pour voir s'ils intégré le nouveau staff global.
Nous sommes un staff sérieux qui travaillons dans différents domaine pro, sur le terrain nous mettons nos expériences et nos compétences au service de la communautés en matière principalement de la sécurité et du développement logiciel.
Un serveur booster en niveau 3 (soit 30 boost+) pour apporter toutes les fonctionnalités nécessaire pour les différents besoins des domaines, on sait qu'un live stream est mieux quand il est de qualité en 4k.
Nous partagerons aussi tout ce qui nous semble pertinent, réseaux pro, association, FrenchTech et partenaire.
Nous faisons attention aux plus jeunes et apportons de la préventions avec différents moyens mis à disposition et de mise en contact direct 24h/24 pour : le signalement, le harcèlement, l'écoute et aussi l'échange avec la brigade de la gendarmerie du numérique...
👔 Nos objectifs
Devenir une référence de confiance, confort et sécurité pour toutes les tranches d'âges, avec nous c'est du gagnant / gagnant.
Avoir une seule communauté et débloquer les nouvelles fonctionnalités de Discord comme tu las remarqué qui sont récemment apparut.
Atteindre avec tout le monde un minimum de 500 membres pour débloqué les statistiques du serveur et avoir une meilleur gestion et suivi de celui-ci pour plus de sérieux.
Atteindre 10 000 membres pour faire une demande spécial et être reconnue dans les serveurs publique de Discord.
Rassembler l'expérience de la plupart des serveurs pour faire un mieux collectif, l'échange avant tout, nous pourrons mettre en commun par exemple la liste des bannis des autres serveurs ...
❔Comment vous allez tous procéder
Dans un premier temps nous sommes entrains de créer le nouveau serveur avec tout ce qu'il faut.
Ensuite tu sera avertie une fois ton accord envoyé au staff pour commencer à faire le nécessaire de ton coté c'est à dire :
✅ Sauvegarder et mettre de coté tout ce qu'il te semble pertinent comme par exemple des liens, images, source intéressante ...
✅ Faire une annonce deux semaines avant le basculement définitif de ton serveur vers le nouveau le temps de voir avec toi pour créer les bons salons avec les rôles. Nous vous donnerons un message standard à copier coller pour vous facilitez le travail.
✅ Laisser sur l'ancien serveur uniquement un seul salon verrouillé avec un lien d'invitation vers le nouveau serveur, afin d'éviter de perdre des membres venu par le biais d'un moteur de recherche ou des listes de serveur Discord. (au pire bloquer l'accès aux autres salons pour éviter de supprimer les épingles intéressante)
Nous sommes uniquement au début de tout ce que nous sommes en trains de démarrer tous ensemble, la suite dans le prochain épisode peut-être avec toi !
🔗Link
Pour rejoindre le nouveau serveur
Adresse du Discord
Pense à discuter avec un administrateur pour te présenter et qu'on vérifie ton serveur avant de te fusionner sur le serveur final.
......... est la pour toi sur le serveur. N'hésitez pas à lui envoyer un message privé si besoin.
🕒 Merci
D'avoir pris le temps de lire ! N'hésite pas à partager le document si tu as envie 😉
👔 Les auteurs
Rédacteurs, initiateurs du projet de fusion and co : @.............. et @...........
-
Regardez l'adresse mail de l'expéditeur :
Lorsque vous recevez un courriel, vous devez toujours regarder l'e-mail de l'expéditeur. Mais il faut tout de même rester vigilant, car certaines fausses e-mail, ressemblent beaucoup aux e-mail officielles.
Pour avoir confirmation qu'une e-mail soit bien officiel, vous pouvez vous référer à vos factures ou contrats s'il s'agit d'un service, ou en allant sur le site internet des diverses entreprises dont vous recevez des courriels.
Regardez l'extension des fichiers joints :
Si dans le courriel que vous avez reçu, il y a un fichier, soyez vigilant sur l'extension de ce dernier. Si un fichier a pour extension ".bat", ".exe" ou une extension qui ne vous est pas familière, il est très probable que ce soit un programme malveillant (spyware, malware, keylogger, etc).
Inspectez les adresses URI sans cliquer dessus :
Dans n'importe quel courriel frauduleux, vous y trouverez des adresses URI (anciennement URL). Pour pouvoir analyser le lien, glissez votre sourie sans cliquer sur le lien, puis dans un petit encadré blanc en bas à gauche de votre écran ou dans une petite fenêtre attachée à votre curseur, vous y retrouverez le lien complet du site internet. S'il s'agit d'une adresse URI qui ne vous est pas familière, il est très probable que ce soit une arnaque, de plus si elle commence par http:// et pas par https://.
Attention, restez tout de même vigilant avec les adresses commençantes par https://, car bien que ce soit un indicateur qu'un site soit sécurisé, derrière peu se cacher une véritable arnaque.
Regardez si le mail contient des fautes de français :
Comme nous l'avons énoncé précédemment pour l'objet du courriel, regardez son contenu pour détecter les erreurs de syntaxes, d'orthographes ou de grammaires.
. Si ce créateur complète la procédure de vérification sous 90 jours, votre pourboire sera transféré. Dans le cas contraire, le pourboire sera renvoyé vers votre porte-monnaie Brave Rewards.
A success message is displayed and the table for Auth sources will be updated with the new entry.
Click on against a table entry to see the supported operations.
Enter User Name, Auth Source, Password if the Auth Source selected is "mangle.local", an appropriate role and click on Submit.
A success message is displayed and the table for Users will be updated with the new entry.
Click on against a table entry to see the supported operations.
Enter Role Name, Privileges and click on Submit.
A success message is displayed and the table for Roles will be updated with the new entry.
Click on against a table entry to see the supported operations.
Enter Logger name, Configured Level, Effective Level and click on Submit.
A success message is displayed and the table for Log levels will be updated with the new entry.
Click on against a table entry to see the supported operations.
Choose Wavefront or Datadog, provide credentials and click on Submit.
A success message is displayed and the table for Monitoring tools will be updated with the new entry.
Click on against a table entry to see the supported operations.
Kubernetes
Docker
VMware vCenter
Remote Machine
From version 2.0, apart from the four endpoints listed above, support has been extended to the following new endpoint:
AWS (Amazon Web Services)
Kubernetes Endpoint
Mangle supports K8s clusters as endpoints or targets for injection. It needs a kubeconfig file to connect to the cluster and run the supported faults. If a kubeconfig file is not provided, Mangle assumes that it is running on a K8s cluster and targets the same cluster for fault injection.
Steps to follow:
Login as an user with read and write privileges to Mangle.
Navigate to Endpoint tab ---> Kubernetes Cluster.
Click on .
Enter a name, credential (kubeconfig file), namespace (mandatory...Please specify "default" if you are unsure of the namespace else provide the actual name), tags (refers to additional tags that should be send to the enabled metric provider to uniquely identify faults against that endpoint) and click on Test Connection.
If Test Connection succeeds click on Submit.
A success message is displayed and the table for Endpoints will be updated with the new entry.
Click on against a table entry to see the supported operations.
Docker Endpoint
Mangle supports docker hosts as endpoints or targets for injection. It needs the IP/Hostname, port details and certificate details (if TLS is enabled for the docker host with --tlsverify option specified) to connect to the docker host and run the supported faults.
Steps to follow:
Login as an user with read and write privileges to Mangle.
Navigate to Endpoint tab.
Click on .
Enter a name, IP/Hostname, port details, tags (refers to additional tags that should be send to the enabled metric provider to uniquely identify faults against that endpoint), certificate details (if TLS is enabled for the docker host)and click on Test Connection.
If Test Connection succeeds click on Submit.
A success message is displayed and the table for Endpoints will be updated with the new entry.
Click on against a table entry to see the supported operations.
VMware vCenter Endpoint
Mangle supports VMware vCenter as endpoints or targets for injection. It needs the IP/Hostname, credentials and a vCenter adapter URL to connect to the vCenter instance and run the supported faults.
Steps to follow:
Login as an user with read and write privileges to Mangle.
Navigate to Endpoint tab.
Click on .
Enter a name, IP/Hostname, credentials, vCenter Adapter URL (format: "https://:"where the IP/hostname is the docker host where the adapter container runs appended with the port used), username, password, tags (refers to additional tags that should be send to the enabled metric provider to uniquely identify faults against that endpoint) and click on Test Connection.
If Test Connection succeeds click on Submit.
A success message is displayed and the table for Endpoints will be updated with the new entry.
Click on against a table entry to see the supported operations.
When the vCenter adapter is deployed on the same machine on which Mangle is running, vCenter adapter IP used for adding vCenter endpoint can be either
A internal docker container IP OR
A docker host IP
To find out the internal docker container IP for mangle-vc-adapter run
Mangle supports any remote machine with ssh enabled as endpoints or targets for injection. It needs the IP/Hostname, credentials (either password or private key), ssh details, OS type and tags to connect to the remote machine and run the supported faults.
Steps to follow:
Login as an user with read and write privileges to Mangle.
Navigate to Endpoint tab.
Click on .
Enter a name, IP/Hostname, credentials (either password or private key), ssh port, ssh timeout, OS type, tags (refers to additional tags that should be send to the enabled metric provider to uniquely identify faults against that endpoint) and click on Test Connection.
If Test Connection succeeds click on Submit.
A success message is displayed and the table for Endpoints will be updated with the new entry.
Click on against a table entry to see the supported operations.
AWS (Amazon Web Services)
Mangle supports AWS as endpoint or target for injection. It needs the Region, credentials (Access key ID and Secret key) and tags to connect to AWS and run the supported faults. Currently the only supported service is EC2. However, there are plans to extend this to other important services in AWS.
Steps to follow:
Login as an user with read and write privileges to Mangle.
Navigate to Endpoint tab.
Click on .
Enter a name, Region, credentials (Access key ID and Secret key), tags (refers to additional tags that should be send to the enabled metric provider to uniquely identify faults against that endpoint) and click on Test Connection.
If Test Connection succeeds click on Submit.
A success message is displayed and the table for Endpoints will be updated with the new entry.
Click on against a table entry to see the supported operations.
Relevant API Reference
For access to Swagger documentation:
Please traverse to link -----> API Documentation from the Mangle UI or access https:///mangle-services/swagger-ui.html#/endpoint-controller
public Task init(T taskData, String injectedTaskId) throws MangleException;
Should provide the Implementation to initialize the Task Helper for executing the Fault, if the existing Task id also provided. This method will be used for executing the Remediation on a Task if the Remediation is available. This initialization is not used for task rerun or the Re-trigger.
public void executeTask(Task task) throws MangleException;
Provide the Implementation for execution steps required in addition to Implementation available in AbstractRemoteCommandExecutionTaskHelper. Plugin developer can use this interface to invoke his own implementation of Helpers for supporting his Fault across multiple endpoints supported in mangle.
Provide the Implementation for defining the Executor required for the Fault Execution. Mangle provide a default implementation of a executor for each Supported Endpoint. The Plugin user is free to use his own executor as long as he is implementing the resource as per the interface ICommandExecutor available at package com.vmware.mangle.utils;
Provide the Implementation if the Fault being developed expect the test machine to be satisfying a condition for the execution. This step is separated from the Fault execution as Mangle wants to make sure the Fault execution or Remediation will not leave the user environment in a irrecoverable state due to execution of them in a non-perquisite satisfying machine.
protected void prepareEndpoint(Task task, List listOfFaultInjectionScripts) throws MangleException; Provide the Implementation if the Fault execution needs certain changes to the Test Machine before execution. Examples are Copying a binary file required to execute a fault. This step is optional for user as the predefined implementation already copies the files returned by listFaultInjectionScripts() to the remote machine.
public String getDescription(Task task);
Provide Implementation to generate description for Fault based on user inputs to help him to identify the task in future through the description. A generic implementation is already available at TaskDescriptionUtils.getDescription(task).
public List listFaultInjectionScripts(Task task);
Provide a implementation that return details of the support scrips to be copied to test machine required for executing the fault getting implemented.
Task-Extension Deep Dive: An example is available as HelloManglePluginTaskHelper at package com.vmware.mangle.plugin.tasks.impl of mangle-plugin-skeleton. This task Helper is an implementation of AbstractRemoteCommandExecutionTaskHelper. The implementation of AbstractRemoteCommandExecutionTaskHelper is only expected to provide the implementation for below methods:
public Task init(T faultSpec) throws MangleException ;
Should provide the Implementation to initialize the Task Helper for executing the Fault. And the commands required for injection/remediation of the Fault are expected to be provided here. More details on the model for providing the Command Information is explained later.
public Task init(T taskData, String injectedTaskId) throws MangleException;
Should provide the Implementation to initialize the Task Helper for executing the Fault, if the existing Task id also provided. This method will be used for executing the Remediation on a Task if the Remediation is available. This initialization is not used for task rerun or the Re-trigger.
public void executeTask(Task task) throws MangleException;
Provide the Implementation for execution steps required in addition to Implementation available in AbstractRemoteCommandExecutionTaskHelper. Plugin developer can use this interface to invoke his own implementation of Helpers for supporting his Fault across multiple endpoints supported in mangle.
Provide the Implementation for defining the Executor required for the Fault Execution. Mangle provide a default implementation of a executor for each Supported Endpoint. The Plugin user should use appropriate executor as per the endpoint provided as the target. Below is the Mapping of Executors to their Endpoint Types.
REMOTE_MACHINE – SSHUtils
DOCKER - DockerCommandUtils
AWS - AWSCommandExecutor
K8s - KubernetesCommandLineClient
vCENTER - VCenterCommandExecutor
EndpointClientFactory class of mangle-task-framework can be used for initializing the appropriate Executor for Injecting the Fault as per user request.
All these executors expect the user to provide a command to be executed on the target machine with associated meta data to mark if it is executed successfully.
Provide the Implementation if the Fault being developed expect the test machine to be satisfying a condition for the execution. This step is separated from the Fault execution as Mangle wants to make sure the Fault execution or Remediation will not leave the user environment in a irrecoverable state due to execution of them in a non-perquisite satisfying machine.
protected void prepareEndpoint(Task task, List listOfFaultInjectionScripts) throws MangleException; Provide the Implementation if the Fault execution needs certain changes to the Test Machine before execution. Examples are Copying a binary file required to execute a fault. This step is optional for user as the predefined implementation already copies the files returned by listFaultInjectionScripts() to the remote machine.
public String getDescription(Task task);
Provide Implementation to generate description for Fault based on user inputs to help him to identify the task in future through the description. A generic implementation is already available at TaskDescriptionUtils.getDescription(task).
public List listFaultInjectionScripts(Task task);
Provide an implementation that return details of the support scrips to be copied to test machine required for executing the fault getting implemented. The support files can be any file required to be placed in the target in order to execute the developed fault. All the out of the box executors is capable of copying files to the corresponding targeted endpoint and the process completes automatically by default implementation of the AbstractRemoteCommandExecutionTaskHelper, provide that the names of the files are returned through listFaultInjectionScripts() implementation.
private List getInjectionCommandInfoList(T faultSpec) {}
Provide the commands to be executed for the Fault to be Injected. The commands should be provided as List. The fields and descriptions for the CommandInfo Fields.
private String command; String value of the actual command with references to members in pool of variables will be available to executor during command execution. The types and the accessing mechanism are explained in below section.
private boolean ignoreExitValueCheck; Boolean value to find if a command execution result should consider the return value of the command execution. Can be given false where there can be possibility that the command execution need not be resulted in only success return value, but it will be based on the command output.
private List expectedCommandOutputList; List of patterns to be provided to validate a command execution output to consider if the execution is success. The relation among the patterns verification is defaulted to logical ‘or’.
private int noOfRetries; Retries to be attempted by the executor before marking the command execution as a Failure.
private int retryInterval; Interval in seconds between any two attempts of a command execution incase of execution failures and opted for retry attempts.
private int timeout; Timeout interval in milliseconds to consider a command execution failure if the response was not received by the executor from the target.
private Map knownFailureMap; Mapping of Patterns to be looked for in the command execution output, to provide easier troubleshooting messages to user by masking stack traces in the result.
private List commandOutputProcessingInfoList; Explained in detailed below.
public class CommandOutputProcessingInfo
Fields are
private List getRemediationCommandInfoList(T faultSpec) {}
Provide the commands to for remediating the fault already Injected. The semantics of CommandInfo is same as it described in the previous section. The args and TaskTroubleShootingInfo collected during the injection will be available during the execution of remediation as well. Hence the dependency data from injection task can be passed to remediation by using the References in the commands.
Aperçu
Hugo est un générateur de site Web HTML et CSS statique écrit en Go . Il est optimisé pour la vitesse, la facilité d'utilisation et la configurabilité. Hugo prend un répertoire avec du contenu et des modèles et les rend dans un site Web HTML complet.
Hugo s'appuie sur des fichiers Markdown avec une interface pour les métadonnées, et vous pouvez exécuter Hugo à partir de n'importe quel répertoire. Cela fonctionne bien pour les hôtes partagés et autres systèmes sur lesquels vous n'avez pas de compte privilégié.
Hugo rend un site Web typique de taille moyenne en une fraction de seconde. Une bonne règle de base est que chaque élément de contenu est rendu en environ 1 milliseconde.
Hugo est conçu pour fonctionner correctement pour tout type de site Web, y compris les blogs, les tumbles et les documents.
Architectures prises en charge
Actuellement, nous fournissons des binaires Hugo pré-construits pour Windows, Linux, FreeBSD, NetBSD, DragonFly BSD, Open BSD, macOS (Darwin) et Android pour les architectures x64, i386 et ARM.
Hugo peut également être compilé à partir des sources partout où la chaîne d'outils du compilateur Go peut s'exécuter, par exemple pour d'autres systèmes d'exploitation, y compris Plan 9 et Solaris.
Si vous souhaitez utiliser Hugo comme générateur de site, installez simplement les binaires Hugo. Les binaires Hugo n'ont pas de dépendances externes.
Pour contribuer au code source ou à la documentation de Hugo, vous devez créer un fork du projet Hugo GitHub et le cloner sur votre machine locale.
Enfin, vous pouvez installer le code source de Hugo avec go, créer les binaires vous-même et exécuter Hugo de cette façon. Construire les binaires est une tâche facile pour un gogetter expérimenté .
Installez Hugo comme générateur de site (installation binaire)
Pour un guide complet sur la contribution à Hugo, consultez le Guide de contribution .
Nous acceptons les contributions à Hugo de tout type, y compris la documentation, les thèmes, l'organisation, les didacticiels, les articles de blog, les rapports de bogues, les problèmes, les demandes de fonctionnalités, les implémentations de fonctionnalités, les demandes d'extraction, les réponses aux questions sur le forum, l'aide à la gestion des problèmes, etc.
La communauté Hugo et les mainteneurs sont très actifs et serviables, et le projet profite grandement de cette activité.
Poser des questions d'assistance
Nous avons un forum de discussion actif où les utilisateurs et les développeurs peuvent poser des questions. Veuillez ne pas utiliser l'outil de suivi des problèmes GitHub pour poser des questions.
Signaler des problèmes
Si vous pensez avoir trouvé un défaut dans Hugo ou dans sa documentation, utilisez le suivi des problèmes GitHub pour signaler le problème aux responsables de Hugo. Si vous n'êtes pas sûr qu'il s'agisse d'un bogue ou non, commencez par demander dans le forum de discussion . Lorsque vous signalez le problème, veuillez fournir la version d'Hugo utilisée ( hugo version).
Soumettre des correctifs
Le projet Hugo accueille tous les contributeurs et contributions quel que soit leur niveau de compétence ou d'expérience. Si vous souhaitez contribuer au projet, nous vous aiderons avec votre contribution. Hugo est un projet très actif avec de nombreuses contributions quotidiennes.
Nous voulons créer le meilleur produit possible pour nos utilisateurs et la meilleure expérience de contribution pour nos développeurs, nous avons un ensemble de directives qui garantissent que toutes les contributions sont acceptables. Les lignes directrices ne sont pas conçues comme un filtre ou un obstacle à la participation. Si vous n'êtes pas familier avec le processus de contribution, l'équipe Hugo vous aidera et vous apprendra comment apporter votre contribution conformément aux directives.
Pour un guide complet sur la contribution du code à Hugo, consultez le Guide de contribution .
Quark est un langage de programmation interprété en Typescript.
Quark est un langage de programmation interprété en Typescript dont la syntaxe se base sur Lisp. Le langage fonctionne dans sa globalité de manière récursive se basant sur un système de registre et CallStack.
Exemple
Comme indiqué, il s'agit d'un Lisp like, en voici quelques démonstrations à travers de simples exemples :
(print "Hello world")
En Lisp, tout réside dans l'habitude et l'organisation. Bien que le langage puisse paraître assez désordonné, ça n'est simplement qu'une question d'habitude. Pratiquer vous permettra de développer une certaine aptitude dans l'organisation de votre code en contrepartie. En plus de cela, le Lisp vous permettra d'accroître votre productivité de par sa liberté et sa simplicité à écrire.
Installation
L'installation de Quark est assez simple, il faut cependant plusieurs dépendances au préalable :
Deno
Git
Fonctionnement
Formatage
Dans un premier temps, le code va être formaté afin que tous les commentaires soient supprimés de ce dernier : le fait que le langage soit simplement interprété supprime toute utilité aux commentaires pour le moment.
Ce code ne retourne donc qu'une simple copie du code brut modifié.
Tokenisation
Ensuite, le code, une fois formaté, va être analysé de manière à retourner une liste de ce qu'on appelle Token : La définition est assez simple :
Voici le résultat de l'analyse du code ci-dessous :
Analyse syntaxique
Par la suite, vient l'étape d'analyse syntaxique qui consiste à créer une représentation du code pouvant être plus simplement ensuite manipulée par l'interpréteur. C'est sans-doute l'un des étapes les plus importantes au bon fonctionnement du langage. Dans le cas de Quark, il s'agit d'une array dite multidepth, voici sa définition :
Pour le code suivant :
La représentation sera :
Interprétation
L'interprétation est la dernière étape du processus du langage de programmation. Elle consiste en l'exécution de notre arbre syntaxique (ou AST) généré à l'étape précédente. Cette étape bien que plus complexe demeure toujours réalisable et assez simple avec un peu de motivation.
Nous ne survolerons cependant que la partie simple de l'interpréteur.
Avant de partir dans les profondeurs du fonctionnement d'un langage interprété, il est déjà important de définir plusieurs termes :
La stack : l'intégralité de votre code est régis par la Stack. Pour faire simple, c'est un conteneur qui contient lui-même des conteneurs appelés Function Frame. Ce dernier vous permet donc de maintenir la structure des différentes variables du code. C'est cette organisation en conteneurs qui permet de délimiter le scoping de ces dernières.
La Function Frame : il s'agit simplement d'un conteneur, cette fois-ci encore, permettant contrairement à la Stack, d'organiser bien plus précisément les variables et leur utilisation. En effet, la function frame contient ce qu'on appelle des Local Frame. La function frame est créée dès lors l'appel d'une fonction. Les function frames ne peuvent pas intéragir entre-elles.
Définition d'une variable
Dès à présent, commençons par la définition d'une variable et sa modification.
Lors de la création d'une variable, cette dernière est stockée sur la dernière frame contenue dans la local frame en cours d'utilisation, ce qui fait qu'elle est constamment créée de manière locale à moins d'être dans la racine du programme, où elle sera alors considérée comme faisant parti intégrante de la frame globale.
La modification de variable, quant à elle, récupère modifie la variable en question dans le scope dans lequel elle est trouvée en dernier. De ce fait, une variable dans un scope antérieur peut être modifiée. Mais ne peut pas être modifié, les variables d'une function frame.
Appel d'une fonction
L'appel d'une fonction déclenche la création d'une nouvelle frame : Les arguments sont définis dans cette nouvelle frame afin qu'ils puissent être accessibles dans la fonction, et le corps de la fonction est ensuite exécuté. La frame est enfin retirée et le résultat de la fonction, retourné.
Valeur de retour
Le système de retour peut paraître assez innocent mais est en réalité une réelle peine si attention n'est pas prise : dans un système où toute fonction retourne constamment une valeur, il est compliqué de différencier une valeur de retour d'une fonction de notre code Quark que d'une simple valeur de retour de notre interpréteur.
C'est pour cela, qu'il a été mis en place dans Quark un système assez simple en définition et en application permettant de gérer simplement et à un seul endroit le retour : ce système consiste en retourner une liste dont le premier élément est la valeur de retour et le second élément est un booléen indiquant s'il s'agit d'une valeur de retour d'une fonction dans Quark ou pas.
A partir de là, s'il s'agit bel et bien d'une valeur de retour, nous pouvons retourner la valeur en question de la fonction et donc arrêter la boucle de noeud, sinon on continue simplement la boucle.
Si vous écrivez avec un logiciel de traitement de texte, vous utilisez certainement les listes à puces. Et vous avez raison car une liste à puces peut être très utile pour améliorer la lisibilité et la compréhension d’un texte. C’est d’ailleurs ça la vraie valeur ajoutée d’une liste à puce.
Ainsi, quand le paragraphe d’un texte est particulièrement long à lire ou trop complexe pour être très vite compris par le lecteur, mieux vaut utiliser une puce pour marquer chaque point important.
Une fois qu’on a dit ça, reste à savoir comment bien écrire une liste à puces. Toutes les réponses dans ce billet… avec une carte de synthèse en cadeau !
Qu’est-ce qu’une puce ?
Les puces sont ces petits symboles qui servent à lister un ensemble d’éléments. On trouve des puces numérotées (ou ordonnées) et des puces non ordonnées.
Dans une liste à puces non ordonnée, chaque paragraphe commence par une puce. Avant le traitement de texte, la puce se résumait à un tiret (les typographistes garants de leur art préconiseraient un cadratin ou de demi-cadratin). Mais aujourd’hui, une puce peut revêtir moult designs.
Exemple des puces du logiciel Word :
Dans une liste numérotée, chaque paragraphe commence par une expression constituée d’un numéro ou d’une lettre et d’un séparateur tel qu’un point ou une parenthèse.
Exemple des puces numérotées du logiciel Word :
Dans une liste numérotée, l’ordre des éléments est important soit dans l’esprit du rédacteur, soit dans un souci de compréhension du lecteur.
Dans ce cas, l’information est mieux comprise parce que les éléments sont placés dans un ordre logique. Elle permet de discriminer les étapes d’un processus.
Lorsque l’ordre des éléments énoncés n’a pas d’importance, mais qu’il s’agit de mettre en valeur certains éléments, on utilise une liste à puces sans numéros.
Veuillez vous assurer que vous disposez :
d’une connexion internet ;
d’une adresse mail ;
du logiciel Skype ;
À quoi faut-il faire attention dans une liste à puces ?
Une liste à puces dans un texte écrit pour une impression papier ou pour une lecture à l’écran est avant tout une énumération visuelle. Cette énumération doit être cohérente.
La cohérence porte sur quatre éléments principaux :
annoncer l’énumération avec une phrase d’introduction (laquelle finit par « :« ) ;
utiliser la même puce au sein d’une même énumération ;
utiliser la même ponctuation(virgule ou point-virgule) ;
Petit focus sur ce dernier point. À votre avis, qu’est ce qui ne fonctionne pas dans l’exemple suivant :
Vous l’aurez compris : ce qui ne fonctionne pas, c’est le mélange de substantifs (« finalisation », « recrutement« ) et de verbes à l’infinitif (« étudier« , « valider« ).
Il faut choisir, le mieux étant toujours de privilégier les verbes d’action.
Autre incohérence, la ponctuation. Il faut ponctuer la fin de chaque élément d’énumération par un point-virgule ou une (simple) virgule, mais ne pas mélanger les deux.
Ce qui pourrait donner :
Quelle ponctuation pour les listes à puces ? Et on met une majuscule au début ou pas ?
Une phrase se terminant par deux-points est le plus souvent suivi énumération (derrière » 1° « , » a) » ou tout autre symbole de puce) dont le premier mot commence par une minuscule.
En revanche, on met une majuscule au début de ces parties de liste lorsqu’elles sont précédées d’une lettre ou d’un numéro suivi d’un point (« A.« , « 1.« , etc.).
Pour se repérer en un clin d’œil dans les règles de ponctuation d’une liste à puces, je vous ai préparé une carte conceptuelle de synthèse de l’essentiel à retenir.
Pour une meilleure lecture, le mieux est de la télécharger (si impression papier, format A3 recommandé).Cliquer sur la carte pour télécharger la version complète (fichier pdf, 3Mo).
En conclusion
Une liste à puce est une énumération qu’il faut utiliser comme une aide à la lecture : elle permet au lecteur de se repérer facilement dans le texte.
Ce qui signifie qu’une énumération ne requiert pas systématiquement l’utilisation d’une liste à puces. Ainsi, une liste à puces peut tout à fait être remplacée par une énumération horizontale.
Soit une phrase qui contient une succession de mots, séparés par des virgules ou des points-virgules.
Exemple :
Pour remplir ce formulaire : 1) vérifier vos nom et prénom ; 2) indiquer votre adresse ; 3) dater et signer.
Et surtout, noter bien qu’une liste à puces est inutile en deçà de trois éléments (trois puces) dans la liste et au-delà d’une quinzaine de mots par élément.
Source :
C'est quoi le Cloud Native ?
Définissons le mot qui est de plus en plus utilisé dans la technologie moderne.
Definition v1.0 CNCF Approved by TOC: 2018-06-11*
Les technologies nativement cloud permettent aux entreprises de construire et d'exploiter des applications élastiques dans des environnements modernes et dynamiques comme des clouds publics, privés ou bien hybrides. Les conteneurs, les services maillés, les micro services, les infrastructures immuables et les API déclaratives illustrent cette approche.
Ces techniques permettent la mise en œuvre de systèmes faiblement couplés, à la fois résistants, pilotables et observables. Combinés à un robuste système d'automatisation, ils permettent aux ingénieurs de procéder à des modifications impactantes, fréquemment et de façon prévisible avec un minimum de travail.
La Cloud Native Computing Foundation cherche à favoriser l'adoption de ce paradigme en encourageant et en soutenant un écosystème de projets "opensource" et indépendants. Nous démocratisons l'état de l'art des pratiques afin de rendre l'innovation accessible à tous.
English
Cloud native technologies empower organizations to build and run scalable applications in modern, dynamic environments such as public, private, and hybrid clouds. Containers, service meshes, microservices, immutable infrastructure, and declarative APIs exemplify this approach.
These techniques enable loosely coupled systems that are resilient, manageable, and observable. Combined with robust automation, they allow engineers to make high-impact changes frequently and predictably with minimal toil.
The Cloud Native Computing Foundation seeks to drive adoption of this paradigm by fostering and sustaining an ecosystem of open source, vendor-neutral projects. We democratize state-of-the-art patterns to make these innovations accessible for everyone.
## العربية تمكّن التقنيات سحابية المصدر المؤسسات من إنشاء تطبيقات قابلة للتطوير و تشغيلها في بيئات حديثة و ديناميكية مثل السحب العامة و الخاصة و الهجينة. يمثل هذا النموذج الحاويات، و شبكات الخدمة، و الخدمات المصغرة، و البنية التحتية غير المستقرة، و واجهات برمجة التطبيقات التعريفية. و تمكن هذه التقنيات النظم المقرونة بالمرونة و القابلية للاداره و الملاحظة. بالاضافه إلى الاتمته القوية ، فانها تسمح للمهندسين باجراء تغييرات عاليه التاثير بشكل متكرر و متوقع مع الحد الأدنى من الكدح. تسعى Cloud Native Computing Foundation إلى دفع اعتماد هذا النموذج من خلال تعزيز نظام إيكولوجي ثابت و مفتوح المصدر و محايد من البائعين. اننا نقوم بإضفاء الديمقراطية على أحدث الأنماط لجعل هذه الابتكارات متاحه للجميع.
클라우드 네이티브 기술을 사용하는 조직은 현대적인 퍼블릭, 프라이빗, 그리고 하이브리드 클라우드와 같이 동적인 환경에서 확장성 있는 애플리케이션을 만들고 운영할 수 있다. 컨테이너, 서비스 메시, 마이크로서비스, 불변의 인프라스트럭처, 그리고 선언적 API가 전형적인 접근 방식에 해당한다.
이 기술은 회복성이 있고, 관리 편의성을 제공하며, 가시성을 갖는 느슨하게 결합된 시스템을 가능하게 한다. 견고한 자동화와 함께 사용하면, 엔지니어는 영향이 큰 변경을 최소한의 노력으로 자주, 예측 가능하게 수행할 수 있다.
Cloud Native Computing Foundation은 벤더 중립적인 오픈소스 프로젝트 생태계를 육성하고 유지함으로써 해당 패러다임 채택을 촉진한다. 우리 재단은 최신 기술 수준의 패턴을 대중화하여 이런 혁신을 누구나 접근 가능하도록 한다.
Español:
Las tecnologías “Cloud Native” empoderan a las organizaciones para construir y correr aplicaciones escalables en ambientes dinámicos modernos, como lo son hoy las nubes públicas, privadas o hibridas. Temas como contenedores, mallas de servicios, microservicios, infraestructura inmutable y APIs declarativas son ejemplos de este enfoque.
Estas técnicas permiten crear sistemas de bajo acoplamiento que son resilentes, administrables y observables. Combinado con técnicas de automatización robusta les permite a los ingenieros realizar cambios de alto impacto de manera frecuente y predecible con un mínimo esfuerzo.
La "Cloud Native Computing Foundation" busca impulsar la adopción de este paradigma mediante el fomento y mantenimiento de un ecosistema de proyectos de código abierto y neutro con respecto a los proveedores. Democratizamos los patrones modernos para que estas innovaciones sean accesibles para todos.
Deutsch:
Cloud native Technologien ermöglichen es Unternehmen, skalierbare Anwendungen in modernen, dynamischen Umgebungen zu implementieren und zu betreiben. Dies können öffentliche, private und Hybrid-Clouds sein. Best Practices, wie Container, Service-Meshs, Microservices, immutable Infrastruktur und deklarative APIs, unterstützen diesen Ansatz.
Die zugrundeliegenden Techniken ermöglichen die Umsetzung von entkoppelten Systemen, die belastbar, handhabbar und beobachtbar sind. Kombiniert mit einer robusten Automatisierung können Softwareentwickler mit geringem Aufwand flexibel und schnell auf Änderungen reagieren.
Die Cloud Native Computing Foundation fördert die Akzeptanz dieser Paradigmen durch die Ausgestaltung eines Open Source Ökosystems aus herstellerneutralen Projekten. Wir demokratisieren modernste und innovative Softwareentwicklungs-Patterns, um diese Innovationen für alle zugänglich zu machen.
Polski
Technologie Cloud Native pozwalają organizacjom tworzyć i wykorzystywać skalowalne aplikacje w nowoczesnych, dynamicznych środowiskach takich jak chmury publiczne, prywatne czy hybrydowe. Przykładami tego podejścia technologicznego są wirtualne kontenery (ang. containers), mikrousługi (ang. microservices), platformy dla mikrousług (ang. service mesh), niezmienna infrastruktura (ang. immutable infrastructure) i deklaratywne interfejsy aplikacyjne (ang. declarative APIs).
Wymienione technologie umożliwiają współistnienie luźno-powiązanych (ang. loosely coupled) systemów, które cechują się wysokim poziomem odporności, zarządzalności i monitorowalności. W powiązaniu z niezawodną automatyzacją pozwalają inżynierom regularnie i przewidywalnie wprowadzać istotne zmiany z minimalnym wysiłkiem.
Intencją Cloud Native Computing Foundation jest przyczynienie się do adopcji tego paradygmatu poprzez wspieranie ekosystemu niezależnych projektów open-source. Demokratyzujemy wysokiej klasy wzorce tworzenia wolnego oprogramowania, aby uczynić te innowacje dostępne dla wszystkich.
Português Brasileiro:
Tecnologias nativas ao cloud empoderam empresas a criarem e rodarem aplicações escaláveis em ambientes modernos e dinâmicos, como núvens públicas, privadas e híbridas. Containeres, service meshes, microsserviços, infraestruturas imutáveis e APIs declarativas são alguns exemplos dessa estratégia.
Essas técnicas permitem criar sistemas de baixo acoplamento, resilientes, gerenciáveis e observáveis. Combinadas com automações robustas, elas permitem que os engenheiros façam alterações de alto impacto de forma frequente e previsível, com o mínimo de esforço.
A Cloud Native Computing Foundation procura conduzir a adoção desse paradigma auxiliando e sustentando um ecosistema de projetos de código aberto e não atrelados a nenhum fornecedor. Nós democratizamos padrões estado-da-arte para fazer com que essas inovações sejam acessíveis a todos.
Русский:
Нативные облачные (Cloud native) технологии позволяют организациям создавать и запускать масштабируемые приложения в современных динамических средах, таких как публичные, частные и гибридные облака. Контейнеры, сервисные сита (service meshes), микросервисы, неизменяемая инфраструктура и декларативные API являются примером такого подхода.
Эти техники позволяют слабосвязанным системам быть устойчивыми, управляемыми и под постоянным контролем. В сочетании с надежной автоматизацией они позволяют инженерам часто и предсказуемо вносить значительные изменения с минимальными усилиями.
Cloud Native Computing Foundation ставит целью адаптировать эту парадигму, развивая и поддерживая экосистему проектов, с открытым исходным кодом, независимую от их поставщиков. Мы демократизируем современные модели, чтобы сделать эти инновации доступными для всех.
Italiano:
Le tecnologie cloud native permettono alle organizzazioni di costruire ed eseguire applicazioni scalabili in ambienti moderni e dinamici come cloud pubblici, privati e ibridi. I container, i micro-servizi, le infrastrutture immutabili e le API dichiarative esemplificano questo approccio.
Queste tecniche permettono che sistemi debolmente accoppiati siano resilienti, gestibili e osservabili. Combinati con un sistema robusto di automazione, permettono agli ingegneri di eseguire frequentemente e con minimo sforzo i cambi ad alto impatto
La Cloud Native Computing Foundation cerca di favorire l'adozione di questo paradigma incoraggiando e sostenendo un ecosistema di progetti open source e indipendenti dai vendor. Noi democratizziamo le pratiche allo stato dell'arte per rendere queste innovazioni accessibili a tutti.
Bahasa Indonesia:
Teknologi cloud native memperlengkapi organisasi-organisasi untuk membangun dan menjalankan aplikasi-aplikasi yang dapat diskalakan di dalam lingkungan yang modern dan dinamis seperti layanan cloud publik, privat, maupun hibrida. Kontainer, jaringan layanan (service mesh), layanan mikro (microservice), infrastruktur yang tidak dapat diubah (immutable), dan API-API yang deklaratif merupakan contoh-contoh pendekatan ini.
Teknik-teknik tersebut memungkinkan sistem-sistem yang terhubung secara longgar (loosely coupled) yang tahan banting, dapat dikelola, dan dapat dipantau. Dikombinasikan dengan automasi yang baik, mereka memungkinkan para rekayasawan (engineer) untuk membuat perubahan-perubahan yang berdampak besar secara sering dan dapat diprediksi dengan usaha yang minimal.
Cloud Native Computing Foundation berusaha untuk mendorong adopsi paradigma ini dengan membina dan menopang sebuah ekosistem proyek-proyek yang bersifat sumber terbuka (open source) dan tidak memihak vendor tertentu. Kami mendemokratisasi pola-pola terkini agar inovasi-inovasi ini dapat diakses oleh semua orang.
Comment se rétracter lors d'un achat (ecommerce) ?
Mis à jour le 11 janvier 2021 | Temps : 11-14 minutes
Le particulier qui fait l'acquisition d'un bien ou d'un service sur un site de e-commerce dispose d'un délai de rétractation de 14 jours, sauf exceptions. Comment peut-il exercer son droit ?
Installation Sqlite3 avec NPM ou Yarn
Petit tutoriel suite à des erreurs d'installation sur Windows 10
Le but de cet article est de résoudre les erreurs rencontrés sur Windows 10 à l'installation de Sqlite3 le 10 janvier 2021
Contrairement aux serveurs de bases de données traditionnels, comme MySQL ou PostgreSQL, sa particularité est de ne pas reproduire le schéma habituel client-serveur mais d'être directement intégrée aux programmes. L'intégralité de la base de données (déclarations, tables, index et données) est stockée dans un fichier indépendant de la plateforme.
SQLite est le moteur de base de données le plus distribué au monde, grâce à son utilisation dans de nombreux logiciels grand public comme Firefox, Skype, Google Gears, dans certains produits d'Apple, d'Adobe et de McAfee et dans les bibliothèques standards de nombreux langages comme PHP ou Python. De par son extrême légèreté (moins de 300 Kio), il est également très populaire sur les systèmes embarqués, notamment sur la plupart des smartphones modernes : l'iPhone ainsi que les systèmes d'exploitation mobiles Symbian et Android l'utilisent comme base de données embarquée.
Mangle Developers' Guide
Sub Modules
Mangle is a spring-boot application with implementation of web services to invoke Fault injection on Supported Endpoints.
The mangle Code is organised is as below sub modules using Maven build tool.
🇬🇧 Quick Start
Step 1: Install Hugo
To verify your new install:
Step 2: Create a New Site
private String regExpression;
Regular Expression Pattern to be used to collect an crucial information from current command’s execution to make it available throughout the Fault execution.
private String extractedPropertyName;
Name should be given to the collected information using the pattern given as regExpression
Types of Variables and Their Usage:
The information provided by the user or collected during the runtime of Fault are made available to command executor as below types of Variables.
TaskTroubleShootingInfo of the Task holds the extracted information from the command execution Output.
args field of CommandExecutionFaultSpec available as taskData in Task holds the data received from the user as args.
$FI_ADD_INFO_FieldName can be used to refer to variables from TaskTroubleShootingInfo
$FI_ARG_Fieldname can be used to refer to variables from args.
$FI_STACK can be used to refer to the output of the previous command.
mangle-byteman-root:
Module for the Mangle java Agent, which is used to support application level fault injection against apps running on JVM.
mangle-models:
Module for the complete data model of Mangle Web Application.
mangle–utils:
Module for all the core logic shared across Mangle Application.
mangle-task-framework:
Module for command execution orchestration in Mangle. Every fault execution or request processing in Mangle is handled as an asynchronous task. This module also contains the code responsible for managing scheduler functionality of Mangle.
mangle-test-plugin:
Module for the test utilities required for testing the mangle–task-framework.
mangle-default-plugin:
Module for all the out of the box faults supported by Mangle as a plugin. This is developed using the pf4j-spring framework. Mangle can support fault execution only if this module is available as plugin.
mangle-ui
Module for the presentation layer of mangle.
mangle –services
Module for core web services exposed to user, corresponding persistence layer and business logic.
mangle-vcenter-adapter:
Module for the spring-boot application that has to be deployed as a container or hosted as an application reachable by Mangle for executing faults against VMware vCenter Server.
The order of execution of sub modules is:
Build Profiles
Different build profiles available in Mangle pom are:
default
This profile builds mangle with last known good configuration of mangle-byteman-agent and does not take latest changes to mangle-byteman-root module into consideration.
To build:
build-all
This profile builds mangle with latest changes of mangle-byteman-agent and is recommended for use if the Mangle java agent jar has to be updated.
To build using this profile:
byteman
This profile builds only the mangle-byteman-root module with the latest changes.
To build using profile byteman
vcenter-adapter
This profile builds only mangle-vcenter-adapter with the latest changes.
Building the code
Prerequisites
Java
Java 8 JDK installed on your OS of choice (Mac OSX, Linux variants, Windows are all supported hosts)
Eclipse Luna or a modern IDE of your choice. Make sure to apply the same formatting profile for code.
Git for source code management.
Maven
Maven is used to build and test the project. Install maven 3.5.X to your local system.
(Optional) Install Maven with your system's package manager (e.g. apt on Ubuntu/Debian, homebrew on OSX, ...).
Set your JAVA_HOME environment variable to be the home of the Java 8 JDK. On OSX, this lands in /Library/Java/JavaVirtualMachines/jdk1.8.0_65.jdk/Contents/Home/.
Run mvn clean install to compile the code, run checkstyle and run unit tests.
Packaging a fat jar
Resulting JAR goes to mangle-services/target/mangle-services.jar.
./mvnw clean package -DskipTests (packages without running tests)
Please refer to Mangle Administrator Guide for starting the jar by providing the Supported DB_OPTIONS and supported CLUSTER_OPTIONS as inputs to jar execution command.
Code Style
License
Each source file has to specify the license at the very top of the file:
Line length
Set to 100
Import statements
The order of import statements is:
import static java.*
import static javax.*
blank line
import static all other imports
blank line
import static com.vmware.*
blank line
import java.*
import javax.*
blank line
import all other imports
blank line
import com.vmware.*
Comments are always placed at independent line. Do not append the comment at the end of the line.
Wrong
Correct
Commit message
Follow the widely used format:
Sample:
50 char in title
Wrap the body at 72 char or less
Checkstyle
Checkstyle runs as part of maven validate lifecycle.
You can call it manually like ./mvnw validate or ./mvnw checkstyle:checkstyle.
Extract that .zip file to get a “gohugo-theme-ananke-master” directory.
Rename that directory to “ananke”, and move it into the “themes/” directory.
Then, add the theme to the site configuration:
Step 4: Add Some Content
You can manually create content files (for example as content//.) and provide metadata in them, however you can use the new command to do a few things for you (like add title and date):
Edit the newly created content file if you want, it will start with something like this:
Feel free to edit or add new content and simply refresh in browser to see changes quickly (You might need to force refresh in webbrowser, something like Ctrl-R usually works).
Step 6: Customize the Theme
Your new site already looks great, but you will want to tweak it a little before you release it to the public.
Site Configuration
Open up config.toml in a text editor:
Replace the title above with something more personal. Also, if you already have a domain ready, set the baseURL. Note that this value is not needed when running the local development server.
For theme specific configuration options, see the theme site.
java –jar mangle-services-.x.x.x-jar –D...... (Db parameters are mandatory)
/* * Copyright (c) 2016-2019 VMware, Inc. All Rights Reserved. * * This product is licensed to you under the Apache License, Version 2.0 (the "License"). * You may not use this product except in compliance with the License. * * This product may include a number of subcomponents with separate copyright notices * and license terms. Your use of these subcomponents is subject to the terms and * conditions of the subcomponent's license, as noted in the LICENSE file. */
host.setLoggingLevel(Level.OFF); // setting log level OFF
// setting log level OFF host.setLoggingLevel(Level.OFF);
Short (50 chars or less) summary of changesMore detailed explanatory text, if necessary. Wrap it toabout 72 characters or so. In some contexts, the firstline is treated as the subject of an email and the rest ofthe text as the body. The blank line separating thesummary from the body is critical (unless you omit the bodyentirely); tools like rebase can get confused if you runthe two together.Further paragraphs come after blank lines. - Bullet points are okay, too - Typically a hyphen or asterisk is used for the bullet, preceded by a single space, with blank lines in between, but conventions vary here
cd quickstart
git init
git submodule add https://github.com/budparr/gohugo-theme-ananke.git themes/ananke
echo 'theme = "ananke"' >> config.toml
hugo new posts/my-first-post.md
---
title: "My First Post"
date: 2019-03-26T08:47:11+01:00
draft: true
---
▶ hugo server -D
| EN
+------------------+----+
Pages | 10
Paginator pages | 0
Non-page files | 0
Static files | 3
Processed images | 0
Aliases | 1
Sitemaps | 1
Cleaned | 0
Total in 11 ms
Watching for changes in /Users/bep/quickstart/{content,data,layouts,static,themes}
Watching for config changes in /Users/bep/quickstart/config.toml
Environment: "development"
Serving pages from memory
Running in Fast Render Mode. For full rebuilds on change: hugo server --disableFastRender
Web Server is available at http://localhost:1313/ (bind address 127.0.0.1)
Press Ctrl+C to stop
baseURL = "https://example.org/"
languageCode = "en-us"
title = "My New Hugo Site"
theme = "ananke"
hugo -D
# installation du binaire écrit en Go
snap install hugo --channel=extended
sudo apt-get install hugo
# création d'un nouveau site
hugo new site bluekeys
# initialisation de git et ajout d'un sous module
git init
git submodule add https://github.com/budparr/gohugo-theme-ananke.git themes/ananke
# configuration du thème par rapport au sous module ajouté
echo 'theme = "ananke"' >> config.toml
# création d'un nouvelle article
hugo new posts/my-first-post.md
# exécution en local du site pour tester
hugo server -D
# génération du site statique
# Ou tu génére et tu vas dans le dossier public
hugo -D
La Local Frame : c'est le conteneur le plus profond, celui qui contient quant à lui, l'intégralité de vos variables, du scope global au scope local, il est omniprésent. Chaque local frame représente un niveau de scope bien précis et propre à la function frame en question. Les local frames peuvent intéragir entre-elles.
Le scoping : Le scoping n'est ni plus ni moins qu'un terme pour désigner la délimitation de code via des blocs. Cette dite délimitation permet notamment la création de nouvelles Local Frames, ce pouvant être utile à la création de variables "privées".
L’ordre du jour de notre prochaine réunion portera exclusivement sur le projet « Davido plus » :
– finalisation du compte-rendu de la séance précédente,– étudier les propositions des fournisseurs ayant répondu à l’appel d’offres ;– valider la composition du groupe projet « Davido plus »,– recrutement de l’agent de sécurité pour le bâtiment dédié au projet.
Exemple précédent modifié :
L’ordre du jour de notre prochaine réunion portera exclusivement sur le projet « Davido plus » :
– finaliser le compte-rendu de la séance précédente,– étudier les propositions des fournisseurs ayant répondu à l’appel d’offres,– valider la composition du groupe projet « Davido plus »,– mettre en place le recrutement de l’agent de sécurité pour le bâtiment dédié au projet.
Bien écrire les listes à puces : les listes à puce non ordonnées
Bien écrire les listes à puces : les listes à puce ordonnées ou numérotées.
En quoi consiste le droit de rétractation ?
Le droit de rétractation est une possibilité reconnue par la loi aux particuliers de revenir sur un achat réalisé sur internet et qui leur permet de revenir sur leur commande sans justification.
Lorsque le droit de rétractation a été exercé dans les 14 jours, le vendeur en ligne doit alors rembourser le bien ou la prestation de service en cause.
Le droit de rétractation s'applique aussi pour les produits soldés, d'occasion ou déstockés. Mais la loi exclut expressément le droit de rétractation pour certains biens ou services.
Droit de rétractation des professionnels
Un professionnel ne dispose normalement pas de délai de rétractation.
Cependant, certains professionnels peuvent bénéficier d’un délai de rétractation de 14 jours, dans les mêmes conditions que les particuliers (article L221-3 du Code de la consommation), lorsqu'ils ne disposent pas de plus de 5 salariés et que l'objet du contrat n'entre pas dans leur champ d'activité.
Pendant combien de temps peut-on se rétracter en cas d'achat sur internet ?
Le délai de rétractation est de 14 jours calendaires. Le vendeur en ligne peut aussi offrir un délai plus long à ses clients et l'accompagner de formalités d'exercice ou de conditions de remboursement moins favorables.
En revanche, si le vendeur n'a pas confirmé certaines informations obligatoires au plus tard au moment de la livraison, le délai de rétractation est prorogé de 12 mois.
Néanmoins, si ces informations sont communiquées dans les 12 mois, le délai de rétractation est de nouveau de 14 jours. Il court à partir de la réception des informations par l'acheteur.
Existe-t-il des cas où le droit de rétractation est exclu ?
Sauf si les conditions générales de vente prévoient le contraire, l'acheteur ne bénéficie pas du droit de rétractation en cas d'achat :
de biens ou de services dont le prix dépend des taux du marché financier,
de biens qui, par leur nature, ne peuvent être réexpédiés ou peuvent se détériorer ou se périmer rapidement (par exemple, produits alimentaires),
de biens confectionnés à la demande du consommateur ou nettement personnalisés (par exemple, ameublement sur mesure), y compris lorsque le professionnel n’a pas encore entamé la production du bien (CJUE 21-10-2020 aff. 529/19),
de cassettes vidéo, CD, DVD ou de logiciels informatiques s'ils ont été ouverts par l'acheteur,
des biens ouverts et non retournables pour des raisons d'hygiène ou de protection de la santé (cosmétiques et sous-vêtements, notamment),
de journaux, de périodiques ou de magazines,
des biens indissociables d'autres articles,
de contrats conclus lors d'une enchère publique,
de la fourniture de boissons alcoolisées dont la livraison est différée au-delà de 30 jours et dont la valeur dépend des taux du marché financier,
du contenu numérique fourni sur un support immatériel dont l'exécution a commencé avec l'accord du consommateur et pour lequel il a renoncé à son droit de rétractation,
des services totalement exécutés avant la fin du délai de rétractation ou dont l'exécution a commencé, avec l'accord du consommateur et renoncement exprès à son droit de rétractation, avant la fin de ce délai,
de services de paris ou de loteries autorisés.
Il n'y a pas non plus de possibilité de rétractation pour :
la fourniture de biens de consommation courante, au domicile ou sur le lieu de travail du consommateur par un vendeur faisant des tournées fréquentes et régulières (épicier par exemple),
les travaux d'entretien ou de réparation à réaliser en urgence au domicile du consommateur et à sa demande, dans la limite des pièces de rechange et travaux strictement urgents,
les prestations de services d'hébergement, de transport, de restauration, de loisirs fournies à une date ou selon une périodicité déterminée (billet de train, de spectacle, voyage à forfait, location d'hôtel...).
Le droit de rétractation est-il exerçable en toutes circonstances ?
L'achat était soldé
Les règles relatives au droit de rétractation sont d'ordre public et s'applique donc aussi pendant les périodes de soldes.
Le vendeur ne peut pas l'exclure en cas d'achat sur internet d'un article soldé.
L'achat a été utilisé
Certains vendeurs considèrent que le déballage ou l'utilisation du bien prive l'acheteur de son droit de rétractation. Il n'en est rien. Les tribunaux estiment ainsi que « le droit de rétractation est absolu et discrétionnaire et permet au consommateur d'essayer l'objet commandé et d'en faire usage » (Tribunal judiciaire de Paris le 4 février 2003).
Le vendeur en ligne a simplement la possibilité d'imposer le renvoi du bien dans son emballage d'origine. Mais il ne peut pas exiger que le produit soit retourné dans son emballage d'origine, non ouvert, non descellé et non marqué.
En revanche, si le produit a été trop utilisé, le vendeur en ligne peut pratiquer une décote sur le remboursement.
Comment calculer le délai de rétractation en cas d'achat en ligne ?
Le délai de rétractation de 14 jours commence à s'écouler :
pour les biens achetés sur internet, à partir de leur réception,
pour les prestations de services, à partir de l'acceptation de l'offre. Toutefois, lorsqu'un matériel est nécessaire au lancement du service, le délai peut courir à compter de la réception de ce matériel (par exemple, décodeur).
Le jour qui sert de point de départ ne compte pas. Lorsque le délai s'achève un samedi, un dimanche ou un jour férié ou chômé, il est prolongé jusqu'au premier jour ouvrable suivant. Par exemple, si le bien a été livré le samedi, le délai court à partir du dimanche. Il s'achève le samedi suivant. L'acheteur a donc jusqu'au lundi de la semaine suivante pour retourner le bien.
Lors d'un envoi multiple (deux colis d'une même commande livrés séparément), le délai de rétractation court à partir de la réception du dernier produit. Cela signifie par exemple que ce délai peut s'allonger de 15 jours si l'un des produits commandés est indisponible pendant 15 jours.
Comment exercer son droit de rétractation en cas d'achat sur internet ?
La preuve du respect du délai de rétractation
C'est à l'acheteur de prouver qu'il a bien respecté le délai de rétractation légal (14 jours) ou, s'il est proposé, conventionnel (15 jours, 3 semaines...).
Il dispose de plusieurs moyens pour le faire :
l'envoi de son courrier postal,
l'expédition de son courriel ou de son fax,
le dépôt de son colis à la Poste ou chez un distributeur, un transporteur (récépissé de dépôt),
un appel téléphonique. Si le vendeur propose la possibilité de se rétracter par téléphone, il doit fournir un numéro facturé au prix d'un appel local.
Le site internet doit contenir un formulaire type de rétractation, que l'acheteur aura la possibilité d'utiliser ou non.
Les modalités de renvoi du bien
Le droit de rétractation doit pouvoir s'exercer sans formalité et sans avoir à justifier de motifs.
Le vendeur en ligne cependant a la possibilité d'imposer des formalités particulières : un numéro de retour de colis, des documents complémentaires ou les raisons du retour. Ces formalités sont tolérées si elles se font sans frais et sans contrainte excessive pour l'acheteur.
En revanche, le vendeur en ligne ne peut pas soumettre le retour à son accord ou imposer des formalités injustifiées ou excessives (appel d'un numéro surtaxé ou paiement de frais de dossier, par exemple).
A quelles conditions l'acheteur est-il remboursé ?
Délai de remboursement et droit de rétractation
Le vendeur en ligne doit rembourser son client au plus tard dans les 14 jours qui suivent la date de rétractation.
La somme versée par le client est de plein droit majorée si le remboursement intervient après ce terme :
jusqu'à 10 jours : taux d'intérêt légal (3,14 % pour le premier semestre de l'année 2021),
entre 10 et 20 jours : 5 %,
entre 20 et 30 jours : 10 %,
entre 30 e 60 jours : 20 %,
entre 60 et 90 jours : 50 %,
par nouveau mois de retard : 5 points supplémentaires jusqu'au prix du produit, puis du taux d'intérêt légal.
Le refus du vendeur en ligne de rembourser l'acheteur, qui a exercé son droit de rétractation dans les délais, peut être puni d'une amende de 1 500 € maximum.
Montant du remboursement et droit de rétractation
Le droit de rétractation doit s'exercer sans pénalité. Par conséquent, le vendeur ne peut pas retenir des frais de traitement, de dossier... ou encore exiger une indemnité compensatrice pour l'utilisation du bien (sauf s'il a été trop utilisé).
En plus du prix d'achat du bien ou du service, le vendeur en ligne doit également rembourser à l'acheteur les frais de livraison. En effet, l'article L 221-24 du Code de la consommation précise que le « professionnel rembourse le consommateur de la totalité des sommes versées, y compris les frais de livraison ».
En revanche, les frais de retour restent à la charge du client sauf si les conditions générales de vente prévoient le contraire. Mais le vendeur en ligne ne peut pas retenir des frais de dossier ou autres pénalités d'annulation.
Les conditions générales de vente ne peuvent pas non plus prévoir une clause prévoyant, de manière générale, une indemnisation compensatrice en cas d'utilisation du bien acquis pendant le délai de rétractation. Une telle clause serait illicite.
En cas de renvoi d'une partie seulement de la commande, selon l'administration (avis DGCCRF de novembre 2008), les modalités de remboursement sont les suivantes :
si les frais de port dépendent du nombre d'articles commandés (par exemple, des frais variant par tranches de prix de la commande), ils doivent être remboursés au prorata des articles renvoyés par le client ;
si les frais de port sont forfaitaires, ils ne doivent pas être remboursés.
Modalités de remboursement en cas d'exercice du droit de rétractation
Le remboursement doit s'effectuer en utilisant le même moyen de paiement que celui employé pour l'achat sur internet.
Il est néanmoins possible de réaliser la transaction avec un autre moyen de paiement, à condition d'avoir obtenu l'accord de l'acheteur et de ne pas lui occasionner de frais supplémentaires.
Le vendeur en ligne peut cependant différer le remboursement jusqu'à la récupération des biens, ou la réception d'une preuve de leur réexpédition par l'acheteur, dans le cas de la vente en ligne de biens physiques : reçu Colissimo, attestation du point relais...
Le vendeur a la possibilité de prévoir l'organisation d'un mode de transport spécifique, notamment pour les biens volumineux, à condition que l'acheteur ait la possibilité de choisir un autre mode d'expédition prévoyant des conditions de sécurité équivalentes.
Que faire en cas de litige concernant le droit de rétractation ?
En cas de litige, c'est le consommateur qui doit prouver la date de demande de rétractation.
Par précaution, il est préférable de conserver une preuve de la date de retour du bien ou de dénonciation du contrat : lettre d'accompagnement du produit, accusé de réception...
En cas de refus de remboursement par le vendeur en ligne, ce dernier encourt une amende de 1 500 €.
Source :
Sur Ubuntu 20.04 LTS
Aucun soucis ( 9 secondes ).
Sur Windows 10 janvier 2021(Shadow)
j'ai installé depuis l'interface la dernière version de de NodeJS 14.15.4 LTS (j'ai coché l'option ou chocolat) https://nodejs.org/en/
Effectivement y a bien un soucis, je vient d'ouvrir le fichier de debug log, j'ai collé un bout ici
Le problème est clairement Python, j'ai pas installé Python pour voir si c'était volontairement le soucis en installant uniquement les mêmes versions de NPM et NodeJS que celle sur Ubuntu 20.04 LTS sachant que Python est déjà bien gérer de base par Ubuntu.
Première trace d'erreur
Il explique ici qu'il te faut Python mais qu'il n'a pas trouvé de dossier d'installation pour l'utiliser, sur une version spécifique pour installe node-gyp
Maintenant l'erreur est corrigé, il me dit que je n'ai pas d'installation trouvé de visual studio pour qu'il puisse faire des traitements, go installer.
VS 2015 et pour nodeJS 8 => VS2013https://visualstudio.microsoft.com/fr/vs/older-downloads/ Je vais tenter la 2019 pour voir. (malgré un ordi très puissant avec un super processeur, 12Go de mémoire vive l'installe est très longue)
ça ne lui convient toujours pas mais il trouve cette fois VS2019 et il demande le VS C++ core en plus. De mémoire NodeJs utilise du C++ avec le V8 à coté du coup, je ne suis pas du tout étonné Je vais revoir l'installation pour check si je peux pas l'inclure en retournant voir visual studio installer et cette fois je coche développement web ASP.NET peut être qu'il va m'inclure le VS C++ core cette fois.
Ce n'étais finalement pas nécessaire il me dit que je peux trouvé ce qu'il me faut en allant ici :https://github.com/nodejs/node-gyp#on-windows pour node gyp[05:47]Il me dit d'ouvrir powershell en admin puis ensuite de demander à mon ordi d'installer les outil de dev :
[05:48]Parfait ça fonctionne il à ajouté à NPM un supplément de façon global à la conf du Binaire pour l'avoir en dépendance partout. Mais j'ai toujours le soucis qu'il n'arrive pas à trouver l'installation de VS à utiliser :
D'après un forum il faut que j'ajoute autre chose :
Résultat pour installer Sqlite3 sur Windows 10, il m'aura fallut 1h, quelque recherches et aussi attendre le téléchargement et l'installation sur l'installer VS 2019.
Il faut installer :
Node, Npm ou Yarn, Python latest, Visual Studio 2019 latest,npm install --global windows-build-toolset cocher dans l'installer de VS2019 le developpement c++
En gros, lorsque tu fais ton installation de Sqlite3 il n'arrive pas a télécharger son archive et npm reçoit une 403 résultat, il propose ce qu'on appel une solution de repli (fallback) qui est de build Sqlite3 sauf que pour ça faut les outils de dev C++. Sous Ubuntu je n'ai pas eu de 403 parce-qu'il fait autrement.
Pense à chaque début de projet à faire un : npm init pour créer ton fichier package.json à la racine de ton projet dans le dossier de celui-ci.
Une fois l'installation terminé mon fichier de dépendances package.json ressemble à ça :
💕 Si on me demande pourquoi je préféré Unix pour le développement maintenant vous savez
Vous voulez débuter en sécurité informatique et ne savez pas où commencer ? Vous êtes au bon endroit !
Cet article va vous permettre d'apprendre la cybersécurité en vous donnant des ressources, conseils et différentes informations. Cependant cet article n'est pas la Bible de la cybersécurité ! Vous n'êtes en aucun cas obligé de suivre ce que l'on vous conseille. Si vous avez des recommendations d'ajouts ou d'éléments à retirer, n'hésitez pas à nous contacter sur notre Discord ! Bonne lecture, et bon apprentissage ! :-)
Pas de panique, cette page est là pour vous orienter avec toutes les informations ! Mais avant ça, même si c'est chiant, on doit parler un peu de lois, parce-que nul n'est censé l'ignorer. Il va sans dire que si le piratage peut être fait de manière éthique, il existe de nombreuses personnes qui jugent superflu le fait de rester dans un cadre légal... dans l'éventualité où vous souhaitiez vous abstenir de suivre la loi, laissez-moi vous rappeler les risques auxquels vous seriez exposés.
# On clone le repôt et on se déplace dedans
$ git clone https://github.com/quark-lang/quark
$ cd quark
# On installe ensuite au path le projet
$ deno install --no-check -n quark --allow-all src/main.ts
$ quark
user@Leolios:~$ cd git/
user@Leolios:~/git$ mkdir monbot
user@Leolios:~/git$ cd monbot/
user@Leolios:~/git$ npm init
user@Leolios:~/git/monbot$ npm install sqlite3
npm WARN deprecated [email protected]: request has been deprecated, see https://github.com/request/request/issues/3142
npm WARN deprecated [email protected]: this library is no longer supported
> [email protected] install /home/user/git/monbot/node_modules/sqlite3
> node-pre-gyp install --fallback-to-build
node-pre-gyp WARN Using request for node-pre-gyp https download
[sqlite3] Success: "/home/user/git/monbot/node_modules/sqlite3/lib/binding/napi-v3-linux-x64/node_sqlite3.node" is installed via remote
npm WARN saveError ENOENT: no such file or directory, open '/home/user/git/monbot/package.json'
npm notice created a lockfile as package-lock.json. You should commit this file.
npm WARN enoent ENOENT: no such file or directory, open '/home/user/git/monbot/package.json'
npm WARN monbot No description
npm WARN monbot No repository field.
npm WARN monbot No README data
npm WARN monbot No license field.
+ [email protected]added 120 packages from 167 contributors and audited 120 packages in 9.572s
2 packages are looking for funding
run `npm fund` for details
found 0 vulnerabilities
╭─────────────────────────────────────────────────────────────────╮
│ │
│ New patch version of npm available! 6.14.4 → 6.14.10 │
│ Changelog: https://github.com/npm/cli/releases/tag/v6.14.10 │
│ Run npm install -g npm to update! │
│ │
╰─────────────────────────────────────────────────────────────────╯
user@Leolios:~/git/monbot$ npm -v
6.14.4
C:\Users\Shadow>cd git
C:\Users\Shadow>cd monbot
C:\Users\Shadow>npm init
C:\Users\Shadow\git\monbot>npm install sqlite3
# J'ai ajouter les logs d'erreur de fin
2956 verbose stack Error: [email protected] install: `node-pre-gyp install --fallback-to-build`
2957 verbose pkgid [email protected]2958 verbose cwd C:\Users\Shadow\git\monbot
2959 verbose Windows_NT 10.0.19041
2960 verbose argv "C:\\Program Files\\nodejs\\node.exe" "C:\\Program Files\\nodejs\\node_modules\\npm\\bin\\npm-cli.js" "install" "sqlite3"
2961 verbose node v14.15.4
2962 verbose npm v6.14.10
2963 error code ELIFECYCLE
2964 error errno 1
2965 error [email protected] install: `node-pre-gyp install --fallback-to-build`
2965 error Exit status 1
2966 error Failed at the [email protected] install script.
2966 error This is probably not a problem with npm. There is likely additional logging output above.
2967 verbose exit [ 1, true ]
La France dispose de lois contre le piratage depuis la loi Godfrain (en 1988 !). Déjà à l'époque, la loi prévoyait des peines de prison jusqu'à 2 ans et des amendes jusqu'à 25300€ en comptant l'inflation.
Depuis, les textes de lois ont été modifiés et amendés à plusieurs reprises, prévoyant maintenant des peines beaucoup plus sévères, allant de deux à cinq ans d'emprisonnement et jusqu'à 150000€ d'amende Article 323 du code pénal
Bluekeys se dégage de toute responsabilité quant à la mise en pratique de connaissances acquises grâce à l'association.
Ce qui est interdit et ce qui ne l'est pas
La loi reste vague à ce sujet, en effet l’article 323 du code pénal punit "tout accès non autorisé à un système de traitement d'informations". Les outils de piratage, leurs partages et utilisations restent autorisés. Il est donc légal de pratiquer le piratage tant que vous avez l'autorisation du propriétaire du système, par exemple le vôtre, un autre mis à disposition ou bien une plateforme dédiée comme celle pour les CTF (des explications sur les CTF sont fournies plus bas).
Attention, si la possession et l'utilisation d'outil n'est pas illégale, la possession et le partage de données obtenues illégalement sont techniquement du recel.
En conclusion, voyez le hacking comme une arme à feu, vous pouvez utiliser cette arme sur un champs de tir, de manière tout a fait légale. Exactement de la même manière, vous pouvez très bien utiliser vos outils légalement afin de pirater un site conçu pour ça, ou dans le cas ou vous en avez l'autorisation explicite.
Maintenant que vous êtes au courant de ce qui est interdit et de ce qui ne l'est pas, il est temps de rentrer dans le vif du sujet.
1. Veille technologique
Suivez les experts influents de la cybersécurité sur Twitter. Ceux qui ont le plus de succès ne se font probablement pas appeler experts de la cybersécurité. Ils se contentent de lâcher constamment des bombes de connaissances, des conseils et des astuces qui peuvent aider votre carrière. Voici une courte liste pour vous aider :
2. Combinez lecture et pratique
Il existe plusieurs entreprises qui produisent régulièrement du contenu de qualité sur la sécurité. En tête de liste, nous trouvons CrowdStrike, Endgame, FireEye, Kaspersky, Palo Alto's Unit 42 et TrendLabs. Au fil de votre lecture, essayez de comprendre comment vous détecteriez l'activité décrite, puis comment vous enquêteriez.
Il existe aussi des CTF, il s'agit de compétitions en solo ou en équipe, généralement des challenges lié à la sécurité où il est nécessaire de retrouver un mot de passe qu'on appel le flag, plus d'info sur les CTF:
Ce qui est génial, c'est qu'après, les compétiteurs font ce qu'on appelle des write up. Il s'agit de documents qui expliquent pas à pas comment un challenge a été réussi. C'est une vraie mine d'or d'informations ! Nous recommandons vivement que vous en lisiez ou regardiez, car oui, il y en a même sur YouTube!
Cherchez-vous à développer vos connaissances techniques en vue d'un poste d'analyste ? L'étendue de ce que vous devez savoir peut paraître décourageant. Les connaissances les plus fondamentales à acquérir concernent peut-être la suite de protocoles TCP/IP. Préparez-vous à répondre en toute confiance à la question "que se passe-t-il quand...".
Pour l'apprentissage du Forensic, vous ne pouvez probablement pas obtenir de meilleures bases que la 3e édition de "Incident Response and Computer Forensics". Le chapitre sur l'investigation de Windows est un véritable trésor. Plongez dans Powershell, les cadres d'attaque associés, et apprenez à accroître la visibilité de l'activité PowerShell grâce à la journalisation. Associez ces connaissances à l'une des meilleures formations gratuites disponibles sur Cobalt Strike et d'autres vidéos, regardez-les et appliquez les concepts que vous avez appris dans le cadre de l'essai de 21 jours de Cobalt Strike.
Vous n'avez pas assez de temps ?
Envisagez d'investir. Le "Blue Team Field Manual" et le "Red Team Field Manual" complètent nos recommandations à ce sujet. En parallèle, mettez en place un laboratoire avec des postes de travail Windows 7 (ou ultérieur) reliés à un domaine. Compromettez le poste de travail en utilisant certaines des techniques les plus simples, puis explorez l'activité post-exploitation. Votre objectif est de vous faire une idée aussi bien du côté de l'attaque que de la défense.
En ce qui concerne le réseau, pensez à :
"The Practice of Network Security Monitoring" ;
"Practical Packet Analysis" ;
"Applied Network Security Monitoring".
Lorsque le moment est venu de mettre en pratique ce que vous avez appris dans les livres, utilisez des ressources telles que le blog sur l'analyse du trafic des logiciels malveillants et la consultation de PacketTotal pour vous faire une idée de ce qui est "normal" et de ce qui ne l'est pas. Votre objectif ici devrait être de comprendre les sources de données (preuves réseau) qui peuvent être utilisées pour détecter et expliquer l'activité. Pour affiner vos processus d'investigation sur le réseau, pensez à Security Onion. Installez quelques capteurs réseau, surveillez le trafic et créez des signatures Snort/Suricata pour signaler le trafic illicite. Votre objectif est d'établir un processus d'enquête de base et, comme pour les points d'accès, de comprendre les côtés attaque et défense de l'équation.
3. Cherchez à pratiquer plus qu'à lire
Avez-vous déjà suivi un cours et, des mois plus tard, essayé d'utiliser les connaissances que vous aviez prétendument acquises pour découvrir que vous aviez oublié tous les éléments importants ? Oui, si vous déconnectez l'apprentissage de l'utilisation des connaissances, vous allez être dans une situation difficile. C'est peut-être l'un des plus grands défis à relever lorsqu'on se lance dans un rôle de sécurité plus technique.
Pour y remédier, en plus de combiner lecture et pratique, pensez à la technique de Feynman. Vous n'en avez jamais entendu parler ? Eh bien, il est facile de survoler les éléments que l'on ne comprend pas... mais si vous parvenez à les traduire dans un langage simple de façon à ce que les autres puissent les comprendre, vous les aurez mieux compris par la même occasion.
4. Développer un état d'esprit malveillant
Il y a quelques années, un spécialiste de la sécurité expliquait comment devenir un meilleur défenseur en pensant comme un adversaire. L'histoire s'accompagnait d'échanges maladroits (et humoristiques). Il est entré dans une chambre d'hôtel avec sa famille pendant ses vacances, a vu le distributeur de savon non sécurisé installé dans le mur de la douche et a dit à haute voix : "Wow, ce serait si facile de remplacer le shampoing par du Nair ! (produit d'épilation)" Sa famille était horrifiée.
Soyons clairs : nous ne préconisons pas que vous remplaciez le shampoing par du Nair, ou tout autre produit anti-capillaire. Et le concept de penser comme un agresseur n'est pas nouveau. Il y a huit ans, lorsqu'on a demandé à Lance Cottrell ce qui faisait un bon professionnel de la cybersécurité, il a répondu qu'il se mettait "à la place de l'attaquant et regardait le réseau comme l'ennemi le regarderait, puis réfléchissait à la manière de le protéger".
La meilleure façon d'y parvenir aujourd'hui est de se familiariser avec le cadre ATTACK de MITRE. Il devient rapidement le modèle de référence pour structurer le développement d'un processus d'investigation et comprendre où (et comment) vous pouvez appliquer la détection et l'investigation. Vous pouvez vous familiariser avec ce cadre avant d'entreprendre des lectures approfondies, puis y revenir de temps en temps si nécessaire.
5. Soyez intrépide
Ne laissez pas votre manque de connaissances vous arrêter. Il existe des organisations prêtes à investir dans des personnes ayant les bonnes caractéristiques et le désir d'apprendre. Postulez pour le poste, même si vous ne pensez pas être qualifié. Vous recevrez peut-être un refus. Et alors ? Essayez à nouveau dans une autre entreprise. Ou essayez à nouveau dans cette même entreprise plus tard. La lecture ne vous mènera pas loin... c'est en appliquant vos connaissances que vous passerez au niveau supérieur. Et devinez quoi, vous vous souvenez de la technique de Feynman ? Oui, en enseignant aux autres les connaissances que vous avez acquises, vous passerez au niveau supérieur.
Bonne chance, bonne chasse ! Enfin... à ceux qui disent "une formation en informatique et des compétences techniques approfondies vous aideront à trouver un emploi dans la sécurité", nous répondons : "Nous sommes d'accord !" Et à ceux qui disent que "les rôles dans la sécurité peuvent être larges et que vous pouvez les utiliser pour développer une expertise technique au fil du temps", nous répondons : "Nous sommes également d'accord !"
Ce que nous ne croyons pas, c'est de dire à des gens que nous ne connaissons pas qu'ils ne peuvent pas faire quelque chose sans comprendre leur situation unique. Il peut y avoir des chemins qui sont généralement plus faciles, ou généralement plus difficiles. Mais supposer que vous ne pouvez pas faire quelque chose est un vent contraire dont vous n'avez pas besoin. Nous espérons que vous avez trouvé ici des conseils qui vous donneront l'impulsion nécessaire pour envisager un emploi de sécurité de premier échelon (ou plus) et que vous postulerez. À cette fin, nous vous souhaitons... bonne chance !
6. Un diplôme universitaire est-il nécessaire pour faire carrière dans la cybersécurité ?
La réponse est courte : pas nécessairement. "Notre industrie a été inaugurée par des personnes sans diplôme universitaire", affirme Josh Feinblum. Travaillez dur pour vous impliquer dans la communauté, contribuez à des projets open source, essayez de parler de recherches cool lors de conférences - ce sont toutes des choses que les pionniers originaux ont faites et qui peuvent offrir des opportunités aux personnes intelligentes et travailleuses d'entrer dans l'industrie.
7. Prérequis en matière de cybersécurité
Comme dans tout domaine technologique, il est utile de commencer par acquérir les bases de la programmation. "Être capable de comprendre un langage de programmation vous donnera un bon départ dans la cybersécurité", déclare Kristen Kozinski. Vous n'avez pas besoin d'être un expert, mais être capable de lire et de comprendre un langage est une bonne compétence à avoir. Il ne s'agit pas d'un prérequis indispensable en matière de cybersécurité, mais c'est définitivement agréable à avoir.
8. Déterminez ce que vous voulez apprendre.
Le domaine de la cybersécurité est très vaste et comporte de nombreuses spécialités, qui changent et évoluent en permanence. La première étape de votre apprentissage autonome de la cybersécurité consiste à définir les domaines sur lesquels vous souhaitez vous concentrer et de vous faire une bonne image mentale de l'ensemble. Vous avez la possibilité de changer d'avis plus tard ou de pivoter, il est essentiel de savoir quel domaine vous intéresse. Demandez-vous si vous voulez vous concentrer sur la programmation, les tests de pénétration, la sécurité des réseaux, la criminalistique ou un autre domaine. En décidant maintenant, vous pourrez déterminer la meilleure voie à suivre.
9. Puis-je apprendre gratuitement ?
Il existe de nombreuses ressources gratuites disponibles en ligne et dans les bibliothèques locales, qui peuvent fournir une grande quantité d'informations sur la cybersécurité. À un moment donné dans tout parcours d'apprentissage, il sera probablement nécessaire d'investir dans des connaissances supplémentaires. Cependant, si vous souhaitez vous entrainer sans avoir à payer des serveurs, nous pouvons vous conseiller différents sites gratuits.
Root-Me: Root-Me est un site qui vous permettra de vous entrainer dans divers domaines, et ce de façon entièrement gratuite. Il vous suffit de créer un compte et de démarrer un challenge !
HackTheBox: HackTheBox est un site qui vous met à disposition des "box". Il s'agit d'ordinateurs sur lesquels vous pourrez vous entrainer, afin d'obtenir un accès admin. Attention, ce site propose avant tout des box plus difficiles, on le recommande donc peu si vous débutez!
TryHackMe: TryHackMe est un site similaire à HackTheBox, cependant celui-ci est plus adéquat pour des débutants, et en plus il contient plusieurs excellents petits "cours"!
10. Parler anglais
Bien qu'il existe de nombreuses ressources en français, il en existe encore plus en anglais. Quand vous rencontrerez un problème, vous trouverez d'avantage de résultats et de réponses en anglais. De plus, vous aurez bien plus d'opportunité d'emploi si vous parlez anglais. En clair, pour faire de la sécurité, il est plus que recommandé de parler anglais, ou d'apprendre l'anglais.
11. Linux et les VM
Une machine virtuelle ou VM est un environnement entièrement virtualisé qui fonctionne sur une machine physique. Elle exécute son propre système d’exploitation (OS) et bénéficie des mêmes équipement qu’une machine physique : CPU, mémoire RAM, disque dur et carte réseau. Plusieurs machines virtuelles avec des OS différents peuvent coexister sur le même serveur physique : Linux, MacOS, Windows… Ce qui est important, c'est Linux! Si vous ne connaissez pas, nous vous conseillons vivement de rechercher comment créer une VM Linux et comment utiliser Linux. Il s'agit d'un puissant outil, mais il peut paraître compliqué quand vous débutez. Pas besoin de s'inquiéter : vous y arriverez vite !
12. Ressources
Il est important d'apprendre en utilisant de bonnes bases, pour cela nous vous avons fait une liste de ressources intéressantes !
Sources
Définition
Compilation d'outils et de commandes intéressantes, vous trouverez des informations sur toutes les principales failles.
Outil de scan de machine, comme nmap
Collection d'exploits visant à escalader ses privilèges
Collection d'exploits visant à escalader ses privilèges
🇬🇧 Bypassing Cloudflare WAF with the origin server IP address | Detectify Blog
This is a guest blog post from Detectify Crowdsource hacker, Gwendal Le Coguic. This is a tutorial on how to bypass Cloudflare WAF with the origin server IP address.
Detectify collaborates with trusted ethical hackers to crowdsource vulnerability research that powers our cutting-edge web application security scanner. The Crowdsource community of hackers help us keep our ears to the ground in the security community to bring us details on active exploits in the wild.
Cloudflare is a widely used web app firewall (WAF) provider. But what if you could bypass all these protections in a second making the defense useless? This article is a tutorial on bypassing Cloudflare WAF with the origin server IP address.
Note that what is following is probably relevant for any kind of Web Application Firewall.
Intro
With more than , Cloudflare is now one of the most popular web application firewalls (WAF). A year ago Cloudflare released a fast DNS resolver, which became the proverbial cherry on top of their service offering. Working as a reverse proxy, the WAF does not only offer a protection against DDOS but can also trigger an alert when it detects an attack. For paid subscriptions, users have the option to turn on protection against common vulnerabilities such as SQLi, XSS and CSRF, yet this must be manually enabled. This option is not available for free accounts.
While the WAF is pretty good at blocking basic payloads, many bypasses around Cloudflare WAF already exist and new ones pop up everyday so it’s important to keep poking at testing the security of Cloudflare. At the exact moment I am writing this article:
As a hacker bug bounty hunter, it’s obvious that it could be very interesting to get rid of the firewall. For that, you basically have 3 options:
Customize your payloads in order to bypass the rules in place. It can be interesting to improve your skills about firewall bypass but it can be a tedious and time-consuming task, which is not something you can afford when you’re a bug hunter – time is prime! If you’re up for this option, you better try crazy payloads listed in or search on Twitter.
Alter the requests in a proper way to disrupt the server. And as the same as first option, it can be time-consuming, requires patience and good fuzzing skills. wrote a nice presentation which could help to create such requests by .
In this in this article, I’m going to focus on the last option and how to achieve it based on tips grabbed here and there.
Reminder: Cloudflare is a tool that has to be set by humans, usually developers or system administrators. Cloudflare is not responsible of the misconfiguration that could lead to successful attacks performed using the methods described below.
But first, Recon!
The idea is to start your normal recon process and grab as many IP addresses as you can (host, nslookup, whois, …), then check which of those servers have a web server enabled (netcat, nmap, masscan). Once you have a list of web server IP, the next step is to check if the protected domain is configured on one of them as a . If not, you’ll get the default server page or the default website configured. If yes then you found the entry point! Using Burp:
This show the subdomain I’m looking for but with the wrong IP address:
This shows the wrong subdomain, but with a good IP address:
This shows the subdomain I’m looking for, but with a good IP address – perfect!
Some tools available to automate this process:
Censys
If your target has a SSL certificate (and it should!), then it’s registered in the database (I strongly recommend to subscribe). Choose “Certificates” in the select input, provide the domain of your target, then hit.
You should see a list of certificates that fit to your target:
Click on every result to display the details and, in the “Explore” menu at the very right, choose “IPv4 Hosts”:
You should be able to see the IP addresses of the servers that use the certificate:
From here, grab all IP you can and, back to the previous chapter, try to access your target through all of them.
The next step is to retrieve the headers in the mails issued by your target: Subscribe the newsletter, create an account, use the function “forgotten password”, order something… in a nutshell do whatever you can to get an email from the website you’re testing (note that Burp Collaborator can be used).
Once you get an email, check the source, and especially the headers. Record all IPs you can find there, as well as subdomains, that could possibly belong to a hosting service. And again, try to access your target through all of them.
The value of header Return-Path worked pretty well for me:
Test using Curl:
Another trick is to send a mail from your own mailbox to a non-existing email address @yourtarget.com. If the delivery fails, you should receive back a notification. Thanks to .
XML-RPC Pingback
This well known tool in WordPress, the XML-RPC (Remote Procedure Call), allows an administrator to manage his/her blog remotely using XML requests. A pingback is the response of a ping. A ping is performed when a site A links to a site B, then the site B notifies the site A that it is aware of the mention. This is the pingback.
You can easily check if it’s enable by calling https://www.target.com/xmlrpc.php. You should get the following:XML-RPC server accepts POST requests only.
According to , the functions takes 2 parameters sourceUri and targetUri. Here is how it looks like in Burp Suite:
Credit to .
Previous findings
If you’re not able to find the origin IP using the previous methods or if the website was not protected when you first started your hunt but finally became protected, remember that sometimes your best friend is your target itself and it can give you the information you are looking for.
Basically what you need is that the web server of your target performs a request to your server/collaborator. Using another type of issue could also be a good idea: SSRF, XXE, XSS or whatever you already found, to inject a payload that contains your server/collaborator address and check the logs. If you got any hit then check the virtual host again.
Even the simplest vulnerabilities like Open Redirect or HTML/CSS injection can be useful if it’s interpreted by the application web server.
For now we have seen how to find and check IP addresses manually, fortunately we have great developers in our community. Below are some tools that are supposed to do the job for you, and these could save your precious time. You can include them in your recon process as soon as you detect a Cloudflare protection.
Note, that none of these methods are 100% reliable as all targets are different and what will work for one, may not work for another. My advice: try them all.
Detectify collaborates with 150 handpicked white hat hackers like Gwendal Le Conguic to vulnerability research for our automated web application scanner. Check the security status of your websites using our test bed of 1500+ known vulnerabilities.
Get around Cloudflare by finding the origin IP of the web server. Probably the easiest option, no technical skills required, it’s also part of the recon process so no time wasted. As soon as you get it, you don’t have to worry anymore about the WAF or the DDOS protection (rate limit).
For a quick POC we recommend that you deploy a single node instance of Mangle using the OVA file that we have made available .
Using the OVA is a fast and easy way to create a Mangle VM on VMware vSphere.
After you have downloaded the OVA, log in to your vSphere environment and perform the following steps:
Start the Import Process
From the Actions pull-down menu for a datacenter, choose Deploy OVF Template.
Provide the location of the downloaded ova file.
Choose Next.
After the VM is boots up successfully, open the command window. Press Alt+F2 to log into the VM.
The default account credentials are:
Username: root
Password: vmware
Because of limitations within OVA support on vSphere, it was necessary to specify a default password for the OVA option. However, for security reasons, we would recommend that you modify the password after importing the appliance.
It takes a couple of minutes for the containers to run. Once the Mangle application and DB containers are running, the Mangle application should be available at the following URL:
You will be prompted to change the admin password to continue.
Default Mangle Username:
Password: admin
Export the VM as a Template (Optional)
Consider converting this imported VM into a template (from the Actions menu, choose Export ) so that you have a master Mangle instance that can be combined with vSphere Guest Customization to enable rapid provisioning of Mangle instances.
Now you can move on to the .
Deploying the Mangle Containers
Prerequisites
Before creating the Mangle container a Cassandra DB container should be made available on a Docker host. You can choose to deploy the DB and the Application container on the same Docker host or on different Docker hosts. However, we recommend that you use a separate Docker host for each of these. You can setup a Docker host by following the instructions .
To deploy Cassandra, you can either use the authentication enabled image tested and verified with Mangle available on the Mangle Docker repo or use the default public Cassandra image hosted on Dockerhub.
If you chose to use the Cassandra image from Mangle Docker Repo:
If you chose to use the Cassandra image from:
Deploying the Mangle application container
To deploy the Mangle container using a Cassandra DB deployed using the image from Mangle Docker repo or with DB authentication and ssl enabled, run the docker command below on the docker host after substituting the values in angle braces <> with actual values.
To deploy the Mangle container using a Cassandra DB deployed using the image from Dockerhub or with DB authentication and ssl disabled, run the docker command below on the docker host after substituting the values in angle braces <> with actual values.
The Mangle docker container takes two environmental variables
"DB_OPTIONS", which can take a list of java arguments identifying the properties of the database cluster
"CLUSTER_OPTIONS", which can take a list of java arguments identifying the properties of the Mangle application cluster
Although the docker run commands above lists only a few DB_OPTIONS and CLUSTER_OPTIONS parameters, Mangle supports a lot more for further customization.
Supported DB_OPTIONS
Supported CLUSTER_OPTIONS
Deploying the Mangle vCenter adapter container
Mangle vCenter Adapter is a fault injection adapter for injecting vCenter specific faults. All the vCenter operations from the Mangle application will be carried out through this adapter.
To deploy the vCenter adapter container run the docker command below on the docker host.
The API documentation for the vCenter Adapter can be found at:
https://::/mangle-vc-adapter/swagger-ui.html
The vCenter adapter requires authentication against any API calls. It supports only one user, admin with password admin. All the post APIs that are supported by the adapter will take the vCenter information as a request body.
Deploying Mangle on Kubernetes
All the relevant YAML files are available under the Mangle git repository under location 'mangle\mangle-support\kubernetes'
Create a namespace called 'mangle' under the K8s cluster.
kubectl --kubeconfig=create namespace mangle
Create Cassandra pod and service.
Multi Node Deployment
A multi-node setup for Mangle ensures availability in case of unexpected failures. We recommend that you use a 3 node Mangle setup.
Prerequisites
You need at least 4 docker hosts for setting up a multi node Mangle instance; 1 for the Cassandra DB and 3 for Mangle application containers . You can setup a docker host by following the instructions .
A multi node setup of Mangle is implemented using Hazelcast. Mangle multi node setup uses TCP connection to communicate with each other. The configuration of the setup is handled by providing the right arguments to the docker container run command, which identifies the cluster.
The docker container takes an environmental variable "CLUSTER_OPTIONS", which can take a list of java arguments identifying the properties of the cluster. Following are the different arguments that should be part of "CLUSTER_OPTIONS": clusterName - A unique string that identifies the cluster to which the current mangle app will be joining. If not provided, the Mangle app will by default use string "mangle" as the clusterName, and if this doesn't match the one already configured with the cluster, the node is trying to join to, container start fails. clusterValidationToken - A unique string which will act similar to a password for a member to get validated against the existing cluster. If the validation token doesn't match with the one that is being used by the cluster, the container will fail to start.
publicAddress - IP of the docker host on which the mangle application will be deployed. This is the IP that mangle will use to establish a connection with the other members that are already part of the cluster, and hence it is necessary to provide the host IP and make sure the docker host is discoverable from other nodes clusterMembers - This is an optional property that takes a comma-separated list of IP addresses that are part of the cluster. If not provided, Mangle will query DB and find the members of the cluster that is using the DB and will try connecting to that automatically. It is enough for mangle to connect to at least one member to become part of the cluster.
deploymentMode - Takes either CLUSTER/STANDALONE value. Deployment Mode parameter is mandatory for the multi-node deployment, with the value set to CLUSTER on every node that will be part of the cluster, where as for the single node deployment, this field can be ignored, which by default will be STANDALONE. If DB was used by one type of deployment setup, one needs to update this parameter to support the other type, either though the mangle or by directly going in to DB.
NOTE:
All the nodes (docker hosts) participating in the cluster should be synchronized with a single time server.
If a different mangle app uses the same clusterValidationToken, clusterName and DB of existing cluster, the node will automatically joins that existing cluster.
All the mangle app participating in the cluster should use the same cassandra DB.
The properties clusterValidationToken and publicAddress are mandatory for any mangle container spin up, if not provided container will fail to start.
Deploy a Cassandra DB container by referring to the section .
Deploy the Mangle cluster by bringing up the mangle container in each docker host.
For the first node in the cluster:
For the subsequent nodes in the cluster:
Deployment Mode and Quorum
Mangle implements quorum strategy to for supporting HA and to avoid any split brain scenarios when deployed as a cluster.
Mangle can be deployed in two different deployment modes
STANDALONE: quorum value is 1, cannot be updated to any other value
CLUSTER: min quorum value is 2, cannot be set to value lesser than ceil((n + 1)/2), n being number of nodes currently in the cluster
If a node is deployed initially in the STANDALONE mode, and user changes the deployment mode to CLUSTER, the quorum will automatically be updated to 2. When user keeps adding new nodes to the cluster, the quorum value updates depending on the number of nodes in the cluster. eg: when user adds new node to 3 node cluster(quorum=2) making it 4 nodes in the cluster, the quorum value is updated to 3. Determined by the formula, ceil((n + 1)/2)
If a node is deployed initially in the CLUSTER mode, and user changes the deployment mode to STANDALONE mode, all other nodes except for the Hazelcast master will shutdown. They will lose the connection with the existing node, and won't take any post calls, and will entries will be removed from the cluster table.
NOTE:
Active members list of the active quorum will be maintained in DB under the table cluster. Similarly, master instance entry will also be maintained in the db under the same table.
Actions triggered when Mangle loses quorum
All the schedules will be paused
No post calls can be made against mangle
Task that were triggered on any node will continue to be executed until Failed/Completed
Actions triggered when Mangle gets a quorum (from no quorum in any of the cluster member)
All the schedules that are in the scheduled state and all the schedules that were paused because of the quorum failure will be triggered
All the tasks that are in progress will be queue to executed after 5minutes of quorum created event (This is to avoid any simultaneous Execution)
Master (Oldest member in the cluster) will take care of adding the list of active members to the cluster table, and updating itself as master
Actions triggered when a Mangle instance joins one active cluster
Some of the schedules will be assigned to the new the node due to migration
Some of the tasks will assigned to the new node, and they will be queued for triggering after 5mins
Existing tasks that in-progress will continue to execute in the old node
Scenarios around quorum
Scenario 1: When a mangle instance in 3 node cluster, leaves a cluster due to network partition, and the quorum value is 2
Let us consider 3 instances a, b, c in the CLUSTER
a leaves the cluster due to network partition
a is not able to communicate with b, c
Scenario 2: When mangle instance in 2 node cluster leaves a cluster due to network partition, and the quorum value is 2
Let us consider 2 instances a, b in the CLUSTER
a leaves the cluster due to network partition, a cannot communicate with b and vice versa
two clusters are created with each having one node
Enter a name for the virtual machine and select a location for the virtual machine.
Choose Next.
Specify the compute resource
Select a cluster, host or resource pool where the virtual machine needs to be deployed.
Choose Next.
Review details
Choose Next.
Accept License Agreement
Read through the Mangle License Agreement, and then choose I accept all license agreements.
Choose Next.
Select Storage
Mangle is provisioned with a maximum disk size. By default, Mangle uses only the portion of disk space that it needs, usually much less that the entire disk size ( Thin client). If you want to pre-allocate the entire disk size (reserving it entirely for Mangle instead), select Thick instead.
Choose Next.
Select Network
Provide a static or dhcp IP for Mangle after choosing an appropriate destination network.
Choose Next.
Verify Deployment Settings and click Finish to start creating the virtual machine. Depending on bandwidth, this operation might take a while. When finished, vSphere powers up the Mangle VM based on your selections.
Pour créer un nouveau projet avec Hugo, propose un kit de démarrage en libre téléchargement. Que vous ayez déjà utilisé le générateur de site statique Hugo ou pas, ce kit est intéressant, car il propose une configuration complète et un workflow de développement moderne basé sur les outils de l’écosystème de npm. nous montre comment s’en servir pour créer votre premier site en moins de 30 minutes.
, le générateur de site statique écrit en Go, a pris la communauté de vitesse. Il présente tous les avantages d’un générateur de site statique — 100% flexible, sécurisé et rapide — mais il vole également la vedette quand on . Le site de est d’ailleurs développé avec Hugo.
-DcassandraContactPoints : IP Address of Cassandra DB (mandatory, default value is "localhost" and works only if the Mangle application and DB are on the same Docker host)-DcassandraClusterName : Cassandra cluster name (mandatory, value should be the one passed during cassandra db creation as an environmental variable CASSANDRA_CLUSTER_NAME)-DcassandraKeyspaceName : Cassandra keyspace name (optional, default value is "mangledb" if you are using the Cassandra image file from Mangle Docker repo)-DcassandraPorts : Cassandra DB port used (optional, default value is "9042")-DcassandraSslEnabled : Cassandra DB ssl configuration (optional, default value is "false"...mandatory and should be set to true if ssl is enabled)-DcassandraUsername : Cassandra DB username (mandatory only if the Cassandra DB is created with authentication enabled)-DcassandraPassword : Cassandra DB password (mandatory only if the Cassandra DB is created with authentication enabled)-DcassandraSchemaAction : Cassandra DB schema action (optional, default value is "create_if_not_exists")-DcassandraConsistencyLevel : Cassandra DB Consistency level (optional, default value is "local-quorum")-DcassandraSerialConsistencyLevel : Cassandra DB serial consistency level (optional, default value is "local-serial")-DcassandraDCName : Cassandra DB DC name (optional, value should be the one passed during cassandra db creation as an environmental variable CASSANDRA_DC or if it is set a value other than "DC1")-DcassandraNoOfReplicas : Cassandra DB replicas numbers (optional, default value is "1"...mandatory only if multiple nodes are available in the DB cluster)
-DpublicAddress : IP address of the mangle node (mandatory)-DclusterValidationToken : Any string token name for mangle cluster (mandatory and should be kept in mind if more nodes need to be added to the cluster.)-DclusterName : Any string cluster name for mangle (optional, default value is "mangle")-DclusterMembers : Members in the mangle cluster (optional)
Nous allons voir comment configurer Hugo sur votre ordinateur, comment installer et personnaliser un thème, en ajoutant nos propres fichiers CSS et JavaScript.
Quelle différence avec le guide de démarrage rapide de la documentation d’Hugo ? Nous allons utiliser notre kit de démarrage régulièrement mis à jour qui ajoute un workflow de développement moderne à Hugo.
Vous bénéficiez ainsi automatiquement d’une structure de départ pour Hugo. Dans notre kit, elle est stockée dans le dossier hugo. À l’intérieur se trouvent divers dossiers qui abritent le contenu de votre site, les gabarits de page et les fichiers CSS, JS, images, etc. L’arborescence de la structure de base ressemble à ceci — j’ai laissé quelques fichiers et dossiers de côté de façon à ce que ce soit plus clair :
Pour démarrer le projet, ouvrez une fenêtre de terminal et positionnez-vous dans le dossier qui contient la structure de départ (hugo-boilerplate par défaut) :
cd chemin/vers/hugo-boilerplate/
Installez ensuite toutes les dépendances du projet en lançant :
npm install
Pour lancer le serveur de développement et ouvrir le site dans votre navigateur, lancez simplement :
npm start
2. Configurer votre site
Nous allons commencer par ajouter de nouveaux contenus au site. Pour ce faire, nous allons devoir mettre à jour le contenu présent dans le dossier hugo/content.
Mettre à jour un article
Commencer par mettre à jour l’exemple d’article fourni dans notre structure de départ. Ouvrez le fichier hugo/content/posts/example.md dans votre éditeur de texte. Il est composé d’un en-tête front matter avec un champ titre et d’un texte d’exemple au format markdown.
e>
Cet article n’a pas de date ! Essayez d’en définir une en ajoutant l’entrée suivante dans l’en-tête Front Matter de l’article:
date: "YYYY-MM-DDTHH:MM:SS-00:00"
RemplacezYYYY-MM-DDTHH:MM:SS-00:00 avec une date valide, comme… 2018-01-01T12:42:00-00:00. Si votre date se situe dans le futur, Hugo ne générera pas cet article en production.
Sauvegardez vos changements puis affichez l’article mis à jour dans votre navigateur à l’adresse http://localhost:3000/. La date affichée devant le titre de l’article devrait avoir été mise à jour.
Créer un nouvel article
Maintenant essayons de créer un nouvel article. Nous utiliserons pour cela la commande fournie avec Hugo pour générer un nouvel article. Dans notre projet, Hugo est déclaré comme une dépendance NPM, nous pouvons donc l’utiliser avec la commande :
npm run hugo -- --
Créez votre premier article en lançant :
npm run hugo -- new posts/mon-premier-article.md
Cela va créer un nouvel article au format markdown dans hugo/content/posts/mon-premier-article.md. Ouvrez ce fichier dans votre éditeur de texte favori.
Ce fichier comporte un en-tête Front Matter (des métadonnées structurées relatives à la page) dont on peut tirer parti dans les gabarits de page. Sous le front matter, nous pouvons ajouter du contenu au format markdown :
Ajoutez par exemple le contenu suivant dans le fichier et sauvegardez vos changements :
Pour le moment votre nouveau site n’est pas très beau. Remédions à cela en ajoutant un thème issu de la galerie de thèmes de Hugo, développé par un des meilleurs contributeurs de la communauté.
Le thème Casper de @vjeantet
Nous allons utiliser le thème Casper de @vjeantet. Pour ce faire nous allons ajouter le thème dans le dossier hugo/themes, plus exactement dans le dossier hugo/themes/hugo-theme-casper/.
Clonez ou téléchargez le thème et décompressez l’archive dans hugo/themes/hugo-theme-casper/.
Ensuite, mettez à jour la configuration du site aves les options de configuration spécifiques au thème.
Ouvrez le fichier hugo/config.toml dans votre éditeur de texte favori et remplacer son contenu par celui-ci :
Reportez-vous à la documentation du thème pour prendre connaissance de toutes les options de configuration disponibles.
Pour finir, supprimez les exemples de gabarits de page fournis avec notre modèle de départ. Pour cela lancez la commande :
Regardez maintenant dans votre navigateur et vérifiez que votre site a bien été mis à jour !
3. Personnaliser votre site
Maintenant que nous avons mis en place un site fonctionnel avec un thème, vous avez probablement envie de le personnaliser.
Nous allons commencer par éditer les paramètres du site dans le fichier hugo/config.toml. Mettez à jour les valeurs suivantes comme bon vous semble :
title = "Hugo Boilerplate"
description = "Bien démarrer avec Hugo
metadescription = "Utilisé dans la balise meta 'description' pour l’accueil et les pages d’index, faute de quoi c'est l’entrée 'description' du front matter de la page qui sera utilisé"
author = "VOTRE_NOM"
Le thème Casper avec du contenu et les styles par défaut
Le thème Casper avec du contenu et les styles par défaut
Bien, ajoutons maintenant une image de fond pour la bannière d’en-tête. Dans le fichier hugo/config.toml, vous trouverez une section [params]. Modifiez le paramètre cover pour qu’il ait la valeur /img/darius-soodmand-116253.jpg, sauvegardez vos changements.
Ajout d’une image de fond
Retournons maintenant voir notre site dans le navigateur. C’est déjà mieux, mais il y a encore du travail.
4. Personnaliser votre thème
Maintenant que vous avez adapté le site pour le personnaliser en peu, nous allons nous attarder sur l’aspect le plus puissant d’Hugo et de ce kit de démarrage: un templating simple et puissant.
Nous venons d’ajouter le thème Casper au site, ce qui permet à Hugo d’utiliser tous les gabarits HTML présents dans le dossier hugo/themes/hugo-theme-casper/layouts/ lors de la génération du site.
Nous allons maintenant étendre le thème grâce à l’héritage de gabarits d’Hugo.
Tous les fichiers de gabarits présents dans le dossier hugo/layouts/ surchargeront n’importe quel gabarit du même nom présent dans le répertoire des gabarits du thème, nous permettant ainsi de personnaliser notre site sans toucher au thème d’origine.
CSS & Javascript personnalisé
À côté d’Hugo, ce kit de démarrage fourni un serveur de développement qui va post-traiter automatiquement les fichiers CSS et JS pour le navigateur. Tous les fichiers CSS, JS, images présents dans le dossier src/ seront traités automatiquement et déplacés dans le dossier hugo/static/.
Ajoutons-les à notre thème de manière à pouvoir le personnaliser comme nous voulons. Nous allons copier des fichiers de gabarits du thème et ajouter les fichiers CSS et JS personnalisés de notre kit dans ces gabarits.
Premièrement, nous allons copier le fichier partiel header.html du thème dans le dossier hugo/layouts/partials/ :
Ouvrez le fichier hugo/layouts/partials/header.html dans votre éditeur de texte et repérez les lignes suivantes :
Ajoutez en dessous la ligne suivante :
Ensuite, recopions le fichier partiel footer.html dans le dossier hugo/layouts/partials/ de manière à pouvoir ajouter notre fichier JS personnalisé :
Ouvrez maintenant le fichier hugo/layouts/partials/footer.html et repérez les lignes suivantes :
Ajoutez juste en dessous:
Maintenant tout notre code CSS et JS personnalisé sera utilisé sur le site.
Faisons un essai en augmentant la hauteur de l’en-tête principal. Ouvrez le fichier src/css/styles.css et ajoutez le code suivant à la fin du fichier :
Le résultat final
Le résultat final
Admirez le résultat final dans votre navigateur !
5. Prochaine étape
Vous êtes maintenant prêt·e à commencer à créer un site statique avec Hugo !
Vous pouvez continuer à utiliser le thème Casper ou repartir du début en utilisant les modèles du répertoire hugo/layouts/.
Les fichiers des modèles de gabarits de page se trouvent dans le dépôt de notre kit de démarrage si vous souhaitez repartir de zéro.
Pour en apprendre un peu plus sur Hugo, reportez-vous aux sections suivantes de la documentation officielle :
Nous verrons dans un prochain article comment configurer le versionnement avec Git pour faciliter l’intégration continue et le déploiement chez différents hébergeurs avec Forestry, un CMS pour les sites statiques générés avec Hugo ou Jekyll.
Apprendre des technologies pour savoir faire un peu de qualité
🗓️ Dernière maj le 14 octobre 2020
Le but de ce TP est de monter une pipeline de test dev maison. Le tp permet de vous apprendre certaine technologie, au menu :
First day
.
├── hugo/ // Le site Hugo, avec les fichiers de contenu, de données, statiques.
| ├── .forestry/ // rassemble les fichiers de configuration pour Forestry.io
| ├── content/ // Tout le contenu du site est stocké ici
| ├── data/ // Les fichiers de données du site au format TOML, YAML ou JSON
| ├── layouts/ // Vos modèles de page
| | ├── partials/ // Les fichiers partiels réutilisables de votre site
| | ├── shortcodes/ // Les fichiers shortcodes de votre site
| ├── static/ // Les fichiers statiques de votre site
| | ├── css/ // Les fichiers CSS compilés
| | ├── img/ // Les images du site.
| | ├── js/ // Les fichiers JS compilés
| | └── svg/ // Les fichiers SVG vont ici
| └── config.toml // Le fichier de configuration d’Hugo
└─── src/
├── css // Les fichiers source CSS/SCSS à compiler vers /css/
└── js // Les fichiers source JS à compiler vers /js/
---
title: "Mon Premier Article"
date: "2018-03-09T14:24:17-04:00"
draft: true
---
## Bienvenue
Pratique ce modèle de projet *Hugo*. j'espère que vous appréciez ce guide !
baseURL= "/"
languageCode= "fr"
title= "Hugo Boilerplate"
paginate = 5
copyright = "Tous droits réservés - 2018"
theme = "hugo-theme-casper"
disableKinds = ["taxonomy", "taxonomyTerm"]
[params]
description = "Bien démarrrer avec Hugo"
metadescription = "Utilisé dans la balise meta 'description' pour l’accueil et les pages d’index, faute de quoi c'est l’entrée 'description' du front matter de la page qui sera utilisé."
cover = ""
author = "VOTRE_NOM"
authorlocation = "Terre, Galaxie de la Voie Lactée"
authorwebsite = ""
authorbio= ""
logo = ""
hjsStyle = "default"
paginatedsections = ["posts"]
Le mieux pour effectuer ensuite des tests d'intégration et effectuer du déploiement facilement ça serait d'avoir une petite app API REST. Utilisez le langage/framework de votre choix pour coder une API simpliste (une ou deux entités, avec du GET/POST/DELETE simplement).
Une première pipeline
Dans l'interface de Gitlab, sur un dépôt donné, vous trouverez dans le volet de gauche un menu CI/CD, où vous verrez vos pipelines s'exécuter.
Afin de déclencher une pipeline, il faut un fichier .gitlab-ci.yml à la racine de votre dépôt git.
Exemple de structure :
Tester ce premier fichier .yml.
Linting de code
Créer une nouvelle pipeline qui met en place du linting. Pour ce faire :
trouver un binaire qui est capable de lint votre code (par exemple pylint pour Python)
utiliser une image Docker qui contient ce binaire
créer une pipeline qui mobilise cette image afin de tester votre code
Second day
Gitlab : Docker integration
Il est possible d'utiliser les pipelines de CI/CD pour construire et packager des images Docker. Ces images peuvent ensuite être utilisées à des fins de dév, ou poussées sur une infra de prod.
Gitlab embarque nativement un registre Docker (un registre permet d'héberger des images Docker, à l'instar du Docker Hub).
Lors du déroulement d'une pipeline, plusieurs variables d'environnement sont disponibles à l'intérieur du fichier .gitlab-ci.yml. On peut par exemple récupérer dynamiquement le nom de la branche qui est en train d'être poussée, l'ID de commit ou encore, l'adresse du registre Docker associé à l'instance Gitlab.
Pour tester tout ça, on va avoir besoin de deux fichiers :
un Dockerfile
décrit comment construire une image Docker
un .gitlab-ci.yml qui fait appel à des commandes docker pour construire et pousser les images sur le registre
Testez le build et push automatique de conteneur :
ajouter ces fichiers à un dépôt Gitlab
une fois le push effectué et la pipeline terminée, un nouvel onglet est disponible lorsque vous consultez le projet depuis la WebUI Packages & Registries > Container Registry
Pour pousser un peu plus, vous pouvez créer un Dockerfile vous-même qui package dans une image Docker votre code et le pousse sur le registry. Si vous avez Docker sur votre machine, vous pourrez ensuite directement récupérer les images avec un docker pull.
Sonarqube
Bon. Pour Sonarqube c'est compliqué d'utiliser l'instance publique gitlab.com et Sonarqube de concert si on a pas accès facilement à une IP publique pour tout le monde.
L'alternative : un docker-compose.yml qui monte ce qu'il faut pour reproduire un environnement de travail similaire à Gitlab. Vous pouvez le lancer dans une VM pour avoir cette stack en local et utiliser Sonarqube.
Le docker-compose.yml est clairement inspiré du TP infra et embarque :
Gitea
gère des dépôts gits
gestion de users/permissions
Drone
Pipeline de CI
Registre Docker
Sonarqube
Analyse de code
Steps :
installer Docker et docker-compose en suivant la documentation officielle
dans une VM Linux si vous pouvez
sur votre hôte c'est possible, je vous laisse gérer votre environnement :)
récupérer le et le placer dans un répertoire de travail
lancer la stack avec un docker-compose up -d
ajouter une ligne à votre fichiers hosts pour faire pointer le nom ci vers l'IP de la machine qui porte la stack
Les différents WebUI sont dispos sur des ports différents :
Gitea : http://ci:3000
Drone : http://ci
Sonarqube : http://ci:8080
Steps :
aller sur la WebUI de Gitea
onglet Explore
laisser les paramètres par défaut SAUF : n'oubliez pas la création d'un utilisateur admin (tout en bas)
vous authentifier pour vérifier le bon fonctionnement
créer un dépôt et y pousser du code
aller sur la WebUI de Sonarqube
se log avec admin:admin
aller dans les paramètre du compte My Account puis onglet Security
aller sur la WebUI de Drone
les credentials sont les mêmes que pour Gitea
déclencher une synchro avec Gitea
ajouter un .drone.yml à la racine de votre dépôt
git push tout ça
vous devriez voir votre code sur Gitea, testé dans Drone, analysé dans Sonarqube
Explorez une peu l'interface de Sonarqube une fois qu'il est en place, beaucoup de métriques intéressantes y remontent.
Drone est quant à lui un outil minimaliste mais puissant. Vous pouvez mettre en place une pipeline similaire à celle de Gitlab sous Drone.
Le « reverse » n’est pas une activité strictement informatique : on peut penser à la formule du Coca-Cola qui a été analysée au spectrographe de masse, aux capsules de café dites « compatibles », à la fabrication d’accessoires pour l’iPhone 5 (dont Apple n’a pas publié les spécifications), etc.
À la limite de l’informatique, il existe également une forte activité autour du « reverse » de cartes électroniques, de bitstreams FPGA, voire de composants électroniques. Cette activité existe depuis fort longtemps, par exemple dans le domaine de la télévision sur abonnement (Pay TV), mais elle devient de plus en plus présente dans les conférences de sécurité, à mesure que la sécurité descend dans les couches matérielles via des TPM et autres processeurs « ad-hoc ». Portes d’hôtel, bus automobiles, microcode des cartes Wi-Fi, téléphones par satellite, femtocells, routeurs et autres équipements embarqués deviennent des objets d’étude pour les « hackers ». À titre anecdotique, on peut par exemple citer le projet 3DBrew
Application Faults
For version 1.0, Mangle supported the following types of application faults:
CPU Fault
Memory Fault
From version 2.0, apart from the faults listed above, support has been extended to the following new faults:
qui compte « libérer » la console Nintendo 3DS en décapsulant le processeur Nintendo pour en extraire les clés privées par microscopie électronique.
Dans le domaine de la sécurité informatique, le « reverse » est souvent considéré comme le « Graal » des compétences, à la limite de la sorcellerie. Pénétrons donc dans le territoire des arts obscurs.
2. L’épine législative
La question récurrente liée à la pratique du « reverse » en France est légale : que risque-t-on à s’afficher publiquement « reverser » ? Le Malleus Maleficarum nous indique qu’il faut transpercer chaque grain de beauté du suspect à l’aide d’une aiguille : si la plaie ne saigne pas, nous sommes en présence d’un sorcier. Et je ne vous parle pas des techniques déployées par l’ANSSI …
« Je ne suis pas juriste », mais il me semble que la réponse à la question législative n’a aucune importance. Si vous êtes du côté lumineux de la Force – par exemple, que vous analysez des virus pour désinfecter un parc d’entreprise (voire que vous éditez un antivirus français) – ni l’auteur du virus, ni le procureur de la République ne vous inquiéteront pour ce fait.
Si par mégarde vous cheminez sur les sentiers obscurs du cracking et de keygening, vous passerez sous les fourches caudines de l’autorité publique pour un motif quelconque. N’oublions pas que dans la plus célèbre affaire judiciaire de « reverse » française – la société Tegam contre Guillermito – ce dernier a été condamné du fait qu’il n’avait pas acquis de licence pour le logiciel objet de son étude…
Le point juridique étant évacué, entrons désormais dans le vif du sujet.
3. « Reverse engineering » vs. « cracking »
Le vrai « reverse » est une discipline noble et exigeante. Elle consiste à comprendre entièrement un logiciel au point d’en produire une copie interopérable. Les exemples sont nombreux : projet Samba (dont la version 4 peut se substituer à un contrôleur de domaine Microsoft Active Directory), nombreux pilotes Linux et codecs, algorithme RC4 (republié en 1994 sous le nom de ARC4 pour « Alleged RC4 »), etc.
Il s’agit d’une activité très différente de la recherche et de l’exploitation de failles logicielles, ou du « déplombage » de logiciels commerciaux. Il est regrettable de recevoir de nombreux CV mentionnant la compétence « reverse engineering », alors que le candidat ne sait que suivre un flot d’exécution à la main dans son débogueur (technique dite du « F8 »), jusqu’à trouver l’instruction « JNZ » qui va contourner la quasi-totalité des systèmes de licence écrits « à la main ».
4. Bestiaire Monstrueux
Même en se limitant au logiciel informatique, la notion de « reverse » couvre un périmètre excessivement large : du code embarqué dans un microcontrôleur à une application Java, en passant par les « bonnes vieilles » applications en C.
Avant de traiter du cœur du sujet – à savoir les langages compilés (C/C++/Objective-C/…), feuilletons le reste du bestiaire que tout apprenti doit connaître.
4.1 Assembleur
Les applications les plus bas niveaux (BIOS, firmwares, systèmes d’exploitation, jeux pour consoles archaïques, applications MS-DOS, etc.) sont généralement largement écrites en assembleur. Dans ce cas, il n’y a guère d’alternatives : il est strictement nécessaire de connaître très finement l’architecture de la plateforme matérielle cible, ainsi que les instructions du processeur réservées aux opérations bas niveau (initialisation matérielle, etc.).
Ce cas est généralement réservé à des spécialistes et ne sera pas couvert dans la suite de l’article.
4.2 Bytecode
Plutôt que de livrer des applications compilées pour un processeur existant, certains environnements de développement compilent dans un langage intermédiaire de haut niveau, appelé « bytecode ». Un environnement d’exécution (la « machine virtuelle ») doit être fourni pour chaque plateforme matérielle sur laquelle doit s’exécuter ce langage intermédiaire.
Le lecteur éveillé pense immédiatement aux environnements Java et .NET, mais l’utilisation de « bytecode » est beaucoup plus répandue : on peut citer Flash ActionScript, Visual Basic 6 et son P-Code, les langages de script comme Python (fichiers PYC/PYO), mais aussi … les protections logicielles.
On peut disserter sans fin des avantages et des inconvénients d’un « bytecode » par rapport à du code « natif » d’un point de vue génie logiciel. Ce qui est sûr, c’est que la quasi-totalité des « bytecodes » qui n’ont pas été conçus dans une optique de protection logicielle se décompilent sans aucune difficulté sous forme de code source original. Je vous renvoie à vos outils favoris pour cette opération (JD-GUI pour Java, Reflector pour .NET, Uncompyle2 pour Python, etc.).
4.3 Cas des protections logicielles
La protection logicielle est au reverse engineering ce que la nécromancie est à la divination : ce sont deux écoles qui procèdent selon les mêmes principes, mais que tout oppose. Et tandis que tout le monde consulte son voyant, peu nombreux sont ceux qui admettent lever les morts.
Néanmoins, il ne faut pas se mentir : l’étude des protections logicielles constitue la meilleure école pour apprendre rapidement le reverse engineering. Sites de « crackmes », tutoriels, outils, tout est là pour qui veut brûler les étapes. Plus rapide, plus séduisant, mais pas plus puissant est le « cracking ». Seule la maîtrise de l’algorithmique et de la théorie de la compilation permettra d’atteindre la transcendance.
Les protections logicielles sont généralement mises en œuvre pour protéger la gestion des licences logicielles, d’où le caractère sulfureux de leur analyse. Il faut noter toutefois qu’il existe d’autres cas d’usage, comme par exemple :
La protection d’algorithmes contre l’analyse par des clients légitimes du logiciel (ex. Skype) ;
La protection de codes malveillants contre l’analyse par les éditeurs antivirus (ex. rootkit TDL-4) ;
La protection de « cracks » contre l’analyse par les éditeurs (ex. crack pour Windows Vista simulant un BIOS OEM [2]).
Ces derniers cas légitiment grandement l’activité de reverse engineering des protections logicielles. Vous pouvez donc poursuivre la lecture de cet article sans craindre pour votre âme.
Une « bonne » protection doit résister aussi bien à l’analyse statique qu’à l’analyse dynamique de la cible. L’objet de cet article introductif n’est pas d’énumérer toutes les techniques mises au point dans le jeu du chat et de la souris entre « crackers » et éditeurs de protection, mais il existe grosso modo deux grandes classes de protections logicielles utilisées actuellement :
Les protections externes (dites « packers »). Ces protections visent à « enrober » le logiciel original dans une couche de protection. Le logiciel est chiffré contre l’analyse statique. Il est déchiffré en mémoire à l’exécution, mais des protections anti-débogage et anti-dump permettent d’éviter une récupération trop facile du code.
Les protections internes (dites « obfuscateurs »). Le principe est de réécrire le code assembleur du logiciel afin de le rendre inintelligible aux Moldus. Plusieurs techniques ont été expérimentées : transformation du code assembleur en bytecode (vulnérable à un « class break » si la machine virtuelle est analysée), insertion de code mort ou complexe à évaluer statiquement, réécriture du graphe de contrôle (« code flattening »), etc. Il s’agit d’un domaine de recherche très actif, y compris dans le monde académique.
À titre anecdotique, les systèmes de contrôle de licence sont à classer dans plusieurs catégories :
Les protections matérielles (dongles) : très puissantes, mais assez rares aujourd’hui, sauf pour du logiciel très haut de gamme. Le principe consiste à déporter une partie des traitements dans un composant électronique (clé USB « intelligente ») supposé inviolable. Plus le traitement déporté est complexe, plus il sera difficile à comprendre en boîte noire. Un logiciel qui se contenterait de vérifier la présence du susdit dongle sans jamais s’en servir serait bien sûr condamné à finir sur Astalavista.
Numéro de série ou fichier de licence : la cryptographie moderne autorise des schémas théoriquement inviolables, si l’implémentation est correcte. Mais même un système inviolable peut être piraté… en remplaçant la clé publique de l’éditeur dans le binaire !
Activation en ligne : le logiciel vérifie qu’il dispose du droit de s’exécuter auprès d’un serveur tiers. Dans les cas les plus élaborés, une partie des traitements est effectuée en ligne – mais cette situation n’est pas toujours acceptable par le client.
5. Les Piliers du Temple
Entrons maintenant dans le vif du sujet : quelles sont les compétences requises pour s’attaquer à une application « native », compilée depuis un langage relativement courant (tel que le C) ?
De mon expérience, elles sont au nombre de quatre.
5.1 Connaître l’assembleur cible
Il n’est absolument pas nécessaire de connaître par cœur le manuel de référence du processeur ! À titre d’exemple, le jeu d’instructions des processeurs x86 et x64 contient une majorité d’instructions en virgule flottante, rarement rencontrées et dont la sémantique est impossible à mémoriser.
Par ailleurs, les compilateurs n’utilisent qu’un sous-ensemble réduit du jeu d’instructions, comme on le verra plus tard.
Il est par contre de bon ton de connaître les spécifiés du processeur cible. Sur architectures x86 et x64, ce sont par exemple la segmentation et les registres implicites. Sur architecture SPARC ce sont les registres glissants et les « delay slots » (qu’on retrouve également sur MIPS). Il existe des architectures encore plus exotiques telles que les processeurs VLIW (Very Long Instruction Word).
5.2 Savoir développer
N’oublions pas que le reverse engineering logiciel consiste à comprendre ce qu’a écrit le développeur d’origine. Il est donc fortement recommandé de savoir soi-même développer dans le langage cible…
Il est amusant de constater qu’il existe des modes dans les « design patterns ». Si le code Sendmail est truffé de constructions setjmp/longjmp/goto désormais obsolètes, le tout nouveau C++11 autorise bien d’autres acrobaties…
Par ailleurs, chaque développeur a ses lubies. Il ne s’agit donc pas de savoir programmer, mais d’avoir une idée de comment programment les autres… La lecture régulière de code issu de projets open source – ou la consultation de forums d’aide aux développeurs – permet de se faire une idée de l’extrême liberté que confère le code.
5.3 Connaissance du compilateur
N’oublions pas que le code assembleur n’est qu’une libre interprétation du code de haut niveau écrit par l’humain. Le compilateur a la charge de produire un code fonctionnellement identique, mais qui peut être structurellement très différent. Nous reviendrons plus tard sur les optimisations proposées par les compilateurs, mais si vous êtes du genre à encore penser que vous pouvez faire mieux qu’un compilateur moderne « à la main », arrêtez-vous et lisez immédiatement la formation de Rolf Rolles intitulée « Binary Literacy – Optimizations and OOP » [3].
La diversité des compilateurs s’est considérablement réduite ces derniers temps (il devient rare de rencontrer les compilateurs de Borland, Watcom ou Metrowerks). Les deux survivants sont GCC et Visual Studio – avec LLVM en challenger, et une mention spéciale pour le compilateur Intel (ICC), qui est capable de produire du code incroyablement optimisé – et donc totalement illisible.
Même s’il ne reste que deux compilateurs, il n’en reste pas moins que la liste des options de compilation proposées par GCC laisse rêveur [4]. Or, le niveau d’optimisation, les options finline*, funroll* ou fomit-frame-pointer vont avoir des effets considérables sur le code généré.
5.4 Reconnaissance de forme
C’est probablement la qualité essentielle du bon reverser. Après des milliers d’heures d’apprentissage, son cerveau reconnaît immédiatement toutes les structures « classiques », de la boucle « for »… à l’implémentation DES en boîte blanche.
Je ne prétends absolument pas jouer dans cette catégorie – c’est d’ailleurs pour cela qu’on ne m’a confié que l’introduction – mais je crois qu’il m’a été donné d’approcher des gens réellement hors du commun dans le domaine. Et je peux vous dire que c’est beau comme un concert de Rammstein.
Ce qui nous amène à la conclusion essentielle : seul un conditionnement du cerveau à l’âge où sa plastique est maximale permet de produire un reverser d’exception. Si les Chinois mettent en place des camps d’entraînement, on peut commencer à craindre pour notre propriété intellectuelle. Et si la sécurité informatique espère encore recruter dans 10 ans, il serait temps de mettre http://crackmes.de/ au programme du collège.
6. Another World
6.1 Analyse statique ou analyse dynamique ?
Les puristes vous diront que le vrai « reverser » ne fait que de l’analyse statique, c’est-à-dire de la lecture de code mort (éventuellement couplée à un peu d’exécution symbolique). Il est vrai que cette approche est parfois la seule envisageable, par exemple lorsque la plateforme matérielle n’est pas disponible ou débogable (ex. systèmes SCADA).
Néanmoins, je ne serai pas aussi intransigeant et je vous présenterai l’autre approche moins élégante, mais plus « quick win » : il s’agit de l’analyse dynamique.
En effet, l’observation du logiciel en cours d’exécution permet d’identifier rapidement ses fonctions essentielles en « boîte noire ». Des outils comme Process Monitor, APIMonitor ou WinAPIOverride32 s’avèrent indispensables.
6.2 Démarche pour l’analyse statique
Une démarche de reverse efficace ne commence pas bille en tête par la lecture du code assembleur. D’autres éléments plus facilement observables donnent rapidement des pistes essentielles.
Sections
Cela peut sembler une évidence, mais si votre cible contient 3 sections nommées UPX0, UPX1 et UPX2, vous gagnerez un temps précieux à utiliser la commande upx -d plutôt que d’exécuter pas-à-pas le programme depuis le point d’entrée [5]…
Il faut également prêter attention au développeur malicieux, qui utilise une version modifiée du logiciel UPX pour induire en erreur l’analyste. C’est pourquoi des outils d’identification (tels que PEiD) proposent de rechercher les signatures applicatives des « packers » les plus courants.
Imports/exports
La liste des fonctions importées – lorsqu’elle est disponible – permet rapidement de se faire une idée des parties essentielles du programme : cryptographie, génération d’aléa, accès au réseau, etc.
Dans l’hypothèse où l’application cible prend une « empreinte » de la plateforme matérielle pour générer un numéro d’installation unique par exemple, identifier les fonctions GetAdaptersAddresses() ou GetVolumeInformation() dans les imports donne des points d’entrée intéressants…
Constantes
La plupart des algorithmes reposent sur des constantes « bien connues » : la chaîne de caractères KGS!@#$% pour la génération des hashes LM, les constantes 0x67452301 0xEFCDAB89 0x98BADCFE 0x10325476 pour MD5, etc.
D’autre part, de nombreuses implémentations « optimisées » reposent également sur des tableaux pré-calculés : c’est le cas pour DES, tous les algorithmes de CRC, etc.
Enfin, la plupart des algorithmes disposent d’une structure identifiable (nombre de tours, ordre des décalages, etc.).
Chaînes de caractères
Les chaînes de caractères sont des constantes particulières. Il n’existe pas de méthode scientifique pour explorer les chaînes de caractères, mais l’œil humain repère rapidement les chaînes « intéressantes » : chaînes encodées en Base64 ou en ROT13, chaînes donnant des indications d’usage (comme User-Agent : Mozilla/4.0 ou BEGIN RSA PRIVATE KEY), copyrights, références au code source, messages de débogage, etc.
Bibliothèques et code open source
Force est de constater que les développeurs adorent la réutilisation de code, comme l’a encore démontré la récente faille dans libupnp. OpenSSL, Boost, ZLib et LibPNG font également partie des suspects habituels. La présentation d’Antony Desnos sur les applications Android laisse rêveur, sachant que certaines applications se composent à 95% de code publicitaire !
Il est donc strictement indispensable d’élaguer tout le code provenant des librairies standards fournies avec le compilateur, et tout le code issu des projets open source, avant de se concentrer sur la partie essentielle du code.
Il n’existe pas d’approche universelle dans le domaine, mais il existe au moins deux pistes intéressantes : la génération de signatures pour IDA avec l’outil FLAIR [6], et l’outil BinDiff [7]. Ce dernier étant basé sur la comparaison de graphes, il est indépendant du langage assembleur : il est donc théoriquement possible de compiler OpenSSL sur Linux/x86, puis d’identifier les fonctions correspondantes dans un binaire Android/ARM par exemple.
Il existe des projets visant à mutualiser l’échange de signatures entre « reversers », comme par exemple CrowdRE [8].
Métadonnées
Selon les technologies utilisées, le compilateur peut intégrer dans le binaire des métadonnées parfois très intéressantes : informations de débogage, données RTTI pour le C++ (voire à ce sujet l’article de Jean-Philippe LUYTEN dans MISC n°61), stubs des interfaces MS-RPC (cf. plugin mIDA), etc.
Traces et modes de débogage
De (trop) nombreux logiciels disposent de fonctions de journalisation qui peuvent être réactivées par une configuration spécifique (clé de base de registre, variable d’environnement, conjonction astrale, etc.). La sortie de cette journalisation peut s’effectuer dans un fichier texte, un fichier au format Windows ETL, un débogueur attaché au processus, etc.
Non seulement les chaînes de caractères associées à ces fonctions vont livrer des informations précieuses pour l’analyse statique (comme les types ou les noms des champs dans les structures de données), mais ces traces vont également considérablement accélérer l’analyse dynamique.
Je crois qu’on sous-estime grandement la valeur des versions « Checked Build » de Windows disponibles aux abonnés MSDN…
6.3 Théorie de la compilation
Passons en revue quelques techniques « classiques » d’optimisation qu’il est de bon ton de connaître.
Alimentation du « pipeline » et prédiction de branchement
Les processeurs modernes pratiquent la divination : ils exécutent des instructions au-delà de la valeur courante du pointeur d’instruction (exécution spéculative), dans l’ordre qui leur paraît le plus efficace (ré-ordonnancement). Cette optimisation est très efficace sur des instructions arithmétiques indépendantes - d’autant que le compilateur va entremêler les instructions (scheduling) et allouer les registres en conséquence - mais se heurte au problème des sauts conditionnels.
La majorité des sauts conditionnels étant corrélés à l’implémentation d’une boucle, le processeur applique l’heuristique suivante : les sauts en arrière sont généralement pris, tandis que les sauts en avant ne sont généralement pas pris. Si le processeur s’est trompé dans sa prédiction, il doit annuler le commencement d’exécution de toutes les instructions qui ne seront finalement pas exécutées, ce qui est très coûteux.
Le compilateur connaît cette heuristique, ce qui lui permet d’optimiser les boucles et les tests conditionnels.
Sur architectures Intel x86 et x64, il est possible de contrôler la prédiction de branchement via des registres de configuration, voire d’enregistrer tous les branchements dans un buffer circulaire (Branch Trace Store) à des fins de profiling.
Sur architecture ARM, toutes les instructions sont conditionnelles, ce qui permet des optimisations intéressantes, comme la suppression des sauts conditionnels pour les assignations simples (de type opérateur ternaire).
Le Pentium Pro (architecture P6) a introduit l’instruction d’assignation conditionnelle CMOV, qui permet le même type d’optimisation. Il faut toutefois noter que le gain en performance n’est pas automatique, et que d’autres astuces (comme l’instruction SBB, qui prend en compte la valeur du « Carry Flag ») permettaient déjà des optimisations.
Le déroulement de boucle
La meilleure solution pour éviter le coût des sauts conditionnels… c’est de les supprimer purement et simplement !
Si le compilateur connaît à l’avance le nombre d’itérations dans une boucle, et que le code généré peut tenir entièrement dans une page de code (soit 4 Ko sur architectures x86/x64), alors le compilateur copie/colle le code de la boucle autant de fois que nécessaire.
Cette construction est très courante dans les séquences d’initialisation d’algorithmes cryptographiques. Le code généré semble anormalement long de prime abord, mais s’analyse très rapidement.
L’alignement
Par conception des microcircuits, il est beaucoup plus efficace de travailler à la taille native des mots du processeur. Par exemple, une implémentation naïve de memcpy() pourrait être :
for (i=0 ; i < len ; i++) dst[i] = src[i] ;
Aucune librairie C ne propose une implémentation aussi médiocre : travailler octet par octet sur un bus de 32 bits, c’est diviser par 4 la performance. Une meilleure implémentation de memcpy() serait la suivante :
En amont, s’assurer que dst et src sont alloués à des adresses multiples de 4. Si les deux tableaux sont alignés sur 4 Ko et occupent donc un nombre minimal de pages en mémoire, c’est encore mieux.
Copier len / 4 mots de 32 bits.
Copier les len % 4 octets restants.
C’est en substance l’implémentation qu’on trouve dans la librairie C de Windows XP (MSVCRT.DLL).
Bien entendu, des algorithmes plus complexes s’optimisent encore mieux. Je vous invite par exemple à consulter l’implémentation de la fonction strlen() dans la librairie C du projet GNU (mais pas celle de BSD, qui est naïve).
Si vous êtes sensible à la beauté du code, voici l’implémentation réelle de strlen() sur Mac OS 10.7 (64 bits), telle que représentée par l’outil otool :
_strlen:
pxor %xmm0,%xmm0
movl %edi,%ecx
movq %rdi,%rdx
andq $0xf0,%rdi
orl $0xff,%eax
pcmpeqb (%rdi),%xmm0
andl $0x0f,%ecx
shll %cl,%eax
pmovmskb %xmm0,%ecx
andl %eax,%ecx
je 0x000a250b
00000000000a2501:
bsfl %ecx,%eax
subq %rdx,%rdi
addq %rdi,%rax
ret
00000000000a250b:
pxor %xmm0,%xmm0
addq $0x10,%rdi
00000000000a2513:
movdqa (%rdi),%xmm1
addq $0x10,%rdi
pcmpeqb %xmm0,%xmm1
pmovmskb %xmm1,%ecx
testl %ecx,%ecx
je 0x000a2513
subq $0x10,%rdi
jmp 0x000a2501
« Inlining »
Comme les sauts conditionnels, l’appel de fonction est une opération excessivement coûteuse, surtout si la destination ne se trouve pas dans la même page de code.
On notera au passage que le noyau Windows – ainsi que le logiciel Chrome [9] – font l’objet d’une optimisation post-compilation, qui consiste à regrouper le code le plus souvent exécuté dans quelques pages mémoire, plutôt que de le répartir dans tout le binaire (optimisation dite « OMAP » [10]). Il est même optimal d’aligner le code sur la taille des lignes du cache d’instruction, soit 16 octets sur architectures x86 et x64.
Afin de limiter les appels de fonction, le compilateur peut décider d’inclure le code de la sous-routine directement sur son lieu d’appel, comme dans les exemples ci-dessous.
strcpy()
strcmp()
Notez l’utilisation des instructions SCAS/MOVS/CMPS associées au préfixe REP, plutôt qu’une construction de boucle beaucoup moins performante.
Les instructions interdites
Certaines instructions sont peu ou pas utilisées par les compilateurs. Il s’agit d’une optimisation liée au temps d’exécution de ces instructions. Par exemple, l’instruction LOOP nécessite 6 cycles d’horloge en cas de branchement sur processeur 80486. La séquence DEC ECX / JNZ xxx ne nécessite que 1 + 3 cycles pour la même opération.
A contrario, l’instruction LEA est couramment utilisée pour effectuer des additions entre constantes et registres, alors que ça n’est pas sa fonction première.
La situation se complique encore, car le nombre de cycles par instruction est très variable d’un processeur à l’autre. C’est pourquoi en fonction du processeur cible que vous spécifierez au compilateur Intel ICC, vous obtiendrez un code sensiblement différent…
Multiplication et division
La multiplication et la division par une puissance de 2 s’implémentent par un simple décalage de bits : ce sont des opérations simples. Les mêmes opérations avec des opérandes arbitraires sont des opérations excessivement coûteuses. À titre d’exemple, voici les durées d’exécution (en nombre de cycles d’horloge) de quelques instructions sur un processeur 80486 :
Opération
Opérande
Cycles
Multiplication
IMUL <reg32>
12 à 42
MUL <reg32>
13 à 42
Division
DIV <reg32>
40
Pour multiplier X par 12, le compilateur va donc découper l’opération de la manière suivante : (X*8) + (X*4).
Pour diviser un nombre X sur 32 bits par 17, le compilateur peut être tenté d’utiliser la multiplication réciproque.
Selon l’algorithme d’Euclide étendu, l’inverse de 17 modulo 2^32 est 4042322161. Il suffit donc de multiplier X par ce nombre (modulo 2^32) pour obtenir le résultat de la division.
6.4 Pratique de la décompilation
La compilation en langage assembleur provoque la perte d’informations essentielles, telles que le type de données. La décompilation (retour au code source d’origine) s’avère donc être un problème difficile. Ce domaine a stimulé de nombreux travaux universitaires, qui sont pour la plupart restés du niveau de la « preuve de concept ».
Loin du Latex et autres CiteSeer, un maître du reverse engineering - auteur du logiciel IDA Pro – s’est un jour attaqué au problème. Combinant l’abondante théorie sur le sujet avec sa pratique de la chose et de nombreuses heuristiques par compilateur, il fabriqua par un matin blême la Pierre Philosophale de la décompilation : Hex-Rays Decompiler [11].
Aujourd’hui, cet outil intégré à IDA Pro décompile de manière tout à fait correcte les assembleurs x86 et ARM, supporte l’enrichissement manuel du listing, mais permet également le débogage au niveau du code source reconstitué. Il justifie donc largement son coût d’acquisition, relativement modique pour une entreprise.
CPU fault enables spiking cpu usage values for a selected application within a specified endpoint by a percentage specified by the user. Mangle uses a modified Byteman agent to simulate this fault and supports only Java based applications at present. With the help of a timeout field the duration for the fault run can be specified after which Mangle triggers the automatic remediation procedure which includes a cleanup of the Byteman agent from the target endpoint.
This fault therefore takes additional arguments to identify the application under test.
Steps to follow:
Login as a user with read and write privileges to Mangle.
Navigate to Fault Execution tab ---> Application Faults ---> CPU.
Select an Endpoint.
If the Endpoint is of type Kubernetes:
Provide additional K8s arguments such as Container Name, Pod Labels and the Random Injection flag.
If the Endpoint is of type Docker:
Provide additional Docker argument such as Container Name.
Provide a "CPU Load" value. For eg: 80 to simulate a CPU usage of 80% on the selected application.
Provide "Injection Home Dir" only if you would like Mangle to push the script files needed to simulate the fault to a specific location on the endpoint. Else the default temp location will be used.
Provide a "Timeout" value in milliseconds. For eg: if you need the CPU load of 80% to be sustained for a duration of 1 hour then you should provide the timeout value as 3600000 (1 hour = 3600000 ms). After this duration, Mangle will ensure remediation of the fault without any manual intervention.
Provide additional JVM properties such as Java Home, JVM Process, Free Port and Logon User. For eg: If the application under test is a VMware application then the JRE for the application resides in a specific location so for Java Home enter string /usr/java/jre-vmware/bin/java. The JVM Process can be either the process id of the application or the JVM descriptor name. In cases where you schedule, application faults, it is preferable to specify the JVM descriptor name. The Free Port is for the Byteman agent to talk to the application, so provide one that is not in use. The Logon User should be a user who has permissions to access and run the application under test. If it is root specify that else specify the appropriate user id.
Schedule options are required only if the fault needs to be re-executed at regular intervals against an endpoint.
Tags are key value pairs that will be send to the active monitoring tool under Mangle Admin settings ---> Metric Providers at the time of publishing events for fault injection and remediation. They are not mandatory.
Click on Run Fault.
The user will be re-directed to the Processed Requests section under Requests & Reports tab.
If Mangle was able to successfully trigger the fault, the status of the task will change to "COMPLETED". The fault will continue to run at the endpoint until the timeout expires or a remediation request is triggered. The option to trigger a remediation request at anytime can be found on clicking the button against the task in the Processed Requests table.
For monitoring purposes, log into either Wavefront or Datadog once it is configured as an active Metric provider in Mangle and refer to the Events section. Events similar to the screenshots provided below will be available on the monitoring tool for tracking purposes.
Memory Fault
Memory fault enables spiking memory usage values for a selected endpoint by a percentage specified by the user. With the help of a timeout field the duration for the fault run can be specified after which Mangle triggers the automatic remediation procedure.
Steps to follow:
Login as a user with read and write privileges to Mangle.
Navigate to Fault Execution tab ---> Application Faults ---> Memory.
Select an Endpoint.
If the Endpoint is of type Kubernetes:
Provide additional K8s arguments such as Container Name, Pod Labels and the Random Injection flag.
If the Endpoint is of type Docker:
Provide additional Docker argument such as Container Name.
Provide a "Memory Load" value. For eg: 80 to simulate a Memory usage of 80% on the selected Endpoint.
Provide "Injection Home Dir" only if you would like Mangle to push the script files needed to simulate the fault to a specific location on the endpoint. Else the default temp location will be used.
Provide a "Timeout" value in milliseconds. For eg: if you need the Memory load of 80% to be sustained for a duration of 1 hour then you should provide the timeout value as 3600000 (1 hour = 3600000 ms). After this duration, Mangle will ensure remediation of the fault without any manual intervention.
Provide additional JVM properties such as Java Home, JVM Process, Free Port and Logon User. For eg: If the application under test is a VMware application then the JRE for the application resides in a specific location so for Java Home enter string /usr/java/jre-vmware/bin/java. The JVM Process can be either the process id of the application or the JVM descriptor name. In cases where you schedule, application faults, it is preferable to specify the JVM descriptor name. The Free Port is for the Byteman agent to talk to the application, so provide one that is not in use. The Logon User should be a user who has permissions to access and run the application under test. If it is root specify that else specify the appropriate user id.
Schedule options are required only if the fault needs to be re-executed at regular intervals against an endpoint.
Tags are key value pairs that will be send to the active monitoring tool under Mangle Admin settings ---> Metric Providers at the time of publishing events for fault injection and remediation. They are not mandatory.
Click on Run Fault.
The user will be re-directed to the Processed Requests section under Requests & Reports tab.
If Mangle was able to successfully trigger the fault, the status of the task will change to "COMPLETED". The fault will continue to run at the endpoint until the timeout expires or a remediation request is triggered. The option to trigger a remediation request at anytime can be found on clicking the button against the task in the Processed Requests table.
For monitoring purposes, log into either Wavefront or Datadog once it is configured as an active Metric provider in Mangle and refer to the Events section. Events similar to the screenshots provided below will be available on the monitoring tool for tracking purposes.
File Handler Leak Fault
File Handler Leak fault enables you to simulate conditions where a program requests for a handle to a resource but does not release it when the resource is no longer in use. This condition if left over extended periods of time, will lead to "Too many open file handles" errors and will cause performance degradation or crashes. With the help of a timeout field the duration for the fault run can be specified after which Mangle triggers the automatic remediation procedure.
Steps to follow:
Login as a user with read and write privileges to Mangle.
Navigate to Fault Execution tab ---> Application Faults ---> Memory.
Select an Endpoint.
If the Endpoint is of type Kubernetes:
Provide additional K8s arguments such as Container Name, Pod Labels and the Random Injection flag.
If the Endpoint is of type Docker:
Provide additional Docker argument such as Container Name.
Provide "Injection Home Dir" only if you would like Mangle to push the script files needed to simulate the fault to a specific location on the endpoint. Else the default temp location will be used.
Provide a "Timeout" value in milliseconds. For eg: if you need the File Handler leak to be sustained for a duration of 1 hour then you should provide the timeout value as 3600000 (1 hour = 3600000 ms). After this duration, Mangle will ensure remediation of the fault without any manual intervention.
Provide additional JVM properties such as Java Home, JVM Process, Free Port and Logon User. For eg: If the application under test is a VMware application then the JRE for the application resides in a specific location so for Java Home enter string /usr/java/jre-vmware/bin/java. The JVM Process can be either the process id of the application or the JVM descriptor name. In cases where you schedule, application faults, it is preferable to specify the JVM descriptor name. The Free Port is for the Byteman agent to talk to the application, so provide one that is not in use. The Logon User should be a user who has permissions to access and run the application under test. If it is root specify that else specify the appropriate user id.
Schedule options are required only if the fault needs to be re-executed at regular intervals against an endpoint.
Tags are key value pairs that will be send to the active monitoring tool under Mangle Admin settings ---> Metric Providers at the time of publishing events for fault injection and remediation. They are not mandatory.
Click on Run Fault.
The user will be re-directed to the Processed Requests section under Requests & Reports tab.
If Mangle was able to successfully trigger the fault, the status of the task will change to "COMPLETED". The fault will continue to run at the endpoint until the timeout expires or a remediation request is triggered. The option to trigger a remediation request at anytime can be found on clicking the button against the task in the Processed Requests table.
For monitoring purposes, log into either Wavefront or Datadog once it is configured as an active Metric provider in Mangle and refer to the Events section. Events similar to the screenshots provided below will be available on the monitoring tool for tracking purposes.
Thread Leak Fault
Thread Leak fault enables you to simulate conditions where an open thread is not closed. This condition if left over extended periods of time, leads to too many open threads thus creating thread leaks and out of memory issues. Usually a thread dump is required to troubleshoot such issues. With the help of a timeout field the duration for the fault run can be specified after which Mangle triggers the automatic remediation procedure.
Steps to follow:
Login as a user with read and write privileges to Mangle.
Provide additional K8s arguments such as Container Name, Pod Labels and the Random Injection flag.
If the Endpoint is of type Docker:
Provide additional Docker argument such as Container Name.
Set of Out of Memory required flag to true if you want the thread leak to eventually result in OOM errors.
Provide "Injection Home Dir" only if you would like Mangle to push the script files needed to simulate the fault to a specific location on the endpoint. Else the default temp location will be used.
Provide a "Timeout" value in milliseconds. For eg: if you need the Thread leak to be sustained for a duration of 1 hour then you should provide the timeout value as 3600000 (1 hour = 3600000 ms). After this duration, Mangle will ensure remediation of the fault without any manual intervention.
Provide additional JVM properties such as Java Home, JVM Process, Free Port and Logon User. For eg: If the application under test is a VMware application then the JRE for the application resides in a specific location so for Java Home enter string /usr/java/jre-vmware/bin/java. The JVM Process can be either the process id of the application or the JVM descriptor name. In cases where you schedule, application faults, it is preferable to specify the JVM descriptor name. The Free Port is for the Byteman agent to talk to the application, so provide one that is not in use. The Logon User should be a user who has permissions to access and run the application under test. If it is root specify that else specify the appropriate user id.
Schedule options are required only if the fault needs to be re-executed at regular intervals against an endpoint.
Tags are key value pairs that will be send to the active monitoring tool under Mangle Admin settings ---> Metric Providers at the time of publishing events for fault injection and remediation. They are not mandatory.
Click on Run Fault.
The user will be re-directed to the Processed Requests section under Requests & Reports tab.
If Mangle was able to successfully trigger the fault, the status of the task will change to "COMPLETED". The fault will continue to run at the endpoint until the timeout expires or a remediation request is triggered. The option to trigger a remediation request at anytime can be found on clicking the button against the task in the Processed Requests table.
For monitoring purposes, log into either Wavefront or Datadog once it is configured as an active Metric provider in Mangle and refer to the Events section. Events similar to the screenshots provided below will be available on the monitoring tool for tracking purposes.
Java Method Latency Fault
Java Method Latency Fault helps you simulate a condition where calls to a specific Java method can be delayed by a specific time. Please note that you would have to be familiar with the application code; Java classes and methods in order to simulate this fault.
Steps to follow:
Login as a user with read and write privileges to Mangle.
Provide additional K8s arguments such as Container Name, Pod Labels and the Random Injection flag.
If the Endpoint is of type Docker:
Provide additional Docker argument such as Container Name.
Provide "Injection Home Dir" only if you would like Mangle to push the script files needed to simulate the fault to a specific location on the endpoint. Else the default temp location will be used.
Provide "Latency" value in milliseconds so that Mangle can delay calls to the method by that time.
Provide "Class Name" as PluginController if the class of interest is defined as public class PluginController {...}.
Provide "Method Name" as getPlugins if the method to be tested is defined as follows:
Provide "Rule Event" as "AT ENTRY" OR "AT EXIT" to specify if the fault has to be introduced in the beginning or at the end of the method call.
Provide additional JVM properties such as Java Home, JVM Process, Free Port and Logon User. For eg: If the application under test is a VMware application then the JRE for the application resides in a specific location so for Java Home enter string /usr/java/jre-vmware/bin/java. The JVM Process can be either the process id of the application or the JVM descriptor name. In cases where you schedule, application faults, it is preferable to specify the JVM descriptor name. The Free Port is for the Byteman agent to talk to the application, so provide one that is not in use. The Logon User should be a user who has permissions to access and run the application under test. If it is root specify that else specify the appropriate user id.
Schedule options are required only if the fault needs to be re-executed at regular intervals against an endpoint.
Tags are key value pairs that will be send to the active monitoring tool under Mangle Admin settings ---> Metric Providers at the time of publishing events for fault injection and remediation. They are not mandatory.
Click on Run Fault.
The user will be re-directed to the Processed Requests section under Requests & Reports tab.
If Mangle was able to successfully trigger the fault, the status of the task will change to "COMPLETED". The fault will continue to run at the endpoint until the timeout expires or a remediation request is triggered. The option to trigger a remediation request at anytime can be found on clicking the button against the task in the Processed Requests table.
For monitoring purposes, log into either Wavefront or Datadog once it is configured as an active Metric provider in Mangle and refer to the Events section. Events similar to the screenshots provided below will be available on the monitoring tool for tracking purposes.
Spring Service Latency Fault
Spring Service Latency Fault helps you simulate a condition where calls to a specific API can be delayed by a specific time. Please note that you would have to be familiar with the REST application URLs and calls in order to simulate this fault.
Steps to follow:
Login as a user with read and write privileges to Mangle.
Navigate to Fault Execution tab ---> Application Faults ---> Spring Service Latency.
Select an Endpoint.
If the Endpoint is of type Kubernetes:
Provide additional K8s arguments such as Container Name, Pod Labels and the Random Injection flag.
If the Endpoint is of type Docker:
Provide additional Docker argument such as Container Name.
Provide "Injection Home Dir" only if you would like Mangle to push the script files needed to simulate the fault to a specific location on the endpoint. Else the default temp location will be used.
Provide "Latency" value in milliseconds so that Mangle can delay calls to the method by that time.
Provide "Service URI" as /rest/api/v1/plugin if the REST URL of interest is as follows https://xxx.vmware.com/mangle-services/rest/api/v1/plugins.
Provide "Http Method" as GET, POST, PUT, PATCH or DELETE as applicable.
Provide additional JVM properties such as Java Home, JVM Process, Free Port and Logon User. For eg: If the application under test is a VMware application then the JRE for the application resides in a specific location so for Java Home enter string /usr/java/jre-vmware/bin/java. The JVM Process can be either the process id of the application or the JVM descriptor name. In cases where you schedule, application faults, it is preferable to specify the JVM descriptor name. The Free Port is for the Byteman agent to talk to the application, so provide one that is not in use. The Logon User should be a user who has permissions to access and run the application under test. If it is root specify that else specify the appropriate user id.
Schedule options are required only if the fault needs to be re-executed at regular intervals against an endpoint.
Tags are key value pairs that will be send to the active monitoring tool under Mangle Admin settings ---> Metric Providers at the time of publishing events for fault injection and remediation. They are not mandatory.
Click on Run Fault.
The user will be re-directed to the Processed Requests section under Requests & Reports tab.
If Mangle was able to successfully trigger the fault, the status of the task will change to "COMPLETED". The fault will continue to run at the endpoint until the timeout expires or a remediation request is triggered. The option to trigger a remediation request at anytime can be found on clicking the button against the task in the Processed Requests table.
For monitoring purposes, log into either Wavefront or Datadog once it is configured as an active Metric provider in Mangle and refer to the Events section. Events similar to the screenshots provided below will be available on the monitoring tool for tracking purposes.
Spring Service Exception Fault
Spring Service Exception Fault helps you simulate a condition where calls to a specific API can be simulated to throw an exception. Please note that you would have to be familiar with the REST application URLs and calls; application code, classes, methods and exceptions in order to simulate this fault.
Steps to follow:
Login as a user with read and write privileges to Mangle.
Navigate to Fault Execution tab ---> Application Faults ---> Spring Service Exception.
Select an Endpoint.
If the Endpoint is of type Kubernetes:
Provide additional K8s arguments such as Container Name, Pod Labels and the Random Injection flag.
If the Endpoint is of type Docker:
Provide additional Docker argument such as Container Name.
Provide "Injection Home Dir" only if you would like Mangle to push the script files needed to simulate the fault to a specific location on the endpoint. Else the default temp location will be used.
Provide "Service URI" as /rest/api/v1/plugin if the REST URL of interest is as follows https://xxx.vmware.com/mangle-services/rest/api/v1/plugins.
Provide "Http Method" as GET, POST, PUT, PATCH or DELETE as applicable.
Provide "Exception Class" as for eg: java.lang.NullPointerException if you want a null pointer exception to be thrown.
Provide "Exception Message" as any sample message for testing purposes.
Provide additional JVM properties such as Java Home, JVM Process, Free Port and Logon User. For eg: If the application under test is a VMware application then the JRE for the application resides in a specific location so for Java Home enter string /usr/java/jre-vmware/bin/java. The JVM Process can be either the process id of the application or the JVM descriptor name. In cases where you schedule, application faults, it is preferable to specify the JVM descriptor name. The Free Port is for the Byteman agent to talk to the application, so provide one that is not in use. The Logon User should be a user who has permissions to access and run the application under test. If it is root specify that else specify the appropriate user id.
Schedule options are required only if the fault needs to be re-executed at regular intervals against an endpoint.
Tags are key value pairs that will be send to the active monitoring tool under Mangle Admin settings ---> Metric Providers at the time of publishing events for fault injection and remediation. They are not mandatory.
Click on Run Fault.
The user will be re-directed to the Processed Requests section under Requests & Reports tab.
If Mangle was able to successfully trigger the fault, the status of the task will change to "COMPLETED". The fault will continue to run at the endpoint until the timeout expires or a remediation request is triggered. The option to trigger a remediation request at anytime can be found on clicking the button against the task in the Processed Requests table.
For monitoring purposes, log into either Wavefront or Datadog once it is configured as an active Metric provider in Mangle and refer to the Events section. Events similar to the screenshots provided below will be available on the monitoring tool for tracking purposes.
Simulate Java Exception
Java Method Exception Fault helps you simulate a condition where calls to a specific Java method can result in exceptions. Please note that you would have to be familiar with the application code; Java classes, methods and exceptions in order to simulate this fault.
Steps to follow:
Login as a user with read and write privileges to Mangle.
Provide additional K8s arguments such as Container Name, Pod Labels and the Random Injection flag.
If the Endpoint is of type Docker:
Provide additional Docker argument such as Container Name.
Provide "Injection Home Dir" only if you would like Mangle to push the script files needed to simulate the fault to a specific location on the endpoint. Else the default temp location will be used.
Provide "Latency" value in milliseconds so that Mangle can delay calls to the method by that time.
Provide "Class Name" as PluginController if the class of interest is defined as public class PluginController {...}.
Provide "Method Name" as getPlugins if the method to be tested is defined as follows:
Provide "Rule Event" as "AT ENTRY" OR "AT EXIT" to specify if the fault has to be introduced in the beginning or at the end of the method call.
Provide "Exception Class" as for eg: java.lang.NullPointerException if you want a null pointer exception to be thrown.
Provide "Exception Message" as any sample message for testing purposes.
Provide additional JVM properties such as Java Home, JVM Process, Free Port and Logon User. For eg: If the application under test is a VMware application then the JRE for the application resides in a specific location so for Java Home enter string /usr/java/jre-vmware/bin/java. The JVM Process can be either the process id of the application or the JVM descriptor name. In cases where you schedule, application faults, it is preferable to specify the JVM descriptor name. The Free Port is for the Byteman agent to talk to the application, so provide one that is not in use. The Logon User should be a user who has permissions to access and run the application under test. If it is root specify that else specify the appropriate user id.
Schedule options are required only if the fault needs to be re-executed at regular intervals against an endpoint.
Tags are key value pairs that will be send to the active monitoring tool under Mangle Admin settings ---> Metric Providers at the time of publishing events for fault injection and remediation. They are not mandatory.
Click on Run Fault.
The user will be re-directed to the Processed Requests section under Requests & Reports tab.
If Mangle was able to successfully trigger the fault, the status of the task will change to "COMPLETED". The fault will continue to run at the endpoint until the timeout expires or a remediation request is triggered. The option to trigger a remediation request at anytime can be found on clicking the button against the task in the Processed Requests table.
For monitoring purposes, log into either Wavefront or Datadog once it is configured as an active Metric provider in Mangle and refer to the Events section. Events similar to the screenshots provided below will be available on the monitoring tool for tracking purposes.
Kill JVM Fault
Kill JVM Fault helps you simulate a condition where JVM crashes with specific exit codes when calls to a specific Java method are done. Please note that you would have to be familiar with the application code; Java classes, methods and exceptions in order to simulate this fault.
Steps to follow:
Login as a user with read and write privileges to Mangle.
Provide additional K8s arguments such as Container Name, Pod Labels and the Random Injection flag.
If the Endpoint is of type Docker:
Provide additional Docker argument such as Container Name.
Provide "Injection Home Dir" only if you would like Mangle to push the script files needed to simulate the fault to a specific location on the endpoint. Else the default temp location will be used.
Provide "Latency" value in milliseconds so that Mangle can delay calls to the method by that time.
Provide "Class Name" as PluginController if the class of interest is defined as public class PluginController {...}.
Provide "Method Name" as getPlugins if the method to be tested is defined as follows:
Provide "Rule Event" as "AT ENTRY" OR "AT EXIT" to specify if the fault has to be introduced in the beginning or at the end of the method call.
Select an appropriate "Exit Code" from the drop down menu.
Provide additional JVM properties such as Java Home, JVM Process, Free Port and Logon User. For eg: If the application under test is a VMware application then the JRE for the application resides in a specific location so for Java Home enter string /usr/java/jre-vmware/bin/java. The JVM Process can be either the process id of the application or the JVM descriptor name. In cases where you schedule, application faults, it is preferable to specify the JVM descriptor name. The Free Port is for the Byteman agent to talk to the application, so provide one that is not in use. The Logon User should be a user who has permissions to access and run the application under test. If it is root specify that else specify the appropriate user id.
Schedule options are required only if the fault needs to be re-executed at regular intervals against an endpoint.
Tags are key value pairs that will be send to the active monitoring tool under Mangle Admin settings ---> Metric Providers at the time of publishing events for fault injection and remediation. They are not mandatory.
Click on Run Fault.
The user will be re-directed to the Processed Requests section under Requests & Reports tab.
If Mangle was able to successfully trigger the fault, the status of the task will change to "COMPLETED". The fault will continue to run at the endpoint until the timeout expires or a remediation request is triggered. The option to trigger a remediation request at anytime can be found on clicking the button against the task in the Processed Requests table.
For monitoring purposes, log into either Wavefront or Datadog once it is configured as an active Metric provider in Mangle and refer to the Events section. Events similar to the screenshots provided below will be available on the monitoring tool for tracking purposes.
Relevant API Reference
For access to relevant API Swagger documentation:
Please traverse to link -----> API Documentation from the Mangle UI or access https:///mangle-services/swagger-ui.html#/fault-injection-controller
🇬🇧 Deno Introduction with Practical Examples
Key Takeaways
Deno is a JavaScript runtime built with security in mind.
Deno provides many helper functions to streamline frequent operations.
Deno supports non-transpiled TypeScript
Deno strives to address some challenges with Node.js
It’s incredibly easy to create web servers and manage files with Deno
What is Deno?
Deno is a simple, modern, and secure runtime for JavaScript and TypeScript applications built with the Chromium V8 JavaScript engine and Rust, created to .
Deno was originally announced in 2018 and reached 1.0 in 2020, created by the original Node.js founder Ryan Dahl and other .
The name DE-NO may seem odd until you realize that it is simply the interchange of NO-DE. The Deno runtime:
Adopts security by default. Unless explicitly allowed, Deno disallows file, network, or environment access.
Includes TypeScript support out-of-the-box.
Supports.
Get Deno
The easiest way to install Deno is to use the deno_install scripts. You can do this on Linux or macOS with:
curl -fsSL https://deno.land/x/install/install.sh | sh
Windows users can leverage :
choco install deno
A successful install with Linux looks like this:
Note: You may also need to .
There are .
Hands-on Deno
Simple Example
Deno uses .js and .ts file extensions (though it will run any JavaScript or TypeScript file regardless of extension). Our first example demonstrates how we can safely write a browser-based Deno application, a simple JavaScript program that prints the current date and time.
// date_time.js
console.log(new Date());
Let’s run the code:
deno run date_time.js
Results:
2020-07-10T02:20:31.298Z
Example 2: Accessing the Command-line Arguments
With Deno, we can log command-line arguments with just one line of code:
// first_argument.js
console.log(Deno.args[0]);
Running Deno Programs
The run command runs any Deno code. And if you’re stuck, run deno --help, or deno -h, to get help using denocommands.
Deno also provides a way to run programs from a local file, a URL, or by integrating with other applications in the stdin by using "-" (without quotes).
Running code from filename:
deno run date_time.js
Running code from a URL is nearly identical:
deno run https://example.com/date_time.js
Read code from stdin:
echo "console.log('Hello Deno')" | deno run
Deno Script Arguments
Deno provides the args property from the Deno namespace (Deno.args) for accessing script arguments, this property returns an array containing the passed arguments at runtime.
A simple example below outputs the argument for a program with Deno.args.
// args.js
console.log(Deno.args, Deno.args.length);
Note: In Deno, anything passed after the script name will be passed as an argument and not consumed as a Deno runtime flag.
Creating a Web Server With Deno
Putting simplicity and security into consideration, Deno ships with some browser-related APIs which allows you to create a web server with little or no difference from a client-side JavaScript application, with APIs including fetch(), and WebAssembly.
You can create a web server in Deno by importing the http module from the . Although there are already many libraries out there, the Deno system has also provided a straightforward way to accomplish this.
First Web Server Example
Follow these steps to create a simple web server with Deno:
Create a file, for example, server.js.
Run the code from the terminal.
deno run --allow-net server.js
Open your favorite browser and visit
In this example, --allow-net provides network access permission to our program, otherwise Deno will throw a PermissionDenied error. This example:
Imports a module from the HTTP remote package.
Uses serve() method to create the server that listens on port 5000.
Loops through a promise to send the string "Deno server created\n" whenever any request is made to port 5000.
Another Web Server Example: HTML
To create an HTML web server in Deno, we will first have our HTML files that will be served whenever a user visits the server. To do this, follow the steps below:
Create a folder for your project, for example, deno_server.
Navigate to the folder from your terminal:
cd deno_server
Create a file name index.html, and paste the following code into it:
Create a file named server.js and paste the following code into it:
Go to your terminal and run the code:
deno run --allow_net --allow_read server.js
Note: Because the code reads the index.html file and also performs a network operation, --allow-net and --allow-read are required for the code to run successfully.
This example:
Stores the hostname in a variable
Stores the port in a variable
Creates a loop that waits for a request from the client (e.g, user’s browser), reads a file from the server, and then sends the HTML file in response.
TypeScript in Deno?
Deno supports both JavaScript and TypeScript as its first-class languages, allowing you to leverage TypeScript source code directly in your Deno program without needing to first transpile to JavaScript.
A quick example of a TypeScript program in Deno:
Deno Package Management
Package management has been one of the factors for Node.js popularity, however this has also been a major bottleneck to its code instability and vulnerabilities. Node.js also predates JavaScript having a standard module format by several years. Instead of providing a standard package management system like npm, Deno instead recommends using standard ES module imports for loading URL modules. When URL modules are imported for the first time, Deno downloads and caches the module and its dependencies for later use. This also means Deno does not provide global CommonJS module functions like require() which exist in Node.js.
Example of Importing a URL Module in Deno
This example:
Imports parseDate(), parseDateTime() methods from thefrom URL
Downloads the module and saves it in a cache directory, if not already cached, as specified by the DENO_DIR, or the default system's cache directory if DENO_DIR is not specified.
Handling Files With Deno
The Deno FileSystem allows you to perform operating system tasks on files. Like other server programming languages and runtime, Deno also has quite a to read, write, append and remove files. Let's look at a few filesystem examples below.
Reading from a File in Deno
The Deno namespace provides the open() method for reading files.
Let's create a file, sample.ts, and paste the following code:
First let's run the code without the --allow-read flag to see how Deno behaves by default:
deno run sample.ts
This example throws a PermissionDenied error because we wanted to read a file without requesting permission, so let's re-run the example with the correct file access:
deno run --allow-read sample.ts
Writing to a File in Deno
The Deno.writeFile() method provides asynchronous methods for file writing. Let's explore with an example:
Run the Deno file writing example with the --allow-write flag.
Let's read the sample1.txt file to confirm the write, the Deno namespace also provides readTextFile which can be easily used to read text files:
Formatting Code
Unlike Node.js which uses formatter libraries like , Deno includes an automatic formatter with the deno fmt command.
To format all JS/TS files in the current directory including nested directories
deno fmt
To format specific files
deno fmt sample.txt sample1.txt
To format strings from the stdin
cat sample.ts | deno fmt -
To check the file format status
deno fmt --check
To check the format status of some files, space-separated
deno fmt --check sample.js sample.ts
To ignore formatting a section or block of code, precede the code section with // deno-fmt-ignore comment. For example:
To ignore formatting for an entire file, add // deno-fmt-ignore-file to the top of the file:
Comparisons With Node.js
Deno and Node.js have several key similarities and differences:
Conclusion
Deno is still a very new environment with many promising features around security, speed, distribution, and language support. However, due to its infancy, Deno is not yet widely used or recommended for critical production applications. . Deno is open-source software available under the MIT license. Contributions are encouraged via theand should follow the.
Congratulations on your practical introduction to using Deno. Here are few more resources to become familiar with Deno:
— By Ryan Donovan
— By Michael Yuan
— By Diogo Souza
Please share any questions or feedback in the comments.
About the Author
Erisan Olasheni is a Full-stack software engineer, freelancer, and a creative thinker who loves writing programming tutorials and tech tips. CTO at siit.co.
if (StringUtils.hasLength(pluginId)) {
return new ResponseEntity<>(pluginService.getExtensions(pluginId, extensionType), HttpStatus.OK);
}
return new ResponseEntity<>(pluginService.getExtensions(), HttpStatus.OK);
}
if (StringUtils.hasLength(pluginId)) {
return new ResponseEntity<>(pluginService.getExtensions(pluginId, extensionType), HttpStatus.OK);
}
return new ResponseEntity<>(pluginService.getExtensions(), HttpStatus.OK);
}
if (StringUtils.hasLength(pluginId)) {
return new ResponseEntity<>(pluginService.getExtensions(pluginId, extensionType), HttpStatus.OK);
}
return new ResponseEntity<>(pluginService.getExtensions(), HttpStatus.OK);
}
Includes built-in unit testing and code formatting (deno fmt).
Is compatible with browser JavaScript APIs: Programs authored in JavaScript without the Deno namespace and its internal features should work in all modern browsers.
Provides a one-file executable bundler through deno bundle command which lets you share your code for others to run without installing Deno.
Restricts access to a file, network, and environment access.
IDIV <reg32>
43
Décalage
SHL <reg>, <imm8>
2
Addition
ADD <reg>, <reg>
1
🇬🇧 fabionoth/awesome-cyber-security
A collection of awesome software, libraries, documents, books, resources and cool stuff about security.
Inspired by and .
Thanks to all , you're awesome and wouldn't be possible without you! The goal is to build a categorized community-driven collection of very well-known resources.
import { serve } from "https://deno.land/std/http/server.ts";
const server = serve({ port: 5000 });
console.log('Listening to port 5000 on http://localhost:5000');
for await (const server_request of server) {
server_request.respond({ body: "Deno server created\n" });
}
My First Deno Web page
My First Deno Web page
import { serve } from "https://deno.land/std/http/server.ts";
const server = serve({ port: 5000 });
for await (const server_request of server) {
const _file = await Deno.readFile('./index.html');
const decoder = new TextDecoder()
server_request.respond({ body: decoder.decode(_file) });
}
// imports the Deno standard datetime module
import { parseDate, parseDateTime } from 'https://deno.land/std/datetime/mod.ts'
parseDate("20-01-2019", "dd-mm-yyyy") // output : new Date(2019, 0, 20)
parseDate("2019-01-20", "yyyy-mm-dd") // output : new Date(2019, 0, 20)
// open() asynchronously returns the Uint8Array buffer of the file.
const file = await Deno.open('./sample.txt');
// TextDecoder decodes the Uint8Array to unicode text
const decoder = new TextDecoder('utf-8');
// text is decoded and saved.
const text = decoder.decode(await Deno.readAll(file));
console.log(text);
//create a text encoder that encodes utf8 string to Uint8Array
const encoder = new TextEncoder();
// encodes your utf8 text
const data = encoder.encode("Writing to file in Deno is simple!\n");
// asynchronously write to file
// creates or overwrites a file
await Deno.writeFile("./sample1.txt", data);
// set permissions on new file
await Deno.writeFile("./sample3.txt", data, {mode: 0o777});
// append the data to the file
await Deno.writeFile("./sample4.txt", data, {append: true});
// check if the file exists, if not, do nothing
await Deno.writeFile("./sample2.txt", data, {create: false});
// Read the file to see if it truly writes.
console.log(await Deno.readTextFile('./sample1.txt'));
// deno-fmt-ignore-file
const arrs = ["I", "will", "be", "left","unformatted"
];
const rand = Math.ceil(Math.random() * arrs.length) - 1;
// display a random element
console.log(arrs[rand]);
CERT and alerts
Link
Description
(Latest News) Computer emergency response Tean for the EU (Europe Union) institutions, bodies and agencies
(Alerts) US-CERT United States Computer Emergency Readiness Team
An ICS-CERT Alert is intended to provide timely notification to critical infrastructure owners and operators concerning threats or activity with the potential to impact critical infrastructure computing networks.
Certification
Link
Description
A Certified Ethical Hacker is a skilled professional who understands and knows how to look for weaknesses and vulnerabilities in target systems and uses the same knowledge and tools as a malicious hacker, but in a lawful and legitimate manner to assess the security posture of a target system(s). The CEH credential certifies individuals in the specific network security discipline of Ethical Hacking from a vendor-neutral perspective.
The Certified Information Systems Security Professional (CISSP) is an information security certification for security analysts.
CompTIA Security+ is a global certification that validates the baseline skills you need to perform core security functions and pursue an IT security career.
The GPEN certification is for security personnel whose job duties involve assessing target networks and systems to find security vulnerabilities. Certification objectives include penetration-testing methodologies, the legal issues surrounding penetration testing and how to properly conduct a penetration test as well as best practice technical and non-technical techniques specific to conduct a penetration test.
Penetration Testing with Kali (PWK) is a self-paced, online course that introduces students to the latest ethical hacking tools and techniques.
Organizations
Link
Description
CIS® (Center for Internet Security, Inc.) is a forward-thinking, non-profit entity that harnesses the power of a global IT community to safeguard private and public organizations against cyber threats.
CVE® is a list of entries—each containing an identification number, a description, and at least one public reference—for publicly known cybersecurity vulnerabilities.
Need Help unlocking your digital life without paying your attackers?
Open Web Application Security Project
(Alerts) Zero Day Iniciative
Informatives and blogs
Link
Description
Blog
Sans Industrial Control Systems blog
Security blog
Google Security Blog
Hacker blog
CTF, Training L3g@l and G@mes
Link
Description
MotherfuckingCTF inspired platform. But better.
CTF Praticing
Facebook Capture the Flag
Game of Hacker Experience
Brazilian Hackflag
Non-legal Cyber activism
Link
Description
List of sites attacked by unethical Hackers
WikiLeaks is a multi-national media organization and associated library.
IT Hacking list
Link
Description
Google Hackgin Database
Metasploit penetration testing software
AT Hacking list
Link
Description
Open ports in A.T
Default Password database of A.T
Courses and Guides Sites
Link
Description
Free and Open Source Cyber Security Learning
[PT-BR] Safe Development Guide
Website with guides and a Free Ethical Hacking Course
OS - Operation Systens
Link
Description
BackBox Linux is a penetration testing and security assessment oriented Linux distro..
BlackArch Linux is an Arch Linux-based penetration testing distribution for penetration testers and security researchers. The repository contains 1925 tools. You can install tools individually or in groups. BlackArch Linux is compatible with existing Arch installs.
Penetration Testing Destribution OS
Parrot Security Operating System is a Penetration Testing & Forensics Distro dedicated to Ethical Hackers & Cyber Security Professionals.
Qubes OS is a security-oriented operating system (OS). The OS is the software that runs all the other programs on a computer. Some examples of popular OSes are Microsoft Windows, Mac OS X, Android, and iOS. Qubes is free and open-source software (FOSS).
Tools
Link
Description
The FindBugs plugin for security audits of Java Web Applications.
Static Code Reviewer
A global web application vulnerability search engine.
Pentest Framework used by Kali Linux.
Nmap "Network Mapper" is a free and open source utility for network discovery and security auditing.
Introduction sur l'un des outils de cyber-sécurité le plus utiliser dans le pentest
Introduction à BurpSuite
Burp Suite est une suite d’outils développée en Java par la société PortSwigger Ltd. Il existe trois versions de Burpsuite : la version community (free), la version professional et la version enterprise (les deux dernières sont payantes et assez chères).
Pour ce qui est de l’installation je vous invite à lire la page d’installation du site officiel. Pour lancer l’outil, ouvrez un terminal et entrez cette commande: burpsuite
Cette page apparaîtra:
Cliquez sur « Next » puis sur « Start Burp ». Vous atterrirez sur la page principale de Burp:
Sur la barre du dessus vous avez les différents outils disponibles. Au cours de cet article nous verrons comment utiliser le proxy, le repeater, le spider, l’intruder et le decoder.
I/ Proxy
C’est l’outil le plus utilisé de la suite et pour cause, il nous permet d’intercepter toutes les requêtes envoyées depuis notre navigateur, de les modifier et de réceptionner la réponse du serveur. Pour cela il va falloir configurer notre navigateur pour qu’il envoie toutes les requêtes au Burp Proxy. Personnellement je travaille exclusivement sur Firefox donc je vais vous expliquer comment configurer ce navigateur.
Allez dans les «Paramètres» puis dans «Préférences» > «Avancés» et enfin «Réseau».
Cliquez sur « Paramètres » et complétez le panel de configuration de la façon suivante:
En faisant ça on dit juste à Firefox que nous voulons que toutes les requêtes soient envoyés au proxy qui tourne sur le localhost et qui écoute sur le port 8080.
Note : il existe plusieurs plugins pour Firefox et Chrome qui permettent de switcher la configuration des proxys. Pour ma part j’utilise le plugin Proxy SwitchyOmega disponible ici.
Retournez sur Burp Suite, allez dans l’onglet « Proxy » et assurez vous que le proxy est configuré pour intercepter les requêtes:
Voilà ! Notre Burp Proxy est configuré. Maintenant si vous lancez une requête sur Firefox vous allez recevoir une notification qui vous dit que la requête à été intercéé…
Oh wait ! On ne pourra pas se rendre sur des sites en HTTPS à cause des règles HSTS ! Eh oui, nous essayons de contacter le site http://www.facebook.com mais le certificat que nous recevons est celui de Burpsuite donc notre navigateur bloque la connexion!
Pour régler ce problème on va devoir télécharger le certificat d’autorité de Burp et l’installer dans Firefox. Pour cela rendez vous ici en ayant le proxy activé. Puis cliquez sur CA Certificate et téléchargez le certificat.
Maintenant rendez vous dans l’onglet « Avancées » puis « Certificats » dans les paramètres Firefox. Cliquez sur «Voir les certificats». Un onglet va s’ouvrir, allez dans «Autorités»:
Cliquez sur « Importer » puis sélectionnez le certificat que vous avez téléchargé tout à l’heure. Pour finir cochez «Faire confiance à ce CA pour identifier les sites web»:
A partir de là vous ne devriez plus avoir de problèmes. Les requêtes HTTP et HTTPS seront captées par Burp et vous pourrez les modifier.
Problèmes encore, si vous êtes en train de tester les sécurités d’un site en écoutant de la musique sur YouTube vous allez recevoir les requêtes du site que vous testez et celles venant de YouTube (et YouTube va vous flooooooder au max). Donc on va voir comment restreindre notre scope à un ou plusieurs sites. Pour cela allez dans l’onglet « Target » sur Burp Suite:
Sur la gauche vous avez tous les sites pour lesquels des requêtes ont été réceptionnées par Burp.
Attention, pour que le site apparaisse il faut que vous vous y soyez rendus avec le proxy actif.
Si vous voulez que Burp ne se concentre que sur un site il faudra le sélectionner, faire un clic droit et cliquez sur «Add to scope». Ensuite retournez dans la section proxy puis « Options » et modifier les règles d’interception comme ceci:
Voilà! Les seuls requêtes que vous recevrez seront celles que vous avez placé dans votre scope.
Une fois que vous avez intercepté une requête, burp vous affichera son contenu:
Vous pouvez tout modifier. Absolument tout et comment bon vous semble. Ensuite vous n’avez plus qu’à la forwarder (i.e : l’envoyer au serveur) et si vous voulez réceptionner la réponse du serveur il vous suffira de cliquer sur «Action» puis sur «Do intercept > Response to this request».
Bon c’est cool, on intercepte, modifie et renvoie des requêtes mais n’y aurait-il pas moyen de rejouer une requête sans avoir à se retaper toutes ces actions ? Eh bien si, la suite burp propose un outil qui permet de rejouer une requête très simplement: Repeater.
II/ Repeater
Burp Repeater c’est clairement là où vous passerait le plus de temps. Par défaut il n’y a rien dans cet onglet et c'est tout à fait normal puisque c’est à vous de dire quelle requête vous voulez envoyer dans le repeater. Pour cela choisissez une requête dans le proxy, cliquez sur « Action » puis « Send to Repeater » puis rendez vous dans la section Repeater et … Tadaa:
Maintenant vous pouvez modifier votre requête puis l’envoyer. Vous obtiendrez la réponse du serveur automatiquement:
Pour ma part je me sers de cet outil quand j’ai déjà repéré une faille et que je chercher à l’exploiter au mieux ou encore lorsque je fuzz des paramètres afin d’analyser le fonctionnement de l’application.
III/ Spider
Burp Spider est un outil bien sympas puisqu’il permet de mapper un site. C’est en fait un scanner qui va parcourir tous les liens qu’il trouve sur le site web que vous lui avez spécifié.
Pour le lancer c’est très simple, rendez vous dans l’onglet Target, sélectionner le site que vous voulez mapper, clic droit > Spider This Host. Vous trouverez les résultats du scan dans l’onglet Site Map :
Ensuite c’est à vous de faire l’analyse des liens. Certains peuvent être intéressants dans le cadre d’une exploitation!
IV/ Decoder
Le dernier outil que je trouve intéressant c’est le burp decoder. Il permet très rapidement d’encoder/décoder une chaîne de caractères (on s’en sert beaucoup pour bypass des filtres par exemple):
Je ne vais pas vous expliquer comment il fonctionne, je pense que c’est assez explicite
BurpSuite-Utilisation
Comment utiliser Burp Suite - Test de pénétration Web (Partie 1)
Burp Suite de Portswigger est l'un de mes outils préférés à utiliser lors de l'exécution d'un test de pénétration Web. Ce qui suit est un tutoriel Burp Suite étape par étape. Je vais vous montrer comment configurer et utiliser correctement de nombreuses fonctionnalités de Burp Suite. Après avoir lu ceci, vous devriez pouvoir effectuer un test de pénétration Web approfondi. Ce sera le premier d'une série d'articles en deux parties.
Sommaire
Comment utiliser Burp Suite - Test de pénétration Web (Partie 1)
Configuration du proxy SOCKS sortant
Configurer le comportement d'interception
Avis de non-responsabilité: tester des applications Web que vous n'avez pas l'autorisation écrite de tester est illégal et punissable par la loi
Configuration du proxy SOCKS sortant
Selon l'étendue de votre engagement, il peut être nécessaire de tunneler votre trafic Burp Suite via un proxy SOCKS sortant. Cela garantit que le trafic de test provient de votre environnement de test approuvé. Je préfère utiliser une simple connexion SSH qui fonctionne bien à cet effet. Connectez-vous à votre serveur de test et configurez un proxy SOCKS sur votre hôte local via l'option ‘–D’ comme celle-ci.
Accédez à l'onglet Options situé à l'extrême droite du menu supérieur dans Burp Suite. Dans le sous-onglet Connections, faites défiler jusqu'à la troisième section intitulée SOCKS Proxy. Tapez localhost pour l'option hôte et 9292 pour l'option port.
Désormais, Burp Suite est configuré pour acheminer le trafic via votre tunnel SSH sortant. Configurez les paramètres proxy de votre navigateur pour utiliser Burp Suite. Accédez à www.whatismyip.com et assurez-vous que votre adresse IP provient de votre environnement de test.
Conseil: J'utilise un navigateur séparé pour les tests d'applications Web. Cela garantit que je ne transmets accidentellement aucune donnée personnelle à l'un des sites de mes clients, comme le mot de passe de mon compte gmail par exemple.
Je préfère également utiliser un module complémentaire de commutation de proxy tel que SwitchySharp. Cela me permet de basculer facilement entre les différentes configurations de proxy dont je pourrais avoir besoin lors de différents engagements. Voici à quoi ressemblent mes paramètres de configuration pour Burp Suite.
Configurer le comportement d'interception
La prochaine chose que je fais est de configurer la fonction d'interception du proxy. Réglez-le pour ne suspendre que les demandes et réponses en provenance et à destination du site cible. Accédez à l'onglet Proxy sous le sous-onglet Options. Les deuxième et troisième en-têtes affichent les options configurables pour intercepter les demandes et les réponses. Décochez les paramètres par défaut de Burp Suite et cochez URL Is in target scope(L'URL est dans la portée cible). Désactivez ensuite l'interception car elle n'est pas nécessaire pour la procédure pas à pas initiale de l'application. Dans le sous-onglet Intercept, assurez-vous que le bouton à bascule indique Intercept is off
Procédure d'application
Bizarrement , beaucoup de gens aiment sauter cette étape. Je ne le recommande pas. Au cours de la procédure pas à pas initiale de votre application cible, il est important de cliquer manuellement sur autant de sites que possible. Essayez de résister à l'envie de commencer à analyser les choses dans Burp Suite correctement. Au lieu de cela, passez un bon moment et cliquez sur chaque lien et affichez chaque page. Tout comme un utilisateur normal pourrait le faire. Pensez au fonctionnement du site ou à son fonctionnement supposé
Vous devriez penser aux questions suivantes:
Si vous tombez sur des formulaires de saisie, assurez-vous de faire quelques tests manuels. Saisie d'une seule coche et appuyez sur soumettre sur n'importe quel formulaire de recherche ou champ de code postal que vous rencontrez. Vous pourriez être surpris de voir à quelle fréquence les failles de sécurité sont découvertes par une exploration curieuse et non par une analyse automatisée.
Configurez votre portée cible
Maintenant que vous avez une bonne idée du fonctionnement de votre application cible, il est temps de commencer à analyser certains GETs et publications. Cependant, avant de faire des tests avec Burp Suite, il est judicieux de définir correctement votre portée cible. Cela garantira que vous n'envoyez pas de trafic potentiellement malveillant vers des sites Web que vous n'êtes pas autorisé à tester.
Rendez-vous sur l'onglet Target puis sur le sous-onglet Site map. Sélectionnez votre site Web cible dans le volet d'affichage de gauche. Faites un clic droit et choisissez Add to scope. Sélectionnez ensuite tous les autres sites dans le volet d'affichage, cliquez avec le bouton droit et sélectionnez Supprimer de la portée. Si vous l'avez fait correctement, votre onglet de portée Burp Suite devrait ressembler à l'image ci-dessous.
Vol Initial
Cliquez sur l'onglet Target et le sous-onglet Site Map. Faites défiler jusqu'à la branche de site appropriée et développez toutes les flèches jusqu'à ce que vous obteniez une image complète de votre site cible. Cela devrait inclure toutes les pages individuelles que vous avez consultées ainsi que tous les fichiers javascript et css. Prenez un moment pour vous imprégner de tout cela, essayez de repérer les fichiers que vous ne reconnaissez pas dans la procédure manuelle. Vous pouvez utiliser Burp Suite pour afficher la réponse de chaque demande dans un certain nombre de formats différents situés sur l'onglet Resposne du volet d'affichage en bas à droite. Parcourez chaque réponse en recherchant des données intéressantes. Vous pourriez être surpris de découvrir:
Rechercher des mots clés spécifiques
Vous pouvez également tirer parti de Burp Suite pour faire une grosse partie du travail à votre place. Faites un clic droit sur un nœud, dans le sous-menu Engagement tools, sélectionnez Search. L'une de mes préférées consiste à rechercher la chaîne set-cookie. Cela vous permet de savoir quelles pages sont suffisamment intéressantes pour nécessiter un cookie unique. Les cookies sont couramment utilisés par les développeurs d'applications Web pour différencier les demandes d'utilisateurs de plusieurs sites. Cela garantit que l’utilisateur A n’a pas accès aux informations appartenant à l’utilisateur B. Pour cette raison, il est judicieux d'identifier ces pages et d'y porter une attention particulière.
Utilisation de Spider et Discover
Après un peu de piquer et de pousser manuelle, il est généralement avantageux de permettre à Burp Suite de contrôler l'hôte. Faites un clic droit sur la branche racine de la cible dans le Target(plan du site) et sélectionnez Spider this host.
Une fois Spider terminée, revenez à votre plan du site et voyez si vous avez ramassé de nouvelles pages. Si c'est le cas, jetez-y un œil manuel dans votre navigateur et également dans Burp Suite pour voir s'ils produisent quelque chose d'intéressant. Existe-t-il de nouvelles invites de connexion ou des zones de saisie par exemple? Si vous n'êtes toujours pas satisfait de tout ce que vous avez trouvé, vous pouvez essayer le module de découverte de Burp Suite. Cliquez avec le bouton droit sur la branche racine du site cible et dans le sous-menu Engagement tools, sélectionnez Discover Conten. Sur la plupart des sites, ce module peut fonctionner et fonctionnera longtemps. Il est donc recommandé de le surveiller. Assurez-vous qu'il se termine ou arrêtez-le manuellement avant de l'exécuter trop longtemps.
Utilisation de l'onglet Répéteur
L'onglet Répéteur est sans doute l'une des fonctionnalités les plus utiles de Burp Suite. Je l'utilise des centaines de fois sur chaque application web que je teste. Il est extrêmement précieux et incroyablement simple à utiliser. Faites un clic droit sur n'importe quelle demande dans l'onglet Target ou Proxy et sélectionnez Send to Repeater. Ensuite, cliquez sur l'onglet Repeater et appuyez sur Go. Vous verrez quelque chose comme ça:
Utilisation de l'onglet Intruder
Si vous êtes limité dans le temps et avez trop de demandes et de paramètres individuels pour effectuer un test manuel approfondi. Le Burp Suite Intruder est un moyen vraiment génial et puissant d'effectuer un fuzzing automatisé et semi-ciblé. Vous pouvez l'utiliser contre un ou plusieurs paramètres dans une requête HTTP. Faites un clic droit sur une demande comme nous l'avons fait auparavant et cette fois sélectionnez Send to Intruder. Rendez-vous sur l'onglet Intruder et cliquez sur le sous-onglet Positions. Vous devriez voir quelque chose comme ça:
Je recommande d'utiliser le bouton Clear pour supprimer ce qui est sélectionné au départ. Le comportement par défaut consiste à tout tester avec un signe =. Mettez en surbrillance les paramètres que vous ne souhaitez pas utiliser et cliquez sur Add. Ensuite, vous devez aller dans le sous-onglet Payloads et indiquer à Burp Suite quels cas de test effectuer pendant le fuzzing. Un bon point de départ est Fuzzing-full. cela enverra un certain nombre de test de base à chaque paramètre que vous avez mis en évidence dans le sous-onglet Positions.
Utilisation du Scan Automatique
La dernière chose que je fais lors du test d'une application Web est d'effectuer une analyse automatisée à l'aide de Burp Suite. De retour sur votre sous-onglet Site Map, faites un clic droit sur la branche racine de votre site cible et sélectionnez Passively scan this host(Scanner passivement cet hôte). Cela analysera chaque demande et réponse que vous avez générée pendant votre session Burp Suite. Il produira un conseille de vulnérabilité sur le sous-onglet Résults situé sur l'onglet Scanner. J'aime faire l'analyse passive en premier car elle n'envoie aucun trafic au serveur cible. Vous pouvez également configurer Burp Suite pour analyser passivement les demandes et les réponses automatiquement dans le sous-onglet Live scanning (Analyse en direct). Vous pouvez également le faire pour la numérisation active, mais je ne le recommande pas.
Lors d'une analyse active, j'aime utiliser les paramètres suivants:
Comment utiliser Burp Suite - Test de pénétration Web (Partie 2)
Dans la première partie du tutoriel Burp Suite, nous avons présenté certaines des fonctionnalités utiles que Burp Suite a à offrir lors de l'exécution d'un test de pénétration d'application Web. Dans la partie 2 de cette série, nous continuerons d'explorer comment utiliser Burp Suite, notamment: la validation des résultats du scanner, l'exportation des rapports du scanner, l'analyse des résultats XML, l'enregistrement d'une session Burp et les extensions Burp. Allons droit au but!
Validation des résultats du scanner
C'est toujours une bonne idée de valider en profondeur les résultats de tout outil de numérisation automatisé. Burp Suite fournit tout ce dont vous avez besoin pour ce faire sur l'onglet Scanner/Results. Cliquez sur un nœud dans le volet gauche pour voir les vulnérabilités identifiées associées à cette cible. Le volet inférieur droit affiche les informations détaillées de demande/réponse relatives à la vulnérabilité spécifique sélectionnée dans le volet supérieur droit.
L'onglet Advisory contient des informations sur la vulnérabilité, y compris un détail de haut niveau, une description et une recommandation proposée. Les onglets Request & Response afficheront exactement ce que Burp Suite a envoyé à l'application cible afin de vérifier la vulnérabilité ainsi que ce qui a été renvoyé par l'application. Jetez un œil à l'exemple ci-dessous.
L'onglet de demande nous montre quelle page a généré l'alerte.
Juste en demandant cette page dans un navigateur, ou en consultant l'onglet Réponse, nous sommes en mesure de valider que l'adresse e-mail prétendument divulguée était bien présente dans la réponse. Nous pouvons considérer cette question comme validée et aller de l'avant.
Conseil: Assurez-vous d'effectuer cette étape sur chaque vulnérabilité identifiée par le scanner. Tous les outils d'analyse automatisés produisent des faux positifs en raison de la nature des tests effectués. La plupart des entreprises sont capables d'acheter des outils et de les exécuter sur leurs réseaux. Des pentesters sont embauchés spécifiquement pour identifier et supprimer ces faux positifs.
Exportation des rapports de scanner
Une fois que vous avez validé les résultats du scanner, vous souhaiterez peut-être générer un certain type de rapport. Il existe deux options de rapport disponibles dans l'onglet Scanner/Results, HTML et XML. Pour générer un rapport, cliquez avec le bouton droit sur une cible dans le volet d'affichage de gauche et sélectionnez Report selected issues. Cela vous présentera la boîte de dialogue suivante.
Cliquez sur l'Assistant et sélectionnez les éléments que vous souhaitez dans votre rapport et quel format. Le rapport HTML peut être ouvert dans un navigateur, puis exporté au format PDF, ce qui peut être utile pour aider à communiquer les résultats à votre client. Le rapport XML vous permet d'analyser des sections spécifiques d'un rapport pour plus de détails. Si vous générez un rapport XML, assurez-vous de décocher l'option d'encodeur Base64 pour voir les Request/Responses HTTP complètes.
Analyse des résultats XML
J'ai écrit un simple script Ruby pour analyser les données de la sortie XML générée à partir d'un scan automatisé. Le script utilise la gem Nokogiri et génère les résultats dans un fichier CSV délimité par colonne qui peut être importé dans Excel pour produire une belle feuille de calcul. Si vous avez une compréhension de base de l'analyse des nœuds XML à l'aide de sélecteurs CSS, vous n'aurez aucun problème à modifier le script pour répondre à vos besoins spécifiques.
Vous pouvez voir qu'en appelant simplement la méthode .css et en passant [LA VALEUR QUE VOUS VOULEZ].text en tant que paramètre, vous pourrez retirer tous les éléments spécifiques que vous souhaitez de la soupe XML. Exécutez le script sans argument et vous verrez qu'il prend un fichier XML et crache la sortie à l'écran.
Vous pouvez filtrer les résultats dans un fichier.csv si vous le souhaitez. Le fichier CSV peut ensuite être importé dans une feuille de calcul Excel qui ressemble à ceci.
Enregistrement d'une session Burp
Dans certains cas, il peut être nécessaire de suspendre une évaluation et de revenir plus tard. Vous pourriez également vous retrouver à vouloir partager votre session Burp Suite avec un autre consultant. Deux yeux valent souvent mieux qu'un après tout. Dans ces cas, la chose la plus simple à faire est d'enregistrer une copie locale de votre session. Sélectionnez simplement Save state dans le menu Burp en haut. Cela va créer un fichier plat que vous ou un autre consultant pouvez importer dans Burp Suite et voir le trafic capturé et les points précis du test. Il s'agit d'une fonctionnalité extrêmement utile.
Si vous avez essayé de le faire dans le passé et que vous avez remarqué que la taille du fichier résultant était inutilement grande (des centaines de Mo). Il est possible que vous ayez oublié de cocher la case Save in-scope items only
Si vous configurez votre portée en suivant les instructions de la partie 1, vous ne devriez pas avoir à vous soucier d'un fichier d'état massif. La page suivante de l'Assistant vous demande de quels outils vous souhaitez stocker la configuration. J'ai trouvé que les avoir toutes cochées ou toutes non cochées ne semble pas affecter la taille du fichier, voire pas du tout, mais n'hésitez pas à jouer avec ces options et à vous faire votre propre opinion.
Pour restaurer un état de burp précédemment enregistré, sélectionnez simplement Restore state dans le menu Burp en haut. Sélectionnez le fichier dans votre système, cliquez Openet suivez les instructions de l'assistant. Selon la taille du fichier d'état, il peut prendre un moment pour tout importer, mais une fois terminé, vous pouvez continuer votre évaluation ou celle de quelqu'un d'autre pour ce sujet comme si vous n'aviez jamais fait de pause en premier lieu. C'est vraiment cool!
Burp Extensions
Les extensions Burp sont des ajouts après-vente écrits par d'autres pentesters qui peuvent être facilement installés et configurés pour ajouter des fonctionnalités améliorées ou supplémentaires à Burp Suite. Pour illustrer ce processus, nous allons télécharger et installer le Plugin Shellshock Burp depuis la page Accuvant LABS Github. Accédez à l'URL suivante https://github.com/AccuvantLABS/burp-shellshock et cliquez sur le lien Download here!
Cliquez ensuite sur l'onglet Extender dans Burp Suite et cliquez sur le bouton Add dans le coin supérieur gauche. Lorsque la boîte de dialogue apparaît, sélectionnez le fichier .jar Shell Shock que vous venez de télécharger et cliquez sur Next.
Si tout s'est bien passé, vous devriez voir un message indiquant The extension loaded successfully sans message d'erreur ni sortie. L'onglet Extensions montre maintenant que notre extension Shellshock Scanner est chargée. Nous pouvons voir dans la section Détails qu'une nouvelle vérification du scanner a été ajoutée.
Fin de la partie 2
J'espère que ce tutoriel vous a été utile. Après avoir lu les deux articles de cette série, vous devez vous familiariser avec la plupart des fonctionnalités essentielles offertes dans la suite Burp. Veuillez profiter de la section Post Comment pour laisser vos commentaires/questions. Merci d'avoir lu!
The Offensive Security Certified Professional (OSCP) is the companion certification for our Penetration Testing with Kali Linux training course and is the world’s first completely hands-on offensive information security certification. The OSCP challenges the students to prove they have a clear and practical understanding of the penetration testing process and life-cycle through an arduous twenty-four (24) hour certification exam.
* Quels types d'actions quelqu'un peut-il faire, tant du point de vue authentifié que non authentifié?
* Des demandes semblent-elles être traitées par un travail côté serveur ou une opération de base de données?
* Y a-t-il des informations affichées que je peux contrôler
* Commentaires des développeurs
* Adresses mail
* Noms d’utilisateur et mots de passe si vous avez de la chance
* Divulgation du chemin vers d'autres fichiers / répertoires
* Etc…
Le lien ci-dessous concerne le Feedback des sources envoyé suite aux questions/réponses de la plupart de nos communautés sur les langages informatique.
Le contenu ci-dessous est un partage communautaire d'un Github publique sous licence, il permet d'avoir des sources complémentaire sur les langages informatique.
🇬🇧 Not french? Go to the
Bienvenue ! Sur Internet, il existe de nombreux tutoriels/cours pour apprendre le développement, sauf que la plupart d'entre eux sont mauvais parce qu'ils vous enseignent de mauvaises pratiques ou des choses obsolètes. C'est pourquoi cette liste de bonnes sources pour apprendre le développement a été créée.
Tutoriels/Cours par langages
Algorithmie
Bash
Malheureusement, il n'y a pas de bon tutoriel/cours en français pour ce langage.
C
C++
C#
Clojure
Malheureusement, il n'y a pas (encore) de bon tutoriel/cours en français pour ce langage.
Common Lisp
Malheureusement, il n'y a pas (encore) de bon tutoriel/cours en français pour ce langage.
Git
Go
Haskell
HTML/CSS
Java
(contient également bon nombre d'exercices)
Javascript
)
Kotlin
Malheureusement, il n'y a pas de bon tutoriel/cours en français pour ce langage.
Lua
Malheureusement, il n'y a pas de bon tutoriel/cours en français pour ce langage.
OCaml
PHP
ou
ou
Python
Langage recommandé pour commencer le développement
Ruby
Rust
Scala
Ne vous laissez pas décourager par les deux premiers exemples. Tout est expliqué par la suite !
Sécurité
SQL
Éditeurs génériques
Les IDE
(Java, Kotlin, Scala, Rust)
Devenir développeur
Les sites non conseillé
Ces sites donnent de nombreuses informations fausses et/ou obsolètes et ne devraient pas être utilisés
OpenClassrooms
W3Schools
W3Resource
Liens utiles
Ces sites sont une bonne source d'information pour de nombreux langages de programmation.
Livres de programmation gratuits dans un grand nombre de langages
Contribuer
Ce site est open-source ! Une erreur à notifier ? Des liens à rajouter ? Pour cela, rendez-vous sur
Licence
To the extent possible under law, has waived all copyright and related or neighboring rights to awesome-learning-dev-fr. This work is published from: France.
Open Source image CC-BY 4.0
Autres images CC-BY 4.0 Mozilla Foundation ()
ou
ou
Base de données recommandée
(Python)
(C++, C, Java, HTML/CSS, Javascript) Windows et Mac OS seulement
Si vous êtes lycéen/étudiant vous pouvez bénéficier de tous les outils JetBrains de façon totalement gratuite via le ou via le pendant 1 an (renouvelable) (HTML/CSS, Javascript, C, C++, Ruby, C#, SQL, ...)
Apprendre des technologies pour l'infra et savoir le faire avec qualité
🗓️ Dernière maj le 14 octobre 2020
Le but de ce TP est de monter une pipeline de test d'infra et de code d'infra (Ansible) maison. Le tp permet de vous apprendre certaine technologie, au menu :
application permettant de mettre en place des pipelines de test/build
s'intègre nativement avec Gitea
outil de gestion et déploiement de configuration
très utilisé aujourd'hui, c'est l'outil de référence en la matière
outil qui se couple à Ansible pour effectuer des tests sur les playbooks
en particulier des tests de conformité
application de conteneurisation
permet de créer des environnements légers et autonomes
0. Setup environment
Poste de travail
Pendant le TP, je vous conseille d'utiliser une machine GNU/Linux comme "poste de travail". Si vous avez un GNU/Linux en dur c'est OK, sinon je vous recommande une VM "poste de travail" (un CentOS peut faire l'affaire).
En soit aucun pb pour utiliser un autre OS, il faut simplement être à l'aise pour l'utilisation de git, docker, Python pip, et ansible, sur votre machine.
Machines virtuelles
L'OS conseillé pour les VMs en cours est CentOS7. Afin de faciliter et accélérer le déploiement, on va utiliser .
Téléchargez Vagrant pour votre OS, puis initialisez une box centos/7 :
Il peut être bon de repackager la box avec certains éléments préconfigurés, afin de gagner du temps à chaque destroy/up, par exemple :
Je vous conseille notamment d'installer Docker dans votre box repackagée, on en aura souvent besoin par la suite.
Une fois repackagée, il est possible d'utiliser la box comme base dans un Vagrantfile :
Images Docker
Pour ce qui est des images Docker, on va beaucoup réutiliser d'images déjà packagées par la communauté. Cela nous permettra d'aller un peu plus vite dans le TP, sans perdre du temps à écrire des Dockerfiles et build des images sur mesure.
I. Setup environnement Git
EDIT : vous pouvez utiliser le fichier docker-compose.yml :
Qui permet de monter facilement Gitea + Drone afin d'accélérer vos tests.
Pour ce qui est du dépôt git, on va utiliser . C'est une app minimaliste développée en go, qui permet d'héberger des dépôts Git.
Loin d'être fully-featured comme un Gitlab, Gitea opte plutôt pour un aspect modulaire : Gitea lui-même ne se charge que de gérer les dépôts git et leurs accès, il faudra lui greffer d'autres applications afin qu'ils profitent de fonctionnalités supplémentaires.
TO DO : écrire un Vagrantfile qui monte une machines virtuelle CentOS7
la VM va porter Gitea, Drone et run des jobs de build/test
SELinux doit être désactivé
2048M RAM sont conseillés
TO DO : mettre en place Gitea
installer Gitea en suivant la doc officielle
je vous conseille un conteneur Docker pour plus de flexibilité
N'oubliez pas de créer un utser admin lors de la première connexion à la WebUI
TO DO : Effectuer un push une fois que Gitea est fonctionnel
créer un premier dépôt de test
effectuer un premier push pour valider le bon fonctionnement de la solution
II. Mise en place de Drone
est un outil léger permettant de mettre en place des pipelines de build et de test. Il se couple nativement très bien avec Gitea.
Comme beaucoup d'outils en son genre, il fonctionne sur un principe de master/runner :
le master expose la GUI, reçoit les ordres de build et de test, et demandent aux runners d'exécuter des tâches
le runner a pour charger d'exécuter les tâches demandées par le master : c'est lui qui effectue les builds/tests
on va utilise un runner de type Docker
Dans le cadre du TP, ce sera la même VM qui portera le master et un runner Docker.
TO DO : configurer Drone pour le lier à Gitea
Les credentials sont les mêmes que l'utilisateur admin de Gitea.
TO DO : tester une première pipeline de test
créer un dépôt git dans la WebUI de Gitea
synchroniser le dépôt depuis l'interface de Drone
préciser que le dépôt est Trusted (paramètres du dépôt dans la WebUI de Drone)
push le fichier
se rendre sur la WebUI de Drone pour voir le résultat
III. Ansible
Ansible est un outil de gestion et déploiement de configuration. Il permet de contrôler de façon centralisée et uniformisée un parc de machines. C'est désormais la techno open-source de référence pour ce qui est de la gestion de configuration.
Techno très demandée aujourd'hui, nous allons l'utiliser comme base afin de mettre en place des pipelines de CI/CD.
On ne va pas, dans ce cours, approfondir Ansible. Le but est simplement d'avoir des fichiers de code à tester, des applicatons à tester, build, et intégrer, mais aussi manipuler une technologie extrêmement demandée.
Quelques impératifs pour qu'Ansible fonctionne :
les fichiers Ansible sont au format yml
à l'intérieur de ces fichiers, on décrit ce qu'il faut installer et configurer sur les serveurs de destination
la machine qui possède les fichiers .yml doit pouvoir se connecter en SSH sur les serveurs de destination
0. Structure du dépôt Ansible
Vous devrez organiser votre dépôt Ansible selon un format standard :
1. Création de playbooks
TO DO : setup Ansible
s'assurer que Python est installé sur les machines de destination
s'assurer qu'il existe un utilisateur pouvant accéder aux droits de root à l'aide de sudo sur les machines de destination
configurer un échange de clés SSH entre le poste de travail (qui héberge les fichiers yml
TO DO : un premier playbook
créer un inventaire contenant la machine à qualifier
créer un rôle qui installe et configure un serveur NGINX
créer un playbook qui permet de déployer le rôle NGINX sur la machine déclarée dans votre inventaire
Le dépôt Ansible est à déposer dans un endroit personnel (le homedir de votre utilisateur par exemple).
Exemple de structure de dépôt Ansible :
Structure du fichier inventory/ci/hosts.yml :
Structure du fichier playbooks/test.yml :
Structure du fichier roles/nginx/tasks/main.yml :
Contenu de roles/nginx/files/start_nginx.sh
TO DO : tester le bon déploiement du service NGINX et vérifier que le serveur Web est bien fonctionnel
NB : nous travaillerons essentiellement avec des conteneurs pour les tests. Or il n'existe pas de gestion de services (comme systemd) dans les conteneurs Vous ne pourrez donc pas utiliser quelque chose comme systemctl start nginx afin de démarrer NGINX. Le script start_nginx.sh est donc utilisé pour lancer le serveur.
2. Premiers tests
TO DO : tester le code ansible
créer un dépôt dans Gitea, dédié à hébergé votre code Ansible
créer un fichier .drone.yml qui teste la validité des fichier Ansible
le linter est parfait pour ce use-case
TO DO : ajouter un rôle
ajouter un rôle qui déploie des utilisateurs, et le pousser sur le dépôt, afin de tester la pipeline
3. Molecule
Présentation
est un outil qui se couple à Ansible afin d'effectuer des tests d'infra et de conformité.
Le but de cette partie est d'effectuer des tests, à l'aide Molecule, sur le déploiement du rôle Ansible.
Le fonctionnement de Molecule est simple :
créer un environnement de test (conteneur, VM)
dérouler un rôle dans l'environnement
vérifier le bon déroulement du playbook
Par "vérifier le bon déroulement du playbook", on entend : vérifier que le playbook passe, que l'environnement est conforme à nos attentes après déroulement du playbook (est-ce que tel paquet a été bien installé ou tel port firewall a été correctement ouver) ou encore vérifier l'idempotence du playbook (en l'exécutant deux fois d'affilée).
Prise en main
Afin de prendre en main Molecule, il peut être bon de tester quelques commandes à la main.
TO DO : (je vous recommande l'installation avec pip).
Molecule va nous permettre ici de tester le rôle nginx que nous venions d'écrire. Pour que Molecule accepte de tester notre rôle, il est nécessaire d'y ajouter quelques fichiers. Molecule permet de créer un rôle possédant une structure qui correspond aux bonnes pratiques Ansible, afin d'être testé correctement. Pour ce faire :
Le rôle est alors prêt à être tester :
Setup dans la pipeline
TO DO : créer une pipeline qui utilise Molecule
éditer le drone.yml
la pipeline doit utiliser une image Docker qui contient Molecule
image officielle : quay.io/ansible/molecule:3.0.8
Auteur du TP et intervenant professionnel auprès des écoles du supérieur :
Note de coté pour Léolios :
expose une WebUI
Images Docker
2. Premiers tests
3. Molecule
Présentation
Prise en main
pour lancer les services, libres à vous :
en dur
dans des conteneurs Docker (je vous le conseille, plus rapide et plus simple à faire évoluer pour faire joujou pendant le TP)
c'est à dire que le serveur sera capable de lancer des conteneurs Docker afin d'y effectuer des tests
cloner le projet
placer à la racine un fichier .drone.yml qui contient :
l'utilisateur sur les serveurs de destination doit pavoir accès à des droits root (viasudo par exemple)
nécessaires pour beaucoup d'actions comme l'installation de paquets
pousser le fichier .drone.yml pour déclencher une pipeline
le test de la pipeline doit exécuter un molecule test
pour ce faire, vous allez devoir permettre au conteneur molecule de lui-même lancer des conteneurs. On peut le faire en montant le socket Docker /var/run/docker.sock dans le conteneur Molecule pour qu'il puisse lancer des conteneurs sur l'hôte
Directory
Usage
inventory/
Contient l'inventaire des machines et les variables qui y sont liées
roles/
Contient l'ensemble des "roles" Ansible. Un "role" est un ensemble de tasks ayant un sens (par exemple un rôle "Apache" ou "MySQL")
playbooks/
La glu entre l'inventaire et les rôles : les playbooks décrivent quel rôle appliquer sur quelle machine
For version 1.0, Mangle supported the following types of infrastructure faults:
CPU Fault
Memory Fault
$ mkdir workdir
$ cd workdir
# Génération d'un Vagrantfile de base
$ vagrant init centos/7
# Allumer la VM
$ vagrant up
# Récupérer un shell dans la machine
$ vagrant ssh
# Détruire la VM
$ vagrant destroy -f
# Allumage de la VM
$ vagrant up
# Récupération d'un shell dans la VM
$ vagrant ssh
# Mise à jour des dépôts et du système
$ sudo yum update -y
# Installation de paquets additionels
$ sudo yum install -y vim
# Désactivation de SELinux
$ sudo setenforce 0
$ sudo sed -i 's/SELINUX=enforcing/SELINUX=permissive/' /etc/selinux/config
# On quitte la VM
$ exit
# On package la VM sous forme d'un .box
$ vagrant package --output cicd.box
# On ajoute la box à Vagrant
$ vagrant box add cicd.box --name cicd
Vagrant.configure("2") do |config|
config.vm.box = "cicd"
end
#!/bin/bash
if [[ -f /'var/run/nginx.pid' ]]; then
echo 'NGINX is already running'
exit 0
else
echo 'Starting NGINX'
nginx
fi
# Déplacement dans le répertoire qui contient les rôles:
$ cd roles
# On déplace notre ancien rôle
$ mv nginx nginx.old
# Création du nouveau rôle
$ molecule init role nginx
# Récupération des fichiers précédents
$ mv nginx.old/tasks/main.yml nginx/tasks/main.yml
$ mv nginx.old/files/start_nginx.sh nginx/files/start_nginx.sh
# Suppression de l'ancien module
$ rm nginx.old -r
Minor improvements have also been included for Kill Process Fault in version 2 of Mangle.
CPU Fault
CPU fault enables spiking cpu usage values for a selected endpoint by a percentage specified by the user. With the help of a timeout field the duration for the fault run can be specified after which Mangle triggers the automatic remediation procedure.
Steps to follow:
Login as a user with read and write privileges to Mangle.
Navigate to Fault Execution tab ---> Infrastructure Faults ---> CPU.
Select an Endpoint.
Provide a "CPU Load" value. For eg: 80 to simulate a CPU usage of 80% on the selected Endpoint.
Provide "Injection Home Dir" only if you would like Mangle to push the script files needed to simulate the fault to a specific location on the endpoint. Else the default temp location will be used.
Provide a "Timeout" value in milliseconds. For eg: if you need the CPU load of 80% to be sustained for a duration of 1 hour then you should provide the timeout value as 3600000 (1 hour = 3600000 ms). After this duration, Mangle will ensure remediation of the fault without any manual intervention.
Schedule options are required only if the fault needs to be re-executed at regular intervals against an endpoint.
Tags are key value pairs that will be send to the active monitoring tool under Mangle Admin settings ---> Metric Providers at the time of publishing events for fault injection and remediation. They are not mandatory.
Click on Run Fault.
The user will be re-directed to the Processed Requests section under Requests & Reports tab.
If Mangle was able to successfully trigger the fault, the status of the task will change to "COMPLETED". The fault will continue to run at the endpoint until the timeout expires or a remediation request is triggered. The option to trigger a remediation request at anytime can be found on clicking the button against the task in the Processed Requests table.
For monitoring purposes, log into either Wavefront or Datadog once it is configured as an active Metric provider in Mangle and refer to the Events section. Events similar to the screenshots provided below will be available on the monitoring tool for tracking purposes.
Memory Fault
Memory fault enables spiking memory usage values for a selected endpoint by a percentage specified by the user. With the help of a timeout field the duration for the fault run can be specified after which Mangle triggers the automatic remediation procedure.
Steps to follow:
Login as a user with read and write privileges to Mangle.
Navigate to Fault Execution tab ---> Infrastructure Faults ---> Memory.
Select an Endpoint.
Provide a "Memory Load" value. For eg: 80 to simulate a Memory usage of 80% on the selected Endpoint.
Provide "Injection Home Dir" only if you would like Mangle to push the script files needed to simulate the fault to a specific location on the endpoint. Else the default temp location will be used.
Provide a "Timeout" value in milliseconds. For eg: if you need the Memory load of 80% to be sustained for a duration of 1 hour then you should provide the timeout value as 3600000 (1 hour = 3600000 ms). After this duration, Mangle will ensure remediation of the fault without any manual intervention.
Schedule options are required only if the fault needs to be re-executed at regular intervals against an endpoint.
Tags are key value pairs that will be send to the active monitoring tool under Mangle Admin settings ---> Metric Providers at the time of publishing events for fault injection and remediation. They are not mandatory.
Click on Run Fault.
The user will be re-directed to the Processed Requests section under Requests & Reports tab.
If Mangle was able to successfully trigger the fault, the status of the task will change to "COMPLETED". The fault will continue to run at the endpoint until the timeout expires or a remediation request is triggered. The option to trigger a remediation request at anytime can be found on clicking the button against the task in the Processed Requests table.
For monitoring purposes, log into either Wavefront or Datadog once it is configured as an active Metric provider in Mangle and refer to the Events section. Events similar to the screenshots provided below will be available on the monitoring tool for tracking purposes.
Disk IO Fault
Disk IO fault enables spiking disk IO operation for a selected endpoint by an IO size specified by the user in bytes. With the help of a timeout field the duration for the fault run can be specified after which Mangle triggers the automatic remediation procedure.
Steps to follow:
Login as a user with read and write privileges to Mangle.
Navigate to Fault Execution tab ---> Infrastructure Faults ---> Disk IO.
Select an Endpoint.
Provide a "IO Size" value in bytes. For eg: To write in blocks of 5 KB to the disk of the selected Endpoint specify the IO Size as 5120 (5 KB = 5120 bytes). With the specified block size of 5120 bytes, Mangle will not use more than 5 MB (5 MB = 5120 * 1024 bytes) of disk space during the simulation of fault. The space is cleared at the time of fault remediation.
Provide "Injection Home Dir" only if you would like Mangle to push the script files needed to simulate the fault to a specific location on the endpoint. Else the default temp location will be used.
Provide a "Timeout" value in milliseconds. For eg: if you need the IO load of 8192000 to be sustained for a duration of 1 hour then you should provide the timeout value as 3600000 (1 hour = 3600000 ms). After this duration, Mangle will ensure remediation of the fault without any manual intervention.
Schedule options are required only if the fault needs to be re-executed at regular intervals against an endpoint.
Tags are key value pairs that will be send to the active monitoring tool under Mangle Admin settings ---> Metric Providers at the time of publishing events for fault injection and remediation. They are not mandatory.
Click on Run Fault.
The user will be re-directed to the Processed Requests section under Requests & Reports tab.
If Mangle was able to successfully trigger the fault, the status of the task will change to "COMPLETED". The fault will continue to run at the endpoint until the timeout expires or a remediation request is triggered. The option to trigger a remediation request at anytime can be found on clicking the button against the task in the Processed Requests table.
For monitoring purposes, log into either Wavefront or Datadog once it is configured as an active Metric provider in Mangle and refer to the Events section. Events similar to the screenshots provided below will be available on the monitoring tool for tracking purposes.
Kill Process Fault
Kill Process fault enables abrupt termination of any process that is running on the specified endpoint. Unlike other infrastructure faults like CPU, Memory and Disk IO this fault does not have a timeout field because the fault completes very quickly. Some processes/services may be configured for auto-start and some might require a manual start command to be executed. For the first case, auto-remediation through Mangle is not needed. For the second case, you can specify the remediation command that Mangle should use to start the process again. After the fault in completed and if remediation command was accurately specified, a manual remediation can be triggered from the Requests and Reports tab.
Steps to follow:
Login as a user with read and write privileges to Mangle.
Provide a "Process Identifier". This can either be a process id or process name. A process name is preferred if the fault is expected to be scheduled.
From version 2.0 onward, Kill Process fault can kill multiple processes with the same process descriptor. This can be done by setting the "Kill All" drop down to true. If set to false, it will fail if the process descriptor is not unique. Alternatively, you can also use the process id to uniquely identify and kill a process.
Provide a "Remediation Command". For eg: To start the sshd process that was killed on an Ubuntu 17 Server, specify the remediation command as "sudo service ssh start" .
Provide "Injection Home Dir" only if you would like Mangle to push the script files needed to simulate the fault to a specific location on the endpoint. Else the default temp location will be used.
Schedule options are required only if the fault needs to be re-executed at regular intervals against an endpoint.
Tags are key value pairs that will be send to the active monitoring tool under Mangle Admin settings ---> Metric Providers at the time of publishing events for fault injection and remediation. They are not mandatory.
Click on Run Fault.
The user will be re-directed to the Processed Requests section under Requests & Reports tab.
If Mangle was able to successfully trigger the fault, the status of the task will change to "COMPLETED". The option to trigger a remediation request at anytime can be found on clicking the button against the task in the Processed Requests table.
For monitoring purposes, log into either Wavefront or Datadog once it is configured as an active Metric provider in Mangle and refer to the Events section. Events similar to the screenshots provided below will be available on the monitoring tool for tracking purposes.
File Handler Leak Fault
File Handler Leak fault enables you to simulate conditions where a program requests for a handle to a resource but does not release it when the resource is no longer in use. This condition if left over extended periods of time, will lead to "Too many open file handles" errors and will cause performance degradation or crashes. With the help of a timeout field the duration for the fault run can be specified after which Mangle triggers the automatic remediation procedure.
Steps to follow:
Login as a user with read and write privileges to Mangle.
Provide "Injection Home Dir" only if you would like Mangle to push the script files needed to simulate the fault to a specific location on the endpoint. Else the default temp location will be used.
Provide a "Timeout" value in milliseconds. For eg: if you need the out of file handles error to be sustained for a duration of 1 hour then you should provide the timeout value as 3600000 (1 hour = 3600000 ms). After this duration, Mangle will ensure remediation of the fault without any manual intervention.
Schedule options are required only if the fault needs to be re-executed at regular intervals against an endpoint.
Tags are key value pairs that will be send to the active monitoring tool under Mangle Admin settings ---> Metric Providers at the time of publishing events for fault injection and remediation. They are not mandatory.
Click on Run Fault.
The user will be re-directed to the Processed Requests section under Requests & Reports tab.
If Mangle was able to successfully trigger the fault, the status of the task will change to "COMPLETED". The option to trigger a remediation request at anytime can be found on clicking the button against the task in the Processed Requests table.
For monitoring purposes, log into either Wavefront or Datadog once it is configured as an active Metric provider in Mangle and refer to the Events section. Events similar to the screenshots provided below will be available on the monitoring tool for tracking purposes.
Disk Space Fault
Disk Space Fault enables you to simulate out of disk or low disk space conditions. With the help of a timeout field the duration for the fault run can be specified after which Mangle triggers the automatic remediation procedure.
Steps to follow:
Login as a user with read and write privileges to Mangle.
Navigate to Fault Execution tab ---> Infrastructure Faults ---> Disk Space.
Select an Endpoint.
Provide a "Target Directory" so Mangle can target a specific directory location or partition to write to for simulating the low disk space condition.
Provide a "Load" value. For eg: 80 to simulate a Disk usage of 80% of the total disk size or space allocated for a partition, on the selected Endpoint.
Provide "Injection Home Dir" only if you would like Mangle to push the script files needed to simulate the fault to a specific location on the endpoint. Else the default temp location will be used.
Provide a "Timeout" value in milliseconds. For eg: if you need the low disk or out of disk condition to be sustained for a duration of 1 hour then you should provide the timeout value as 3600000 (1 hour = 3600000 ms). After this duration, Mangle will ensure remediation of the fault without any manual intervention.
Schedule options are required only if the fault needs to be re-executed at regular intervals against an endpoint.
Tags are key value pairs that will be send to the active monitoring tool under Mangle Admin settings ---> Metric Providers at the time of publishing events for fault injection and remediation. They are not mandatory.
Click on Run Fault.
The user will be re-directed to the Processed Requests section under Requests & Reports tab.
If Mangle was able to successfully trigger the fault, the status of the task will change to "COMPLETED". The option to trigger a remediation request at anytime can be found on clicking the button against the task in the Processed Requests table.
For monitoring purposes, log into either Wavefront or Datadog once it is configured as an active Metric provider in Mangle and refer to the Events section. Events similar to the screenshots provided below will be available on the monitoring tool for tracking purposes.
Kernel Panic Fault
Kernel Panic Fault simulates conditions where the operating system abruptly stops to prevent further damages, security breaches or data corruption and facilitate diagnosis of a sudden hardware or software failure.
REMEDIATION OPTIONS FOR KERNEL PANIC
Remediation for Kernel Panic is controlled by the operating system itself. Typically on Linux systems, Kernel Panic is usually followed by a system reboot. But in some cases due to the settings specified under file /etc/sysctl.d/99-sysctl.conf the automatic system reboot may not occur. For such cases, a manual reboot needs to be triggered on the endpoint to bring it back to a usable state.
To modify this setting as a one-time option, please run the following command on the endpoint sysctl --system
To modify this setting permanently, remotely log in to the endpoint, modify file /etc/sysctl.d/99-sysctl.conf and add the following command
kernel.panic = 20
Steps to follow:
Login as a user with read and write privileges to Mangle.
Provide "Injection Home Dir" only if you would like Mangle to push the script files needed to simulate the fault to a specific location on the endpoint. Else the default temp location will be used.
Schedule options are required only if the fault needs to be re-executed at regular intervals against an endpoint.
Tags are key value pairs that will be send to the active monitoring tool under Mangle Admin settings ---> Metric Providers at the time of publishing events for fault injection and remediation. They are not mandatory.
Click on Run Fault.
The user will be re-directed to the Processed Requests section under Requests & Reports tab.
If Mangle was able to successfully trigger the fault, the status of the task will change to "COMPLETED". The option to trigger a remediation request at anytime can be found on clicking the button against the task in the Processed Requests table.
For monitoring purposes, log into either Wavefront or Datadog once it is configured as an active Metric provider in Mangle and refer to the Events section. Events similar to the screenshots provided below will be available on the monitoring tool for tracking purposes.
Network Faults
Network Faults enables you to simulate unfavorable conditions such as packet delay, packet duplication, packet loss and packet corruption. With the help of a timeout field the duration for the fault run can be specified after which Mangle triggers the automatic remediation procedure.
Packet Delay
Steps to follow:
Login as a user with read and write privileges to Mangle.
Provide a "Nic Name". For eg: For a remote machine endpoint Nic name could be eth0, eth1 etc depending on what adapter you would want to target for the fault.
Provide a "Latency" value in milliseconds. For eg: 1000 to simulate a packet delay of 1 second on a particular network interface of an Endpoint.
Provide "Injection Home Dir" only if you would like Mangle to push the script files needed to simulate the fault to a specific location on the endpoint. Else the default temp location will be used.
Provide a "Timeout" value in milliseconds. For eg: if you need the packet delay to be sustained for a duration of 1 hour then you should provide the timeout value as 3600000 (1 hour = 3600000 ms). After this duration, Mangle will ensure remediation of the fault without any manual intervention.
Schedule options are required only if the fault needs to be re-executed at regular intervals against an endpoint.
Tags are key value pairs that will be send to the active monitoring tool under Mangle Admin settings ---> Metric Providers at the time of publishing events for fault injection and remediation. They are not mandatory.
Click on Run Fault.
The user will be re-directed to the Processed Requests section under Requests & Reports tab.
If Mangle was able to successfully trigger the fault, the status of the task will change to "COMPLETED". The option to trigger a remediation request at anytime can be found on clicking the button against the task in the Processed Requests table.
For monitoring purposes, log into either Wavefront or Datadog once it is configured as an active Metric provider in Mangle and refer to the Events section. Events similar to the screenshots provided below will be available on the monitoring tool for tracking purposes.
Packet Duplication
Steps to follow:
Login as a user with read and write privileges to Mangle.
Provide a "Nic Name". For eg: For a remote machine endpoint Nic name could be eth0, eth1 etc depending on what adapter you would want to target for the fault.
Provide a "Percentage" value to specify what percentage of the packets should be duplicated. For eg: 10 to simulate a packet duplication of 10 percentage on a particular network interface of an Endpoint.
Provide "Injection Home Dir" only if you would like Mangle to push the script files needed to simulate the fault to a specific location on the endpoint. Else the default temp location will be used.
Provide a "Timeout" value in milliseconds. For eg: if you need the packet duplication to be sustained for a duration of 1 hour then you should provide the timeout value as 3600000 (1 hour = 3600000 ms). After this duration, Mangle will ensure remediation of the fault without any manual intervention.
Schedule options are required only if the fault needs to be re-executed at regular intervals against an endpoint.
Tags are key value pairs that will be send to the active monitoring tool under Mangle Admin settings ---> Metric Providers at the time of publishing events for fault injection and remediation. They are not mandatory.
Click on Run Fault.
The user will be re-directed to the Processed Requests section under Requests & Reports tab.
If Mangle was able to successfully trigger the fault, the status of the task will change to "COMPLETED". The option to trigger a remediation request at anytime can be found on clicking the button against the task in the Processed Requests table.
For monitoring purposes, log into either Wavefront or Datadog once it is configured as an active Metric provider in Mangle and refer to the Events section. Events similar to the screenshots provided below will be available on the monitoring tool for tracking purposes.
Packet Loss
Steps to follow:
Login as a user with read and write privileges to Mangle.
Provide a "Nic Name". For eg: For a remote machine endpoint Nic name could be eth0, eth1 etc depending on what adapter you would want to target for the fault.
Provide a "Percentage" value to specify what percentage of the packets should be dropped. For eg: 10 to simulate a packet drop of 10 percentage on a particular network interface of an Endpoint.
Provide "Injection Home Dir" only if you would like Mangle to push the script files needed to simulate the fault to a specific location on the endpoint. Else the default temp location will be used.
Provide a "Timeout" value in milliseconds. For eg: if you need the packet drop to be sustained for a duration of 1 hour then you should provide the timeout value as 3600000 (1 hour = 3600000 ms). After this duration, Mangle will ensure remediation of the fault without any manual intervention.
Schedule options are required only if the fault needs to be re-executed at regular intervals against an endpoint.
Tags are key value pairs that will be send to the active monitoring tool under Mangle Admin settings ---> Metric Providers at the time of publishing events for fault injection and remediation. They are not mandatory.
Click on Run Fault.
The user will be re-directed to the Processed Requests section under Requests & Reports tab.
If Mangle was able to successfully trigger the fault, the status of the task will change to "COMPLETED". The option to trigger a remediation request at anytime can be found on clicking the button against the task in the Processed Requests table.
For monitoring purposes, log into either Wavefront or Datadog once it is configured as an active Metric provider in Mangle and refer to the Events section. Events similar to the screenshots provided below will be available on the monitoring tool for tracking purposes.
Packet Corruption
Steps to follow:
Login as a user with read and write privileges to Mangle.
Provide a "Nic Name". For eg: For a remote machine endpoint Nic name could be eth0, eth1 etc depending on what adapter you would want to target for the fault.
Provide a "Percentage" value to specify what percentage of the packets should be corrupted. For eg: 10 to simulate a packet corruption of 10 percentage on a particular network interface of an Endpoint.
Provide "Injection Home Dir" only if you would like Mangle to push the script files needed to simulate the fault to a specific location on the endpoint. Else the default temp location will be used.
Provide a "Timeout" value in milliseconds. For eg: if you need the packet corruption to be sustained for a duration of 1 hour then you should provide the timeout value as 3600000 (1 hour = 3600000 ms). After this duration, Mangle will ensure remediation of the fault without any manual intervention.
Schedule options are required only if the fault needs to be re-executed at regular intervals against an endpoint.
Tags are key value pairs that will be send to the active monitoring tool under Mangle Admin settings ---> Metric Providers at the time of publishing events for fault injection and remediation. They are not mandatory.
Click on Run Fault.
The user will be re-directed to the Processed Requests section under Requests & Reports tab.
If Mangle was able to successfully trigger the fault, the status of the task will change to "COMPLETED". The option to trigger a remediation request at anytime can be found on clicking the button against the task in the Processed Requests table.
For monitoring purposes, log into either Wavefront or Datadog once it is configured as an active Metric provider in Mangle and refer to the Events section. Events similar to the screenshots provided below will be available on the monitoring tool for tracking purposes.
Docker State Change
Docker State Change faults enable you to abruptly stop or pause containers running on a Docker host. Unlike other infrastructure faults like CPU, Memory and Disk IO this fault is specific to the Docker endpoint and does not have a timeout field because the fault completes very quickly. Some containers may be configured for auto-start and some might require a manual start command to be executed. For the first case, auto-remediation through Mangle is not needed. For the second case, a manual remediation can be triggered from the Requests and Reports tab after the fault completes.
Steps to follow:
Login as a user with read and write privileges to Mangle.
Navigate to Fault Execution tab ---> Infrastructure Faults ---> Docker ---> State Change.
Select an Endpoint (Only Docker Endpoints are listed).
Select the fault.
Provide a "Container Name".
Schedule options are not available for this fault.
Tags are key value pairs that will be send to the active monitoring tool under Mangle Admin settings ---> Metric Providers at the time of publishing events for fault injection and remediation. They are not mandatory.
Click on Run Fault.
The user will be re-directed to the Processed Requests section under Requests & Reports tab.
If Mangle was able to successfully trigger the fault, the status of the task will change to "COMPLETED". The option to trigger a remediation request at anytime can be found on clicking the button against the task in the Processed Requests table.
For monitoring purposes, log into either Wavefront or Datadog once it is configured as an active Metric provider in Mangle and refer to the Events section. Events similar to the screenshots provided below will be available on the monitoring tool for tracking purposes.
Kubernetes Delete Resource
Kubernetes (K8s) Delete Resource faults enable you to abruptly delete pods or nodes within a K8s cluster. Unlike other infrastructure faults like CPU, Memory and Disk IO this fault is specific to the K8s endpoint and does not have a timeout field because the fault completes very quickly. In most cases, K8s will automatically replace the deleted resource. This fault allows you see how the applications hosted on these pods behave in the event of rescheduling when a K8s resource is deleted and re-created.
Steps to follow:
Login as a user with read and write privileges to Mangle.
Select an Endpoint (Only K8S endpoints are listed).
Select a Resource Type: POD or NODE.
Select a Resource identifier: Resource Name or Resource Labels.
If you choose Resource Name to identify a pod or a node, enter a string.
If you choose Resource Labels provide a key value pair for eg: app=mangle. Since multiple resources can have the same label, you also need to specify if you are interested in a Random Injection. If "Random Injection" is set to true, Mangle will randomly choose one resource in a list of resources identified using the label, for introducing the fault. If "Random Injection" is set to false, it will introduce fault into all resources identified using the resource label.
Schedule options are not available for this fault.
Tags are key value pairs that will be send to the active monitoring tool under Mangle Admin settings ---> Metric Providers at the time of publishing events for fault injection and remediation. They are not mandatory.
Click on Run Fault.
The user will be re-directed to the Processed Requests section under Requests & Reports tab.
If Mangle was able to successfully trigger the fault, the status of the task will change to "COMPLETED". Remediation requests are not supported for this fault.
For monitoring purposes, log into either Wavefront or Datadog once it is configured as an active Metric provider in Mangle and refer to the Events section. Events similar to the screenshots provided below will be available on the monitoring tool for tracking purposes.
Kubernetes Resource Not Ready
Kubernetes (K8s) Resource Not Ready faults enable you to abruptly put pods or nodes within a K8s cluster into a state that is not suitable for scheduling.
Steps to follow:
Login as a user with read and write privileges to Mangle.
Select an Endpoint (Only K8S endpoints are listed).
Select a Resource Type: POD or NODE.
Select a Resource identifier: Resource Name or Resource Labels.
If you choose Resource Name to identify a pod or a node, enter a string.
If you choose Resource Labels provide a key value pair for eg: app=mangle. Since multiple resources can have the same label, you also need to specify if you are interested in a Random Injection. If "Random Injection" is set to true, Mangle will randomly choose one resource in a list of resources identified using the label, for introducing the fault. If "Random Injection" is set to false, it will introduce fault into all resources identified using the resource label.
Provide an app container name. Please note that the application specified should have a readiness probe configured for this fault to be triggered successfully.
Schedule options are not available for this fault.
Tags are key value pairs that will be send to the active monitoring tool under Mangle Admin settings ---> Metric Providers at the time of publishing events for fault injection and remediation. They are not mandatory.
Click on Run Fault.
The user will be re-directed to the Processed Requests section under Requests & Reports tab.
If Mangle was able to successfully trigger the fault, the status of the task will change to "COMPLETED". Remediation requests are not supported for this fault.
For monitoring purposes, log into either Wavefront or Datadog once it is configured as an active Metric provider in Mangle and refer to the Events section. Events similar to the screenshots provided below will be available on the monitoring tool for tracking purposes.
Kubernetes Service Not Available
Kubernetes (K8s) Service Not Available faults enable you to abruptly make a service resource in K8s cluster not available, although the pod will be healthy and running.
Steps to follow:
Login as a user with read and write privileges to Mangle.
Navigate to Fault Execution tab ---> Infrastructure Faults ---> K8S ---> Service Unavailable.
Select an Endpoint (Only K8S endpoints are listed).
Choose the appropriate service identifier: Service Name or Service Labels.
If you choose Service Name, enter an appropriate string.
If you choose Service Labels provide a key value pair for eg: app=mangle. Since multiple resources can have the same label, you also need to specify if you are interested in a Random Injection. If "Random Injection" is set to true, Mangle will randomly choose one resource in a list of resources identified using the label, for introducing the fault. If "Random Injection" is set to false, it will introduce fault into all resources identified using the resource label.
Schedule options are not available for this fault.
Tags are key value pairs that will be send to the active monitoring tool under Mangle Admin settings ---> Metric Providers at the time of publishing events for fault injection and remediation. They are not mandatory.
Click on Run Fault.
The user will be re-directed to the Processed Requests section under Requests & Reports tab.
If Mangle was able to successfully trigger the fault, the status of the task will change to "COMPLETED". Remediation requests are not supported for this fault.
For monitoring purposes, log into either Wavefront or Datadog once it is configured as an active Metric provider in Mangle and refer to the Events section. Events similar to the screenshots provided below will be available on the monitoring tool for tracking purposes.
vCenter Disk Fault
vCenter Disk faults enable you to abruptly disconnect disks from a virtual machine in its inventory. It requires the VM Disk ID and VM Name to trigger the fault. For all vCenter faults, Mangle talks to the mangle-vc-adapter to connect and perform the required action on VC. So it is mandatory that you install the mangle-vc-adapter container prior to adding vCenter Endpoints or running vCenter faults. To find how to install and configure the mangle-vc-adapter, please refer here.
Steps to follow:
Login as a user with read and write privileges to Mangle.
Select an Endpoint (Only vCenter endpoints are listed).
Select the fault: Disconnect Disk.
Provide the VM Name and VM Disk ID. To identify the disk id, the VM moid is required. This information can be gathered from the vCenter MOB (Managed Object Browser). Refer to for help on this. Once you have retrieved the VM moid, the disk id can be retrieved from the disk properties section in the link below after replacing the values in angle braces <>:
https:///mob/?moid=&doPath=layout
Schedule options are not available for this fault.
Tags are key value pairs that will be send to the active monitoring tool under Mangle Admin settings ---> Metric Providers at the time of publishing events for fault injection and remediation. They are not mandatory.
Click on Run Fault.
The user will be re-directed to the Processed Requests section under Requests & Reports tab.
If Mangle was able to successfully trigger the fault, the status of the task will change to "COMPLETED". The option to trigger a remediation request at anytime can be found on clicking the button against the task in the Processed Requests table.
For monitoring purposes, log into either Wavefront or Datadog once it is configured as an active Metric provider in Mangle and refer to the Events section. Events similar to the screenshots provided below will be available on the monitoring tool for tracking purposes.
vCenter NIC Fault
vCenter NIC faults enable you to abruptly disconnect network interface cards from a virtual machine in its inventory. It requires the VM Nic ID and VM Name to trigger the fault. For all vCenter faults, Mangle talks to the mangle-vc-adapter to connect and perform the required action on VC. So it is mandatory that you install the mangle-vc-adapter container prior to adding vCenter Endpoints or running vCenter faults. To find how to install and configure the mangle-vc-adapter, please refer here.
Steps to follow:
Login as a user with read and write privileges to Mangle.
Select an Endpoint (Only vCenter endpoints are listed).
Select the fault: Disconnect Nic.
Provide the VM Name and VM Nic ID. To identify the Nic id, the VM moid is required. This information can be gathered from the vCenter MOB (Managed Object Browser). Refer to for help on this. Once you have retrieved the VM moid, the disk id can be retrieved from the deviceConfigId section in the link below after replacing the values in angle braces <>:
https:///mob/?moid=&doPath=guest%2enet
Schedule options are not available for this fault.
Tags are key value pairs that will be send to the active monitoring tool under Mangle Admin settings ---> Metric Providers at the time of publishing events for fault injection and remediation. They are not mandatory.
Click on Run Fault.
The user will be re-directed to the Processed Requests section under Requests & Reports tab.
If Mangle was able to successfully trigger the fault, the status of the task will change to "COMPLETED". The option to trigger a remediation request at anytime can be found on clicking the button against the task in the Processed Requests table.
For monitoring purposes, log into either Wavefront or Datadog once it is configured as an active Metric provider in Mangle and refer to the Events section. Events similar to the screenshots provided below will be available on the monitoring tool for tracking purposes.
vCenter VM State Change Fault
vCenter VM State Change faults enable you to abruptly power-off, reset or suspend any virtual machine in its inventory. It requires just the VM Name to trigger the fault. For all vCenter faults, Mangle talks to the mangle-vc-adapter to connect and perform the required action on VC. So it is mandatory that you install the mangle-vc-adapter container prior to adding vCenter Endpoints or running vCenter faults. To find how to install and configure the mangle-vc-adapter, please refer here.
Steps to follow:
Login as a user with read and write privileges to Mangle.
Select an Endpoint (Only vCenter endpoints are listed).
Select one of the faults: Poweroff, Suspend or Reset VM.
Provide the VM Name.
Schedule options are not available for this fault.
Tags are key value pairs that will be send to the active monitoring tool under Mangle Admin settings ---> Metric Providers at the time of publishing events for fault injection and remediation. They are not mandatory.
Click on Run Fault.
The user will be re-directed to the Processed Requests section under Requests & Reports tab.
If Mangle was able to successfully trigger the fault, the status of the task will change to "COMPLETED". The option to trigger a remediation request at anytime can be found on clicking the button against the task in the Processed Requests table.
For monitoring purposes, log into either Wavefront or Datadog once it is configured as an active Metric provider in Mangle and refer to the Events section. Events similar to the screenshots provided below will be available on the monitoring tool for tracking purposes.
AWS EC2 State Change Fault
AWS EC2 State Change fault enables you to abruptly terminate, stop or reboot any EC2 instance. It requires AWS tags to uniquely identify instances against which the fault should run.
Steps to follow:
Login as a user with read and write privileges to Mangle.
Select an Endpoint (Only AWS accounts are listed).
Select one of the faults: Terminate_Instances, Stop_Instances, Reboot_Instances.
Provide the AWS tag (key value pair to uniquely identify the instance(s). Since multiple instances can have the same tag, you also need to specify if you are interested in a Random Injection. If "Random Injection" is set to true, Mangle will randomly choose one instance from a list of instances identified using the tag, for introducing the fault. If "Random Injection" is set to false, it will introduce the fault into all the instances identified using the tag.
Schedule options are not available for this fault.
Tags are key value pairs that will be send to the active monitoring tool under Mangle Admin settings ---> Metric Providers at the time of publishing events for fault injection and remediation. They are not mandatory.
Click on Run Fault.
The user will be re-directed to the Processed Requests section under Requests & Reports tab.
If Mangle was able to successfully trigger the fault, the status of the task will change to "COMPLETED". The option to trigger a remediation request at anytime can be found on clicking the button against the task in the Processed Requests table.
For monitoring purposes, log into either Wavefront or Datadog once it is configured as an active Metric provider in Mangle and refer to the Events section. Events similar to the screenshots provided below will be available on the monitoring tool for tracking purposes.
AWS EC2 Network Fault
AWS EC2 Network fault enable you to abruptly terminate, stop or reboot any EC2 instance. It requires AWS tags to uniquely identify instances against which the fault should run.
Steps to follow:
Login as a user with read and write privileges to Mangle.
Select an Endpoint (Only AWS accounts are listed).
Select the faults: Block_All_Network_Traffic.
Provide the AWS tag (key value pair to uniquely identify the instance(s). Since multiple instances can have the same tag, you also need to specify if you are interested in a Random Injection. If "Random Injection" is set to true, Mangle will randomly choose one instance from a list of instances identified using the tag, for introducing the fault. If "Random Injection" is set to false, it will introduce the fault into all the instances identified using the tag.
Schedule options are not available for this fault.
Tags are key value pairs that will be send to the active monitoring tool under Mangle Admin settings ---> Metric Providers at the time of publishing events for fault injection and remediation. They are not mandatory.
Click on Run Fault.
The user will be re-directed to the Processed Requests section under Requests & Reports tab.
If Mangle was able to successfully trigger the fault, the status of the task will change to "COMPLETED". The option to trigger a remediation request at anytime can be found on clicking the button against the task in the Processed Requests table.
For monitoring purposes, log into either Wavefront or Datadog once it is configured as an active Metric provider in Mangle and refer to the Events section. Events similar to the screenshots provided below will be available on the monitoring tool for tracking purposes.
Relevant API Reference
For access to relevant API Swagger documentation:
Please traverse to link -----> API Documentation from the Mangle UI or access https:///mangle-services/swagger-ui.html#/fault-injection-controller
Setup dans la pipeline
🇬🇧 fabacab/awesome-cybersecurity-blueteam
A collection of awesome resources, tools, and other shiny things for cybersecurity blue teams.
are groups of individuals who identify security flaws in information technology systems, verify the effectiveness of security measures, and monitor the systems to ensure that implemented defensive measures remain effective in the future. While not exclusive, this list is heavily biased towards projects and against proprietary products or corporate services. For offensive TTPs, please see .
Your contributions and suggestions are heartily♥ welcome. (✿◕‿◕). Please check the for more details. This work is licensed under a .
Many cybersecurity professionals enable racist state violence, wittingly or unwittingly, by providing services to local, state, and federal policing agencies or otherwise cooperating with similar institutions who do so. This evil most often happens through the coercive mechanism of employment under threat of lack of access to food, shelter, or healthcare. Despite this list's public availability, it is the maintainer's intention and hope that this list supports the people and organizations who work to counter such massive albeit banal evil.
Ansible Lockdown - Curated collection of information security themed Ansible roles that are both vetted and actively maintained.
Clevis - Plugable framework for automated decryption, often used as a Tang client.
DShell - Extensible network forensic analysis framework written in Python that enables rapid development of plugins to support the dissection of network packet captures.
- Server hardening framework providing Ansible, Chef, and Puppet implementations of various baseline security configurations.
- Scriptable PDF file analyzer.
- Python-scriptable reverse engineering sandbox, based on QEMU.
- Container-based solution for automating Docker container base image updates, providing an unattended upgrade experience.
Code libraries and bindings
MultiScanner - File analysis framework written in Python that assists in evaluating a set of files by automatically running a suite of tools against them and aggregating the output.
Posh-VirusTotal - PowerShell interface to VirusTotal.com APIs.
censys-python - Python wrapper to the Censys REST API.
- High level C++ network packet sniffing and crafting library.
- Pythonic interface to the Internet Storm Center/DShield API.
- Minimal, consistent Python API for building integrations with malware sandboxes.
- Python APIs for serializing and de-serializing Structured Threat Information eXpression (STIX) JSON content, plus higher-level APIs for common tasks.
Security Orchestration, Automation, and Response (SOAR)
See also Security Information and Event Management (SIEM), and IR management consoles.
Shuffle - Graphical generalized workflow (automation) builder for IT professionals and blue teamers.
Checkov - Static analysis for Terraform (infrastructure as code) to help detect CIS policy violations and prevent cloud security misconfiguration.
Falco - Behavioral activity monitor designed to detect anomalous activity in containerized applications, hosts, and network packet flows by auditing the Linux kernel and enriched by runtime data such as Kubernetes metrics.
Istio - Open platform for providing a uniform way to integrate microservices, manage traffic flow across microservices, enforce policies and aggregate telemetry data.
- Secure container runtime with lightweight virtual machines that feel and perform like containers, but provide stronger workload isolation using hardware virtualization technology as a second layer of defense.
- Query and validate several common security-related configuration settings of managed Kubernetes cluster objects and the workloads/resources running inside the cluster.
- Tool based on AWS-CLI commands for Amazon Web Services account security assessment and hardening.
- Open source multi-cloud security-auditing tool, which enables security posture assessment of cloud environments.
- Application kernel, written in Go, that implements a substantial portion of the Linux system surface to provide an isolation boundary between the application and the host kernel.
Communications security (COMSEC)
See also Transport-layer defenses.
GPG Sync - Centralize and automate OpenPGP public key distribution, revocation, and updates amongst all members of an organization or team.
Geneva (Genetic Evasion) - Novel experimental genetic algorithm that evolves packet-manipulation-based censorship evasion strategies against nation-state level censors to increase availability of otherwise blocked content.
Bane - Custom and better AppArmor profile generator for Docker containers.
BlackBox - Safely store secrets in Git/Mercurial/Subversion by encrypting them "at rest" using GnuPG.
Cilium - Open source software for transparently securing the network connectivity between application services deployed using Linux container management platforms like Docker and Kubernetes.
- Static analysis tool to probe for vulnerabilities introduced via application container (e.g., Docker) images.
- Discover vulnerabilities across a codebase by performing queries against code as though it were data.
- Application vulnerability management tool built for DevOps and continuous security integration.
- Pentest applications during routine continuous integration build pipelines.
- Prevents you from committing passwords and other sensitive information to a git repository.
- Editor of encrypted files that supports YAML, JSON, ENV, INI and binary formats and encrypts with AWS KMS, GCP KMS, Azure Key Vault, and PGP.
- Finds and fixes vulnerabilities and license violations in open source dependencies and container images.
- Continuous inspection tool that provides detailed reports during automated testing and alerts on newly introduced security vulnerabilities.
- Simple and comprehensive vulnerability scanner for containers and other artifacts, suitable for use in continuous integration pipelines.
- Tool for securely accessing secrets such as API keys, passwords, or certificates through a unified interface.
- Transparent file encryption in git; files which you choose to protect are encrypted when committed, and decrypted when checked out.
Application or Binary Hardening
DynInst - Tools for binary instrumentation, analysis, and modification, useful for binary patching.
DynamoRIO - Runtime code manipulation system that supports code transformations on any part of a program, while it executes, implemented as a process-level virtual machine.
Egalito - Binary recompiler and instrumentation framework that can fully disassemble, transform, and regenerate ordinary Linux binaries designed for binary hardening and security research.
- Instrumentation framework for building dynamic analysis tools.
Compliance testing and reporting
Chef InSpec - Language for describing security and compliance rules, which become automated tests that can be run against IT infrastructures to discover and report on non-compliance.
OpenSCAP Base - Both a library and a command line tool (oscap) used to evaluate a system against SCAP baseline profiles to report on the security posture of the scanned system(s).
CanaryTokens - Self-hostable honeytoken generator and reporting dashboard; demo version available at CanaryTokens.org.
Kushtaka - Sustainable all-in-one honeypot and honeytoken orchestrator for under-resourced blue teams.
Tarpits
Endlessh - SSH tarpit that slowly sends an endless banner.
LaBrea - Program that answers ARP requests for unused IP space, creating the appearance of fake machines that answer further requests very slowly in order to slow down scanners, worms, etcetera.
Host-based tools
Artillery - Combination honeypot, filesystem monitor, and alerting system designed to protect Linux and Windows operating systems.
chkrootkit - Locally checks for signs of a rootkit on GNU/Linux systems.
Crowd Inspect - Free tool for Windows systems aimed to alert you to the presence of malware that may be communicating over the network.
- Intrusion prevention software framework that protects computer servers from brute-force attacks.
- Fully open source and free, feature-rich, Host-based Instrusion Detection System (HIDS).
- POSIX-compliant Bash script that scans a host for various signs of malware.
Sandboxes
Firejail - SUID program that reduces the risk of security breaches by restricting the running environment of untrusted applications using Linux namespaces and seccomp-bpf.
aws_ir - Automates your incident response with zero security preparedness assumptions.
IR management consoles
See also Security Orchestration, Automation, and Response (SOAR).
CIRTKit - Scriptable Digital Forensics and Incident Response (DFIR) toolkit built on Viper.
Fast Incident Response (FIR) - Cybersecurity incident management platform allowing for easy creation, tracking, and reporting of cybersecurity incidents.
Rekall - Advanced forensic and incident response framework.
- Scalable, free Security Incident Response Platform designed to make life easier for SOCs, CSIRTs, and CERTs, featuring tight integration with MISP.
- Web application built by Defense Point Security to allow security researchers the ability to add and retrieve indicators related to their research.
Evidence collection
AutoMacTC - Modular, automated forensic triage collection framework designed to access various forensic artifacts on macOS, parse them, and present them in formats viable for analysis.
CertSpotter - Certificate Transparency log monitor from SSLMate that alerts you when a SSL/TLS certificate is issued for one of your domains.
Gophish - Powerful, open-source phishing framework that makes it easy to test your organization's exposure to phishing.
King Phisher - Tool for testing and promoting user awareness by simulating real world phishing attacks.
- Outlook add-in used to help your users to report suspicious e-mails to security teams.
- Framework that will assist with the detection and response to phishing attacks.
- Platform allowing to create and manage (fake) phishing campaigns intended to train people in identifying suspicious mails.
- Scans SPF and DMARC records for issues that could allow email spoofing.
- Configurable script to watch for issuances of suspicious TLS certificates by domain name in the Certificate Transparency Log (CTL) using the service.
Preparedness training and wargaming
(Also known as adversary emulation, threat simulation, or similar.)
APTSimulator - Toolset to make a system look as if it was the victim of an APT attack.
Atomic Red Team - Library of simple, automatable tests to execute for testing security controls.
DumpsterFire - Modular, menu-driven, cross-platform tool for building repeatable, time-delayed, distributed security events for Blue Team drills and sensor/alert mapping.
- Automated information security preparedness tool to do adversarial simulation.
- Utility to generate malicious network traffic and help security teams evaluate security controls and audit their network visibility.
- Ubuntu-based Open Virtual Appliance (.ova) preconfigured with several threat emulation tools as well as a defender's toolkit.
Security monitoring
Endpoint Detection and Response (EDR)
Wazuh - Open source, multiplatform agent-based security monitoring based on a fork of OSSEC HIDS.
Moloch - Augments your current security infrastructure to store and index network traffic in standard PCAP format, providing fast, indexed access.
- Helps manage network IDS at scale by visualizing Suricata, Zeek, and Moloch life cycles.
- Open source framework for network traffic analysis that ingests Zeek logs and detects beaconing, DNS tunneling, and more.
- Detects the presence of the Responder LLMNR/NBT-NS/MDNS poisoner on a network.
- Widely-deployed, Free Software IPS capable of real-time packet analysis, traffic logging, and custom rule-based triggers.
- Catch spoofed NetBIOS Name Service (NBNS) responses and alert to an email or log file.
- Full-packet-capture utility for buffering packets to disk for intrusion detection and incident response purposes.
- Free, cross-platform, IDS/IPS with on- and off-line analysis modes and deep packet inspection capabilities that is also scriptable with Lua.
- General purpose network security scanner with an extensible plugin system for detecting high severity vulnerabilities with high confidence.
- Free and open-source network telemetry engine for data-driven security investigations.
- Free and open-source packet analyzer useful for network troubleshooting or forensic netflow analysis.
- Powerful network analysis framework focused on security monitoring, formerly known as Bro.
- Free and fast GNU/Linux networking toolkit with numerous utilities such as a connection tracking tool (flowtop), traffic generator (trafgen), and autonomous system (AS) trace route utility (astraceroute).
Security Information and Event Management (SIEM)
AlienVault OSSIM - Single-server open source SIEM platform featuring asset discovery, asset inventorying, behavioral monitoring, and event correlation, driven by AlienVault Open Threat Exchange (OTX).
Prelude SIEM OSS - Open source, agentless SIEM with a long history and several commercial variants featuring security event collection, normalization, and alerting from arbitrary log input and numerous popular monitoring tools.
Icinga - Modular redesign of Nagios with pluggable user interfaces and an expanded set of data connectors, collectors, and reporting tools.
Locust - Open source load testing tool in which you can define user behaviour with Python code and swarm your system with millions of simultaneous users.
Nagios - Popular network and service monitoring solution and reporting platform.
- Free and feature-rich networking monitoring system supporting multiple configurations, a variety of alerting mechanisms (email, XMPP, SMS), and numerous data collection methods (SNMP, HTTP, JDBC, etc).
- Operating system instrumentation framework for macOS, Windows, and Linux, exposing the OS as a high-performance relational database that can be queried with a SQL-like syntax.
- Mature, enterprise-level platform to monitor large-scale IT environments.
Threat hunting
(Also known as hunt teaming and threat detection.)
CimSweep - Suite of CIM/WMI-based tools enabling remote incident response and hunting operations across all versions of Windows.
DeepBlueCLI - PowerShell module for hunt teaming via Windows Event logs.
GRR Rapid Response - Incident response framework focused on remote live forensics consisting of a Python agent installed on assets and Python-based server infrastructure enabling analysts to quickly triage attacks and perform analysis remotely.
- All-in-one Free Software threat hunting stack based on Elasticsearch, Logstash, Kafka, and Kibana with various built-in integrations for analytics including Jupyter Notebook.
- Automate the security incident handling process and facilitate the real-time activities of incident handlers.
- PowerShell module designed to scan remote endpoints for indicators of compromise or survey them for more comprehensive information related to state of those systems.
- PSHunt-like tool for analyzing remote Windows systems that also produces a self-contained HTML report of its findings.
- All in one PowerShell-based platform to perform live hard disk forensic analysis.
- Multi-platform tool for triaging suspected IOCs on many endpoints simultaneously and that integrates with antivirus consoles.
- Freeware endpoint auditing and analysis tool that provides host-based investigative capabilities, offered by FireEye, Inc.
Active Directory Control Paths - Visualize and graph Active Directory permission configs ("control relations") to audit questions such as "Who can read the CEO's email?" and similar.
AttackerKB - Free and public crowdsourced vulnerability assessment platform to help prioritize high-risk patch application and combat vulnerability fatigue.
DATA - Credential phish analysis and automation tool that can accept suspected phishing URLs directly or trigger on observed network traffic containing such a URL.
- Multi-threaded threat intelligence gathering built with Python3 featuring simple text-based configuration and data storage for ease of use and data portability.
- Provides IP network situational awareness of industrial control systems (ICS) and Supervisory Control and Data Acquisition (SCADA) by passively mapping, accounting for, and reporting on your ICS/SCADA network topology and endpoints.
- Gather and combine multiple threat intelligence feed sources into one customizable, standardized CSV-based format.
- Open source software solution for collecting, storing, distributing and sharing cyber security indicators.
- Extendable tool to extract and aggregate IOCs from threat feeds including Twitter, RSS feeds, or other sources.
- Identifies defensive gaps in security posture by leveraging Mitre's ATT&CK framework.
- Binary analysis and management framework enabling easy organization of malware and exploit samples.
OnionBalance - Provides load-balancing while also making Onion services more resilient and reliable by eliminating single points-of-failure.
Vanguards - Version 3 Onion service guard discovery attack mitigation script (intended for eventual inclusion in Tor core).
Transport-layer defenses
Certbot - Free tool to automate the issuance and renewal of TLS certificates from the LetsEncrypt Root CA with plugins that configure various Web and e-mail server software.
MITMEngine - Golang library for server-side detection of TLS interception events.
OpenVPN - Open source, SSL/TLS-based virtual private network (VPN).
- Censorship circumvention and anonymizing overlay network providing distributed, cryptographically verified name services (.onion domains) to enhance publisher privacy and service availability.
BlockBlock - Monitors common persistence locations and alerts whenever a persistent component is added, which helps to detect and prevent malware installation.
Santa - Keep track of binaries that are naughty or nice in an allow/deny-listing system for macOS.
- Easily configure macOS security settings from the terminal.
- Automated configuration of kernel-level, OS-level, and client-level security features including privatizing proxying and anti-virus scanning for macOS.
HardenTools - Utility that disables a number of risky Windows features.
NotRuler - Detect both client-side rules and VBScript enabled forms used by the Ruler attack tool when attempting to compromise a Microsoft Exchange server.
Sandboxie - Free and open source general purpose Windows application sandboxing utility.
- Audit a Windows host's root certificate store against Microsoft's .
- Establishes a Windows RDP session from a list of hostnames and scans for accessibility tools backdoors, alerting if one is discovered.
- Group Policy objects, compliance checks, and configuration tools that provide an automated and flexible approach for securely deploying and maintaining the latest releases of Windows 10.
- Log newly created WMI consumers and processes to the Windows Application event log.
Dernière mise à jour le 1 janvier 2021 par la communauté Github
Une liste collective d'API gratuites et publique réuni par +618 contributeurs à utiliser dans le développement de logiciels et du web.
Pour plus d'informations sur la contribution à ce projet, veuillez consulter le guide de contribution :
Veuillez noter qu'un statut de construction réussie indique que toutes les API listées sont disponibles depuis la dernière mise à jour. Un statut de construction défaillant indique qu'un ou plusieurs services peuvent être indisponibles pour le moment.
Animals
Anime
Anti-Malware
Art & Design
Books
Business
Calendar
Cloud Storage & File Sharing
Continuous Integration
Cryptocurrency
Currency Exchange
Data Validation
Development
Dictionaries
Documents & Productivity
Environment
Events
Finance
Food & Drink
Games & Comics
Geocoding
Government
Health
Jobs
Machine Learning
Music
News
Open Data
Open Source Projects
Patent
Personality
Photography
Science & Math
Security
Shopping
Social
Sports & Fitness
Test Data
Text Analysis
Tracking
Transportation
URL Shorteners
Vehicle
Video
Weather
Based on the Stanford Dogs Dataset
No
Yes
Yes
Cat for every HTTP Status
No
Yes
Unknown
IUCN Red List of Threatened Species
apiKey
No
Unknown
Movement and Migration data of animals
No
Yes
Unknown
Placeholder goat images
No
Yes
Unknown
Random pictures of cats
No
Yes
Yes
Random pictures of dogs
No
Yes
Yes
Random pictures of foxes
No
Yes
No
Provides a way to return various cat images
apiKey
No
Unknown
Adoption
No
Yes
Unknown
Random pictures of Shibu Inu, cats or birds
No
Yes
Ye
Unofficial MyAnimeList API
No
Yes
Yes
Anime discovery platform
OAuth
Yes
Yes
Anime and Manga Database and Community
OAuth
Yes
Unknown
Resources from Studio Ghibli films
No
Yes
Unknown
Scan anime image to get specific detail
No
Yes
Yes
Google Link/Domain Flagging
apiKey
Yes
Unknown
Metacert Link Flagging
apiKey
Yes
Unknown
Scan and Analyse URLs
apiKey
Yes
Unknown
VirusTotal File/URL Analysis
apiKey
Yes
Unknown
Website reputation
apiKey
Yes
Unknown
Design
OAuth
No
Unknown
Art
apiKey
No
Unknown
Icons
apiKey
Yes
Unknown
Icons
OAuth
Yes
Unknown
Icons
OAuth
No
Unknown
Art
apiKey
Yes
Unknown
Books
OAuth
Yes
Unknown
Library Genesis search engine
No
No
Unknown
Books, book covers and related data
No
Yes
No
Books, book covers and related data
No
Yes
Unknown
Gods and poets, their categories, and the verse meters, with the mandal and sukta number
No
Yes
Unknown
Descriptions of all nouns (names, places, animals, things) from vedic literature
No
Yes
Unknown
Registered Domain Names Search
No
Yes
Unknown
Hire freelancers to get work done
OAuth
Yes
Unknown
Flexible, RESTful access to the user's inbox
OAuth
Yes
Unknown
Collect, configure and analyze your data to reach the right audience
OAuth
Yes
Unknown
Validate email address to improve deliverability
apiKey
Yes
Unknown
Email Service
apiKey
Yes
Unknown
Trademark Search
No
No
Unknown
Friendly website analytics made for humans
No
Yes
Unknown
Boards, lists and cards to help you organize and prioritize your projects
OAuth
Yes
Unknown
Lookup for a name and returns nameday date
No
No
Unknown
Display, create and modify Google calendar events
OAuth
Yes
Unknown
Convert between Gregorian and Hebrew, fetch Shabbat and Holiday times, etc
No
No
Unknown
Historical data regarding holidays
apiKey
Yes
Unknown
Protestant liturgical calendar
No
No
Unknown
Public holidays for more than 90 countries
No
Yes
No
Provides namedays for multiple countries
No
Yes
Yes
Database of ICS files for non working days
No
Yes
Unknown
Check if a date is a Russian holiday or not
No
Yes
N
File Sharing and Storage
OAuth
Yes
Unknown
File Sharing and Storage
OAuth
Yes
Unknown
Plain Text Storage
apiKey
Yes
Unknown
IPFS based file storage and sharing with optional IPNS naming
apiKey
Yes
No
Sync your GitHub projects with Travis CI to test your code in minutes
apiKey
Yes
Unknown
Financial and Technical Data related to the Bitcoin Network
No
Yes
Unknown
Cryptocurrency Trading Platform
apiKey
Yes
Unknown
Real-Time Cryptocurrency derivatives trading platform based in Hong Kong
apiKey
Yes
Unknown
Next Generation Crypto Trading Platform
apiKey
Yes
Unknown
Bitcoin Payment, Wallet & Transaction Data
apiKey
Yes
Unknown
Bitcoin Payment, Wallet & Transaction Data
No
Yes
Unknown
All Currency Exchanges integrate under a single api
apiKey
Yes
No
Bitcoin, Bitcoin Cash, Litecoin and Ethereum Prices
apiKey
Yes
Unknown
Cryptocurrency Trading Platform
apiKey
Yes
Unknown
Bitcoin Price Index
No
No
Unknown
Cryptocurrency Price, Market, and Developer/Social Data
No
Yes
Yes
Interacting with Coinigy Accounts and Exchange Directly
apiKey
Yes
Unknown
Real-time Crypto Currency Exchange Rates
apiKey
Yes
Unknown
Crypto Currency Prices
apiKey
Yes
Unknown
Cryptocurrencies prices, volume and more
No
Yes
Unknown
Cryptocurrencies Prices
apiKey
Yes
Unknown
Cryptocurrencies prices, volume and more
No
Yes
Yes
Live Cryptocurrency data
No
Yes
Unknown
Cryptocurrencies Comparison
No
Yes
Unknown
Cryptocurrencies Exchange Rates
No
Yes
Unknown
Cryptocurrencies Exchange
No
Yes
Unknown
Various information on listing, ratings, stats, and more
apiKey
Yes
Unknown
Cryptocurrency Exchange
No
Yes
Unknown
Brazilian Cryptocurrency Information
No
Yes
Unknown
Automated cryptocurrency exchange service
No
No
Yes
US based digital asset exchange
apiKey
Yes
Unknown
Cryptocurrencies Prices
apiKey
Yes
Unknown
A collection of exchange rates
No
Yes
Unknown
Free currency conversion
No
Yes
Yes
Exchange rates with currency conversion
No
Yes
Yes
Exchange rates and currency conversion
apiKey
Yes
Unknown
Exchange rates, currency conversion and time series
No
Yes
Yes
Free exchange rates and historical rates
No
Yes
Unknown
Exchange rates, geolocation and VAT number validation
No
Yes
Yes
US Address Verification
apiKey
Yes
Unknown
Email address validation
No
Yes
Unknown
Open Source phone number validation
No
Yes
Unknown
Phone number validation
No
Yes
Unknown
Content validator against profanity & obscenity
No
No
Unknown
Enter address data quickly with real-time address suggestions
apiKey
Yes
Yes
Extract postal addresses from any text including emails
apiKey
Yes
Yes
Validate and append data for any US postal address
apiKey
Yes
Yes
VAT number validation
No
Yes
Unknown
Chrome based screenshot API for developers
apiKey
Yes
Unknown
IP, Domains and Emails anti-abuse API blocklist
No
Yes
Yes
Wikipedia for Web APIs, OpenAPI/Swagger specs for public APIs
No
Yes
Unknown
Return a site's meta tags in JSON format
X-Mashape-Key
Yes
Unknown
Bitbucket API
OAuth
Yes
Unknown
Find random activities to fight boredom
No
Yes
Unknown
Easily make screenshots of web pages in any screen size, as any device
apiKey
Yes
Unknown
Library info on CDNJS
No
Yes
Unknown
Structured changelog metadata from open source projects
No
Yes
Unknown
Free and simple counting service. You can use it to track page hits and specific events
No
Yes
Yes
Status of all DigitalOcean services
No
Yes
Unknown
Domain name search to find all domains containing particular words/phrases/etc
No
Yes
Unknown
Estimates a gender from a first name
No
Yes
Yes
Make use of GitHub repositories, code and user info programmatically
OAuth
Yes
Yes
Automate GitLab interaction programmatically
OAuth
Yes
Unknown
Chat for Developers
OAuth
Yes
Unknown
Test endpoints for client and server HTTP/2 protocol support
No
Yes
Unknown
Convert text to speech
apiKey
Yes
Yes
Visual Recognition with pretrained or user trained model
apiKey
Yes
Unknown
IFTTT Connect API
No
Yes
Unknown
Generate charts, QR codes and graph images
No
Yes
Yes
Retrieve structured data from a website or RSS feed
apiKey
Yes
Unknown
A simple IP Address API
No
Yes
Unknown
Another simple IP Address API
No
Yes
Unknown
Convert JSON to JSONP (on-the-fly) for easy cross-domain data requests using client-side JavaScript
No
Yes
Unknown
Pretty Prints JSON data
No
Yes
Yes
Free JSON storage service. Ideal for small scale Web apps, Websites and Mobile apps
apiKey
Yes
Yes
Compile and run source code
No
Yes
Unknown
Unofficial REST API for choosealicense.com
No
Yes
No
Retrieve vendor details and other information regarding a given MAC address or an OUI
apiKey
Yes
Yes
Estimate the nationality of a first name
No
Yes
Yes
Multiple spam filtering service
No
Yes
Yes
Spam filtering system
No
Yes
Unknown
Tool for testing APIs
apiKey
Yes
Unknown
Scraping and crawling anticaptcha service
apiKey
Yes
Unknown
A collective list of free JSON APIs for use in web development
No
Yes
Unknown
Push notifications for Android & iOS
apiKey
Yes
Unknown
Create an easy to read QR code and URL shortener
No
Yes
Yes
Generate and decode / read QR code graphics
No
Yes
Unknown
Generate chart and graph images
No
Yes
Yes
A hosted REST-API ready to respond to your AJAX requests
No
Yes
Unknown
Extract and monitor data from any website
apiKey
Yes
Unknown
Easily build scalable web scrapers
apiKey
Yes
Unknown
Create pixel-perfect website screenshots
apiKey
Yes
Yes
ALL-CAPS AS A SERVICE
No
No
Unknown
Q&A forum for developers
OAuth
Yes
Unknown
Definitions with example sentence and photo if available
apiKey
Yes
Yes
Dictionary Data
apiKey
Yes
No
Dictionary Data
apiKey
No
Unknown
Definitions and synonyms for more than 150,000 words
apiKey
Yes
Unknown
Web parser
apiKey
Yes
Unknown
HTML/URL to PDF
apiKey
Yes
Unknown
Bookmarking service
OAuth
Yes
Unknown
Data from XML or JSON to PDF, HTML or Image
apiKey
Yes
Unknown
Provides screenshot, HTML to PDF and content extraction APIs
apiKey
Yes
Unknown
Todo Lists
OAuth
Yes
Unknown
Free vector file converting API
No
No
Yes
Automated time tracking leaderboards for programmers
No
Yes
Unknown
Open air quality data
apiKey
Yes
Unknown
Air quality of China
apiKey
No
Unknown
Energy production photovoltaic (PV) energy systems
apiKey
Yes
Unknown
The Official Carbon Intensity API for Great Britain developed by National Grid
No
Yes
Unknown
Search events, attractions, or venues
apiKey
Yes
Unknown
Realtime & Historical Stock and Market Data
apiKey
Yes
Yes
Spreadbetting and CFD Market Data
apiKey
Yes
Unknown
Connect with users’ bank accounts and access transaction data
apiKey
Yes
Unknown
Indian Financial Systems Code (Bank Branch Codes)
No
Yes
Unknown
US equity/option market data (delayed, intraday, historical)
OAuth
Yes
Yes
Budgeting & Planning
OAuth
Yes
Yes
Random pictures of food dishes
No
Yes
Yes
Alcohol
apiKey
Yes
Unknown
Breweries, Cideries and Craft Beer Bottle Shops
No
Yes
Yes
Food Products Database
No
Yes
Unknown
Brewdog Beer Recipes
No
Yes
Unknown
Food
No
No
Unknown
Community-driven taco database
No
No
Unknown
Food & Drink Reviews
No
Yes
Unknown
Cocktail Recipes
apiKey
Yes
Yes
Meal Recipes
apiKey
Yes
Yes
NYPL human-transcribed historical menu collection
apiKey
No
Unknown
Discover restaurants
apiKey
Yes
Unknown
Steam/PC Game Prices and Deals
No
Yes
Yes
Jokes
No
No
Unknown
Clash of Clans Game Information
apiKey
Yes
Unknown
Clash Royale Game Information
apiKey
Yes
Unknown
Comics
No
Yes
Unknown
Deck of Cards
No
No
Unknown
Bungie Platform API
apiKey
Yes
Unknown
Provides information about Player stats , Match stats, Rankings for Dota 2
No
Yes
Unknown
Reference for 5th edition spells, classes, monsters, and more
No
No
No
Third-Party Developer Documentation
OAuth
Yes
Unknown
Final Fantasy XIV Game data API
No
Yes
Yes
Fortnite Stats
apiKey
Yes
Unknown
Video Games
No
Yes
Unknown
Guild Wars 2 Game Information
apiKey
Yes
Unknown
Halo 5 and Halo Wars 2 Information
apiKey
Yes
Unknown
Hearthstone Cards Information
X-Mashape-Key
Yes
Unknown
Hypixel player stats
apiKey
Yes
Unknown
Hytale blog posts and jobs
No
Yes
Unknown
Video Game Database
apiKey
Yes
Unknown
Programming, Miscellaneous and Dark Jokes
No
Yes
Yes
Programming and general jokes
No
Yes
Unknown
Jeopardy Question Database
No
No
Unknown
Magic The Gathering Game Information
No
No
Unknown
Marvel Comics
apiKey
No
Unknown
Cross Platform Mod API
apiKey
Yes
Unknown
Trivia Questions
No
Yes
Unknown
E-sports games and results
apiKey
Yes
Unknown
PUBG Stats
apiKey
Yes
Unknown
Pokémon Information
No
Yes
Unknown
Pokémon TCG Information
No
Yes
Unknown
All the Rick and Morty information, including images
No
Yes
Yes
League of Legends Game Information
apiKey
Yes
Unknown
Magic: The Gathering database
No
Yes
Yes
Steam Client Interaction
OAuth
Yes
Unknown
All SuperHeroes and Villains data from all universes under a single API
apiKey
Yes
Unknown
The dumbest things Donald Trump has ever said
No
Yes
Unknown
Wargaming.net info and stats
apiKey
Yes
No
Retrieve xkcd comics as JSON
No
Yes
No
Create/customize digital maps based on Bing Maps data
apiKey
Yes
Unknown
Convert British OSGB36 easting and northing (British National Grid) to WGS84 latitude and longitude
No
Yes
Yes
Open APIs for select European cities
No
Yes
Unknown
Daum Maps provide multiple APIs for Korean maps
apiKey
No
Unknown
Free geo ip information, no registration required. 15k/hour rate limit
No
Yes
Yes
French geographical data
No
Yes
Unknown
Address geocoding / reverse geocoding in bulk
apiKey
Yes
Unknown
Provides worldwide forward/reverse geocoding, batch geocoding and geoparsing
No
Yes
Unknown
Geocoding of city name by using latitude and longitude coordinates
apiKey
Yes
Unknown
IP geolocation with ChatOps integration
No
Yes
Yes
Place names and other geographical data
No
No
Unknown
IP geolocation and currency conversion
No
Yes
Yes
A cloud-based platform for planetary-scale environmental data analysis
apiKey
Yes
Unknown
Create/customize digital maps based on Google Maps data
apiKey
Yes
Unknown
Get hello translation following user language
No
Yes
Unknown
Create/customize digital maps based on HERE Maps data
apiKey
Yes
Unknown
Map an IP to a country
No
Yes
Unknown
Find geolocation with ip address
No
Yes
Unknown
Find location with ip address
No
No
Unknown
Find IP address location information
No
Yes
Unknown
Geolocation API that returns extra information about an IP address
apiKey
Yes
Unknown
Free IP Geolocation API
No
Yes
Unknown
IP geolocation web service to get more than 55 parameters
apiKey
Yes
Unknown
Detect proxy and VPN using IP address
apiKey
Yes
Unknown
Locate your visitors by IP with country details
No
Yes
Yes
Free Geolocation tools and APIs for country, region, city and time zone lookup by IP address
apiKey
Yes
Unknown
Locate and identify website visitors by IP address
apiKey
Yes
Unknown
Provides forward/reverse geocoding and batch geocoding
apiKey
Yes
Yes
Create/customize beautiful digital maps
apiKey
Yes
Unknown
Mexico RESTful zip codes API
No
Yes
Unknown
Singapore Land Authority REST API services for Singapore addresses
apiKey
Yes
Unknown
Determine if a lat/lon is on water or land
No
Yes
Unknown
Forward and reverse geocoding using open data
apiKey
Yes
Yes
Navigation, geolocation and geographical data
OAuth
No
Unknown
Provide geolocation data based on postcode for Dutch addresses
No
No
Unknown
Postcode lookup & Geolocation for the UK
No
Yes
Yes
Get information about countries via a RESTful API
No
Yes
Unknown
Discover and share maps with friends
apiKey
Yes
Unknown
Validate and append data for any US ZipCode
apiKey
Yes
Yes
Utah Web API for geocoding Utah addresses
apiKey
Yes
Unknown
Brazil RESTful zip codes API
No
Yes
Unknown
US zip code distance, radius and location API
apiKey
Yes
Unknown
Get information about place such as country, city, state, etc
No
No
Unknown
The US Census Bureau provides various APIs and data sets on demographics and businesses
No
Yes
Unknown
Lyon(FR) City Open Data
apiKey
Yes
Unknown
Nantes(FR) City Open Data
apiKey
Yes
Unknown
New York (US) City Open Data
No
Yes
Unknown
Prague(CZ) City Open Data
No
No
Unknown
The primary platform for Open Source and code sharing for the U.S. Federal Government
apiKey
Yes
Unknown
Formatted and geolocated Colorado public data
No
Yes
Unknown
Colorado State Government Open Data
No
Yes
Unknown
US Public Data
No
Yes
Unknown
US Government Data
apiKey
Yes
Unknown
Contains live datasets including information about petitions, bills, MP votes, attendance and more
No
No
Unknown
Contains D.C. government public datasets, including crime, GIS, financial data, and so on
No
Yes
Unknown
Web services and data sets from the US Environmental Protection Agency
No
Yes
Unknown
Access information on the FBI Wanted program
No
Yes
Unknown
Information on campaign donations in federal elections
apiKey
Yes
Unknown
The Daily Journal of the United States Government
No
Yes
Unknown
UK food hygiene rating data API
No
No
Unknown
Australian Government Open Data
No
Yes
Unknown
Belgium Government Open Data
No
Yes
Unknown
Canadian Government Open Data
No
No
Unknown
French Government Open Data
apiKey
Yes
Unknown
Indian Government Open Data
apiKey
Yes
Unknown
Italy Government Open Data
No
Yes
Unknown
New Zealand Government Open Data
No
Yes
Unknown
Romania Government Open Data
No
No
Unknown
Taiwan Government Open Data
No
Yes
Unknown
United States Government Open Data
No
Yes
Unknown
Federal regulatory materials to increase understanding of the Federal rule making process
apiKey
Yes
Unknown
Find Canadian Government Representatives
No
Yes
Unknown
US federal spending data
No
Yes
Unknown
Covid 19 cases, deaths and recovery per country
No
Yes
Yes
Government measures tracker to fight against the Covid-19 pandemic
No
Yes
Yes
Logging and retrieving diabetes information
No
No
Unknown
Educational content about the US Health Insurance Marketplace
No
Yes
Unknown
NLP that extracts mentions of clinical concepts from text, gives access to clinical ontology
apiKey
Yes
Unknown
Makeup Information
No
No
Unknown
Access to the data from the CMS - medicare.gov
No
Yes
Unknown
National Plan & Provider Enumeration System, info on healthcare providers registered in US
No
Yes
Unknown
Worlds largest verified nutrition database
apiKey
Yes
Unknown
Public FDA data about drugs, devices and foods
No
Yes
Unknown
Medical platform which allows the development of applications for different healthcare scenarios
OAuth
Yes
Unknown
National Nutrient Database for Standard Reference
apiKey
Yes
Unknown
Jobs for software developers
No
Yes
Yes
Jobs with GraphQL
No
Yes
Yes
Job board aggregator
apiKey
Yes
Unknown
Job aggregator
apiKey
Yes
Unknown
Job search engine
apiKey
Yes
Unknown
Job search engine
apiKey
No
Unknown
Job titles, skills and related jobs data
No
No
Unknown
Job board aggregator
apiKey
Yes
Unknown
Job board and company profiles
apiKey
Yes
Unknown
Freelance job board and management system
OAuth
Yes
Unknown
US government job board
apiKey
Yes
Unknown
Job search app and website
apiKey
Yes
Unknown
AI for code review
No
Yes
Unknown
Natural Language Processing
apiKey
Yes
Unknown
Data Analytics
apiKey
Yes
Unknown
Text sentiment analysis
No
Yes
Yes
A time series analysis API
apiKey
Yes
Yes
Forecasting API for timeseries data
apiKey
Yes
Unknown
Natural Language Processing
OAuth
Yes
Unknown
Music
OAuth
Yes
Unknown
Music
OAuth
Yes
Unknown
Crowdsourced lyrics and music knowledge
OAuth
Yes
Unknown
Music genre generator
No
Yes
Unknown
Software products
No
Yes
Unknown
Music
OAuth
Yes
Unknown
Get music libraries, playlists, charts, and perform out of KKBOX's platform
OAuth
Yes
Unknown
Music
apiKey
Yes
Unknown
Simple API to retrieve the lyrics of a song
No
Yes
Unknown
Music
OAuth
Yes
Yes
Music
No
Yes
Unknown
Music
apiKey
Yes
Unknown
Download curated playlists of streaming tracks (YouTube, SoundCloud, etc...)
No
Yes
No
Music Events
OAuth
Yes
Unknown
Provides guitar, bass and drums tabs and chords
No
Yes
Unknown
Allow users to upload and share sounds
OAuth
Yes
Unknown
View Spotify music catalog, manage users' libraries, get recommendations and more
OAuth
Yes
Unknown
Similar artist API (also works for movies and TV shows)
apiKey
Yes
Unknown
Music
apiKey
Yes
Unknown
Crowdsourced lyrics and music knowledge
apiKey
Yes
Unknown
Latest news published in various news sources, blogs and forums
apiKey
Yes
Yes
RSS reader
OAuth
Yes
Unknown
Provides news
apiKey
Yes
Unknown
Headlines currently published on a range of news sources and blogs
apiKey
Yes
Unknown
Personalized news listening experience from NPR
OAuth
Yes
Unknown
Spaceflight related news
No
Yes
Yes
Access all the content the Guardian creates, categorised by tags and section
apiKey
Yes
Unknown
RSS reader
apiKey
Yes
Unknown
United States ham radio callsigns
No
Yes
Unknown
Location Information Prediction
apiKey
Yes
Unknown
News articles and public datasets
apiKey
Yes
Unknown
Broadest collection of public data
apiKey
Yes
Yes
Mobile Device Description
No
Yes
Unknown
Address search via the French Government
No
Yes
Unknown
Get JSON formatted summary with title, description and preview image for any requested URL
apiKey
Yes
Yes
Marijuana strains, races, flavors and effects
apiKey
No
Unknown
Extract structured data from any website
No
Yes
Yes
Data on corporate entities and directors in many countries
apiKey
Yes
Unknown
Stock Market Data
No
Yes
Unknown
Recreational areas, federal lands, historic sites, museums, and other attractions/resources(US)
apiKey
Yes
Unknown
Content Curation Service
apiKey
No
Unknown
Quality of Life Data
No
Yes
Unknown
University names, countries and domains
No
Yes
Unknown
Courses, lecture videos, detailed information for courses etc. for the University of Oslo (Norway)
No
Yes
Unknown
More than 1.5 million barcode numbers from all around the world
apiKey
Yes
Unknown
Collaboratively edited knowledge base operated by the Wikimedia Foundation
OAuth
Yes
Unknown
Mediawiki Encyclopedia
No
Yes
Unknown
Find Local Business
OAuth
Yes
Unknown
Drupal.org
No
Yes
Unknown
Evil Insults
No
Yes
Yes
USA patent api services
No
Yes
Unknown
FavQs allows you to collect, discover and share your favorite quotes
apiKey
Yes
Unknown
Fuck Off As A Service
No
No
Unknown
Inspirational Quotes
No
No
Unknown
The largest selection of dad jokes on the internet
No
Yes
Unknown
REST API for random Kanye West quotes
No
Yes
Yes
Community of readers and writers offering unique perspectives on ideas
OAuth
Yes
Unknown
Memes on Narendra Modi
No
Yes
Unknown
Programming Quotes API for open source projects
No
Yes
Unknown
Quotable is a free, open source quotations API
No
Yes
Unknown
REST API for more than 5000 famous quotes
No
Yes
Unknown
Inspirational Quotes
No
Yes
Unknown
REST API for random Taylor Swift quotes
No
Yes
No
Assess, collect and analyze Personality
No
Yes
Unknown
Api & web archive for the things Donald Trump has said
No
Yes
Unknown
Jiffier GIFs
OAuth
Yes
Unknown
Get all your gifs
apiKey
Yes
Unknown
Upload images
apiKey
Yes
Unknown
Images
OAuth
Yes
Unknown
Images from Unsplash
No
Yes
Unknown
Image Background removal
apiKey
Yes
Yes
Free Stock Photos and Videos
apiKey
Yes
Yes
Photography
apiKey
Yes
Unknown
Resizable kitten placeholder images
No
Yes
Unknown
URL 2 Image
No
Yes
Unknown
Photography
OAuth
Yes
Unknown
Wallpapers
apiKey
Yes
Unknown
Global Biodiversity Information Facility
No
Yes
Yes
Access millions of museum specimens from organizations around the world
No
Yes
Unknown
High Energy Physics info. system
No
Yes
Unknown
Integrated Taxonomic Information System
No
Yes
Unknown
Spaceflight launches and events database
No
Yes
Yes
Asterank.com Information
No
No
Unknown
NASA data, including imagery
No
Yes
Unknown
API for getting APOD (Astronomy Image of the Day) images along with metadata
No
Yes
Yes
Symbolic and Arithmetic Math Calculator
No
Yes
Unknown
Facts about numbers
No
No
Unknown
ISS astronauts, current location, etc
No
No
Unknown
Repository and archive for study designs, research materials, data, manuscripts, etc
No
Yes
Unknown
A free, open, dataset about research and scholarly activities
No
Yes
Unknown
Company, vehicle, launchpad and launch data
No
Yes
Unknown
Sunset and sunrise times for a given latitude and longitude
No
Yes
Unknown
Botanical data for plant species
apiKey
Yes
Unknown
Earthquakes data real-time
No
Yes
Unknown
Water quality and level info for rivers and lakes
No
Yes
Unknown
World Data
No
No
Unknown
Lists of filters for adblockers and firewalls
No
Yes
Unknown
Screen order information using AI to detect frauds
apiKey
Yes
Unknown
Passwords which have previously been exposed in data breaches
apiKey
Yes
Unknown
Perform OSINT via Intelligence X
apiKey
Yes
Unknown
U.S. National Vulnerability Database
No
Yes
Unknown
Scan, search and collect threat intelligence data in real-time
apiKey
Yes
Unknown
Domain and IP related information such as current and historical WHOIS and DNS records
apiKey
Yes
Unknown
Search engine for Internet connected devices
apiKey
Yes
Unknown
UK Police data
No
Yes
Unknown
Sell and Buy on eBay
OAuth
Yes
Unknown
Item price and availability
apiKey
Yes
Unknown
Wegmans Food Markets
apiKey
Yes
Unknown
Team Collaboration Software
OAuth
Yes
Unknown
Make bots for Discord, integrate Discord onto an external platform
OAuth
Yes
Unknown
Communicate with Disqus data
OAuth
Yes
Unknown
Facebook Login, Share on FB, Social Plugins, Analytics and more
OAuth
Yes
Unknown
Interact with Foursquare users and places (geolocation-based checkins, photos, tips, events, etc)
OAuth
Yes
Unknown
Asks someone to fuck off
No
Yes
Unknown
Get Social Media profiles and contact Information
OAuth
Yes
Unknown
Social news for CS and entrepreneurship
No
Yes
Unknown
Instagram Login, Share on Instagram, Social Plugins and more
OAuth
Yes
Unknown
The foundation of all digital integrations with LinkedIn
OAuth
Yes
Unknown
Data about Meetups from Meetup.com
apiKey
Yes
Unknown
Seamless Social Networking features, API, SDK to any app
apiKey
Yes
Unknown
Get Open Collective data
No
Yes
Unknown
The world's catalog of ideas
OAuth
Yes
Unknown
Homepage of the internet
OAuth
Yes
Unknown
Open Source Reddit Clone
OAuth
Yes
Unknown
Team Instant Messaging
OAuth
Yes
Unknown
Simplified HTTP version of the MTProto API for bots
apiKey
Yes
Unknown
Read and write Telegram data
OAuth
Yes
Unknown
A freecycling community with thousands of free items posted every day
OAuth
Yes
Yes
Read and write Tumblr Data
OAuth
Yes
Unknown
Game Streaming API
OAuth
Yes
Unknown
Read and write Twitter data
OAuth
Yes
No
Read and write vk data
OAuth
Yes
Unknown
Official JSON API providing real-time league, team and player statistics about the CFL
apiKey
Yes
No
City Bikes around the world
No
No
Unknown
F1 data from the beginning of the world championships in 1950
No
Yes
Unknown
Fitbit Information
OAuth
Yes
Unknown
Embed codes for goals and highlights from Premier League, Bundesliga, Serie A and many more
No
Yes
Yes
Predictions for upcoming football matches, odds, results and stats
X-Mashape-Key
Yes
Unknown
Football Data
No
No
Unknown
JCDecaux's self-service bicycles
apiKey
Yes
Unknown
Current and historical NBA Statistics
No
Yes
Unknown
NHL historical data and statistics
No
Yes
Unknown
Connect with athletes, activities and more
OAuth
Yes
Unknown
Query sports data, including teams, players, games, scores and statistics
No
No
No
Crowd-Sourced Sports Data and Artwork
apiKey
Yes
Yes
Workout manager data as exercises, muscles or equipment
apiKey
Yes
Unknown
Service to generate test and fake data
apiKey
Yes
Yes
Fake data for testing and prototyping
No
No
Unknown
The "lorem ipsum" generator that doesn't suck
No
No
Unknown
Free and public API that generates random and fake people's data in JSON
No
Yes
No
Generates random user data
No
Yes
Unknown
Generate random robot/alien avatars
No
Yes
Unknown
Generates real-life faces of people who do not exist
No
Yes
Unknown
Generate random fake names
No
Yes
Unknown
Generate yes or no randomly
No
Yes
Unknown
Detects text language
apiKey
Yes
Unknown
Natural language understanding technology, including sentiment, entity and syntax analysis
apiKey
Yes
Unknown
Text Analytics with sentiment analysis, categorization & named entity extraction
OAuth
Yes
Unknown
Natural language processing for advanced text analysis
OAuth
Yes
Unknown
Shipment and Address information
apiKey
Yes
Unknown
Small application that measures your keyboard/mouse usage
No
Yes
Unknown
Travel Search - Limited usage
apiKey
Yes
Unknown
Stations and predicted arrivals for BART
apiKey
No
Unknown
Search car sharing trips
apiKey
Yes
Unknown
Transitland API
No
Yes
Unknown
A-to-B routing with turn-by-turn instructions
apiKey
Yes
Unknown
Open APIs that deliver services in or regarding Iceland
No
Yes
Unknown
Audio guide for travellers
apiKey
Yes
Unknown
Delays in subway lines
No
No
No
The open API for building cool stuff with transport data
apiKey
Yes
Unknown
Global public registry of electric vehicle charging locations
No
Yes
Unknown
Provides safe restroom access for transgender, intersex and gender nonconforming individuals
No
Yes
Unknown
Schiphol
apiKey
Yes
Unknown
Transit Aggregation
No
Yes
Unknown
Marta
No
No
Unknown
Auckland Transport
No
Yes
Unknown
Belgian transport API
No
Yes
Unknown
Third-party VBB API
No
Yes
Unknown
Bordeaux Métropole public transport and more (France)
apiKey
Yes
Unknown
MBTA API
No
No
Unknown
Budapest public transport API
No
Yes
Unknown
CTA
No
No
Unknown
Czech transport API
No
Yes
Unknown
RTD
No
No
Unknown
Finnish transport API
No
Yes
Unknown
Deutsche Bahn (DB) API
apiKey
No
Unknown
Grenoble public transport
No
No
No
Honolulu Transportation Information
apiKey
No
Unknown
India Public Transport API
apiKey
Yes
Unknown
Data about buses routes, parking and traffic
apiKey
Yes
Unknown
TfL API
No
Yes
Unknown
TfGM transport network data
apiKey
Yes
No
Live schedules made simple
No
No
Unknown
RATP Open Data API
No
No
Unknown
SEPTA APIs
No
No
Unknown
SPTrans
OAuth
No
Unknown
Public Transport consumer
OAuth
Yes
Unknown
Official Swiss Public Transport Open Data
apiKey
Yes
Unknown
Swiss public transport API
No
Yes
Unknown
NS, only trains
apiKey
No
Unknown
OVAPI, country-wide public transport
No
Yes
Unknown
TTC
No
Yes
Unknown
NextBus API
No
No
Unknown
TransLink
OAuth
Yes
Unknown
Washington Metro transport API
OAuth
Yes
Unknown
Uber ride requests and price estimation
OAuth
Yes
Yes
Platform for public transport data in emerging cities
OAuth
Yes
Unknown
Monitor, compare and optimize your marketing links
apiKey
Yes
Unknown
Custom URL shortener for sharing branded links
apiKey
Yes
Unknown
Telematics data, remotely access vehicle functions, car configurator, locate service dealers
apiKey
Yes
No
NHTSA Product Information Catalog and Vehicle Listing
No
Yes
Unknown
Lock and unlock vehicles and get data like odometer reading and location. Works on most new cars


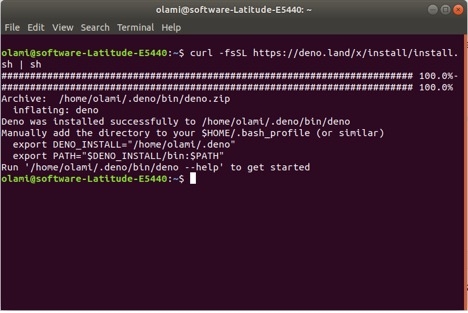
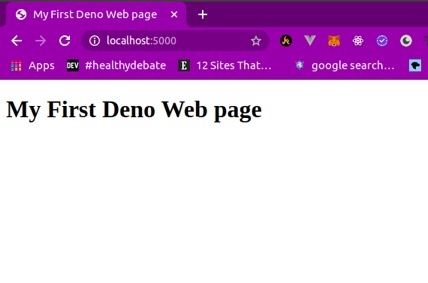
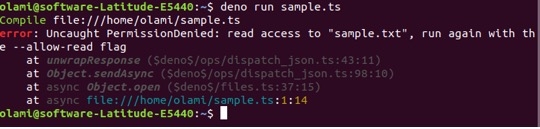
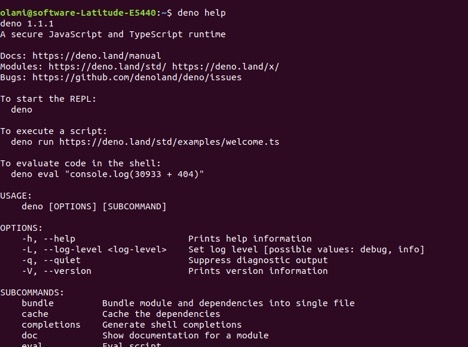
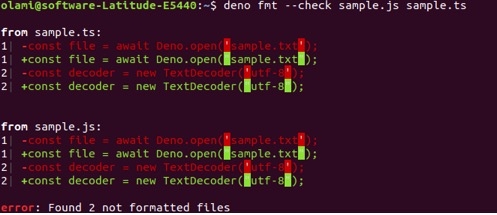
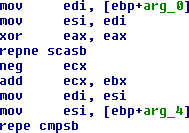
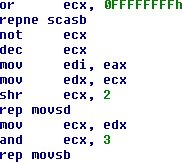


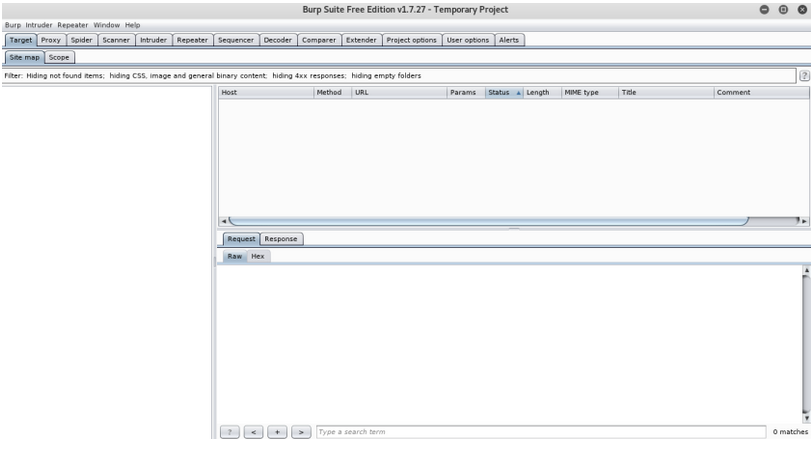
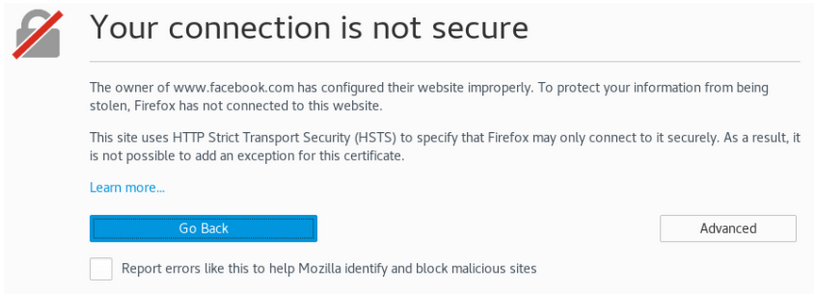
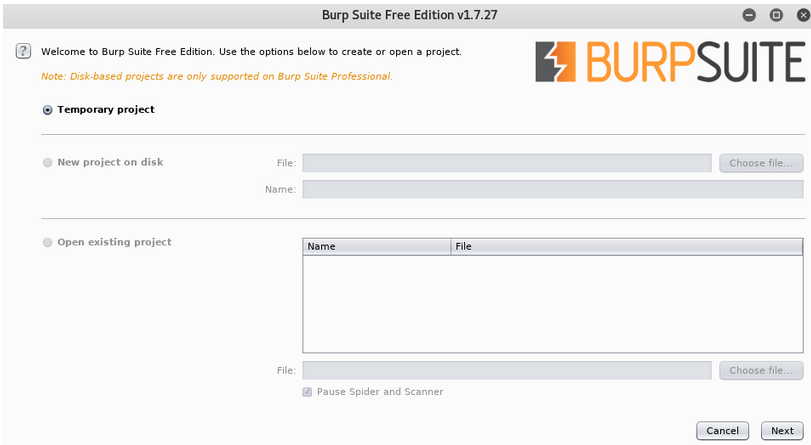
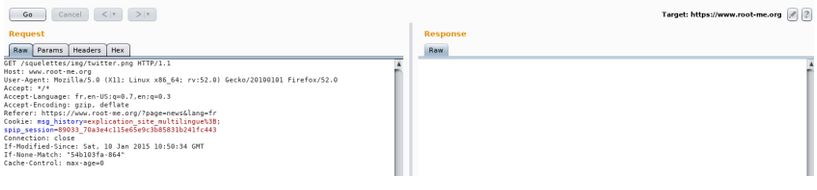


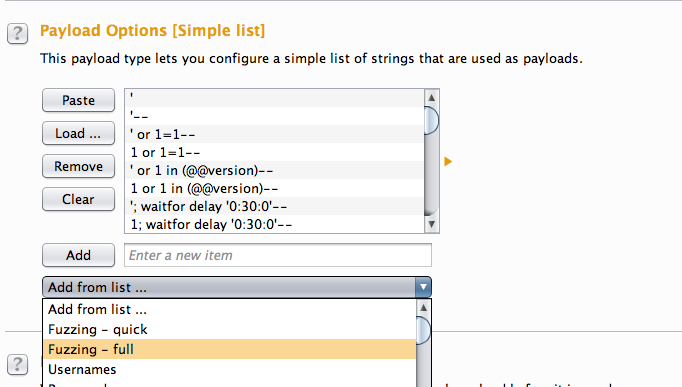
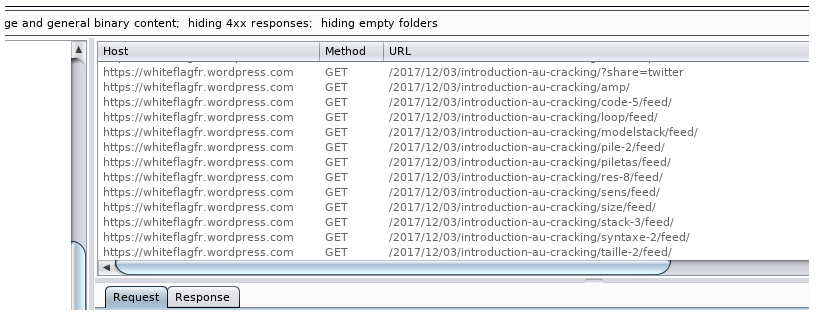
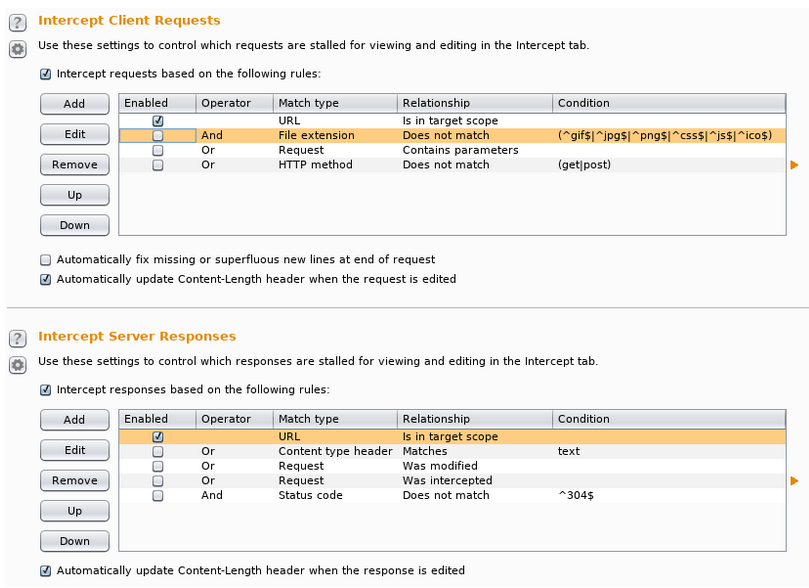
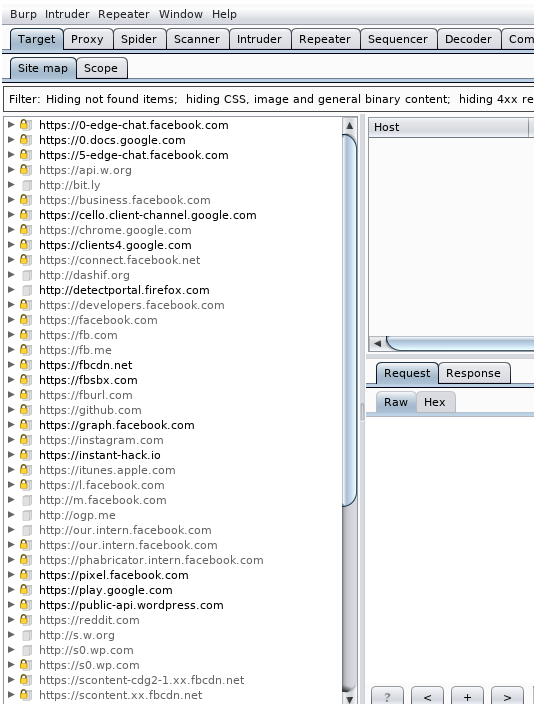
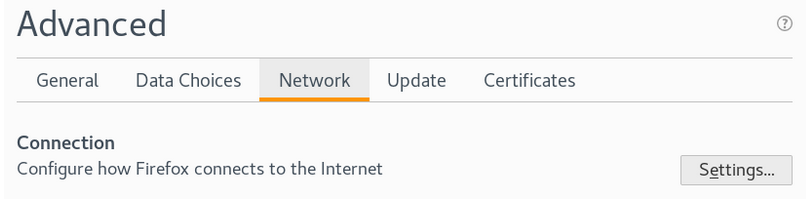
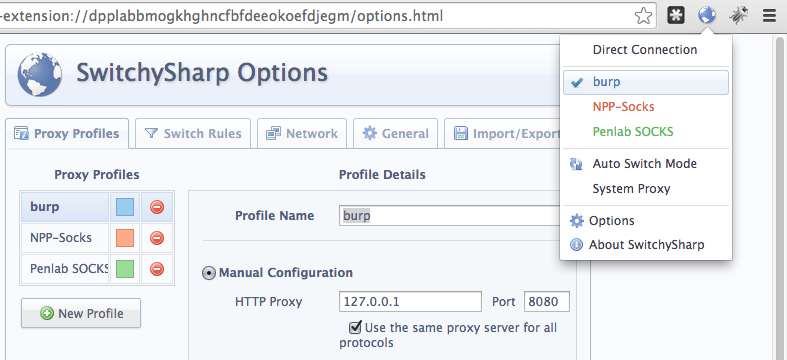


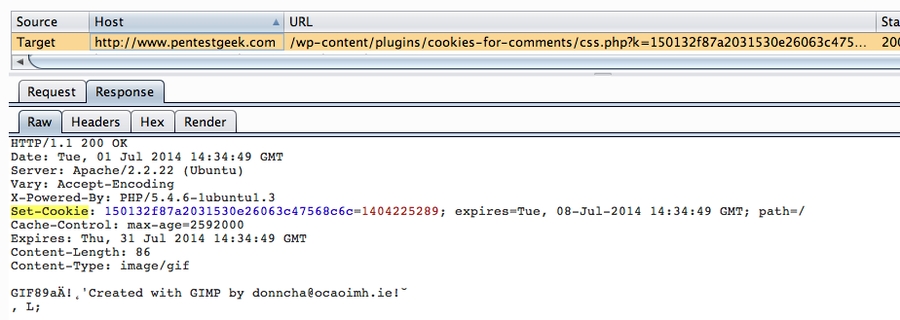
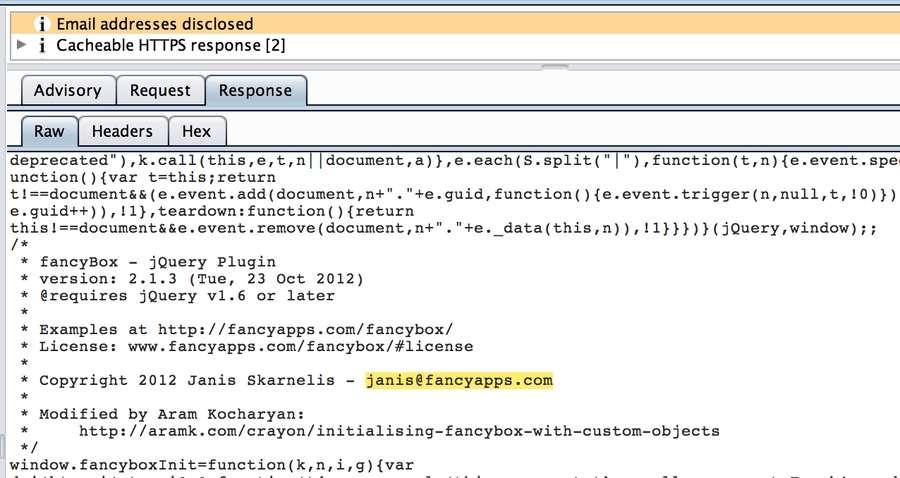
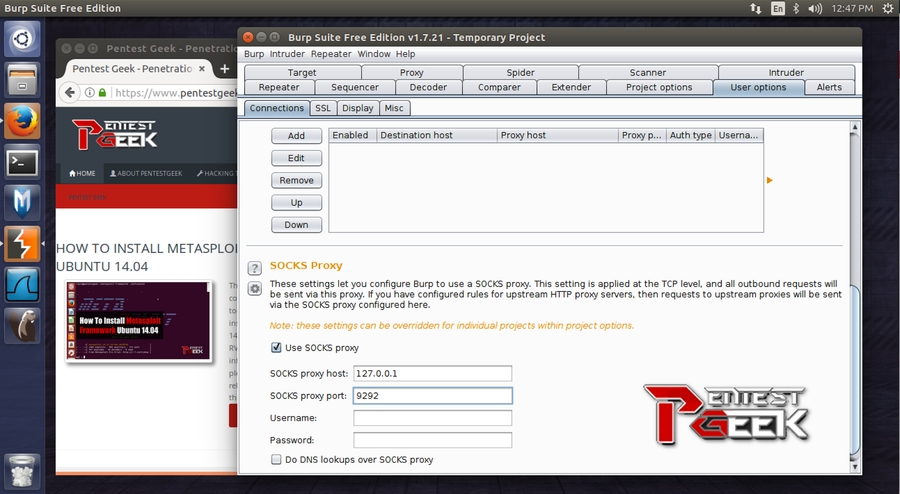
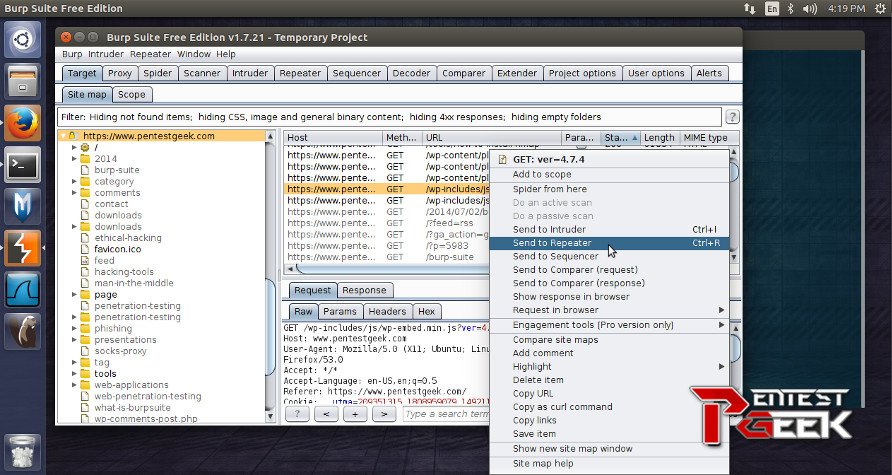
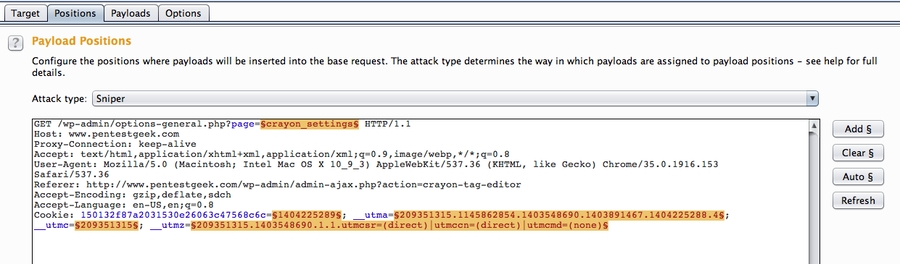
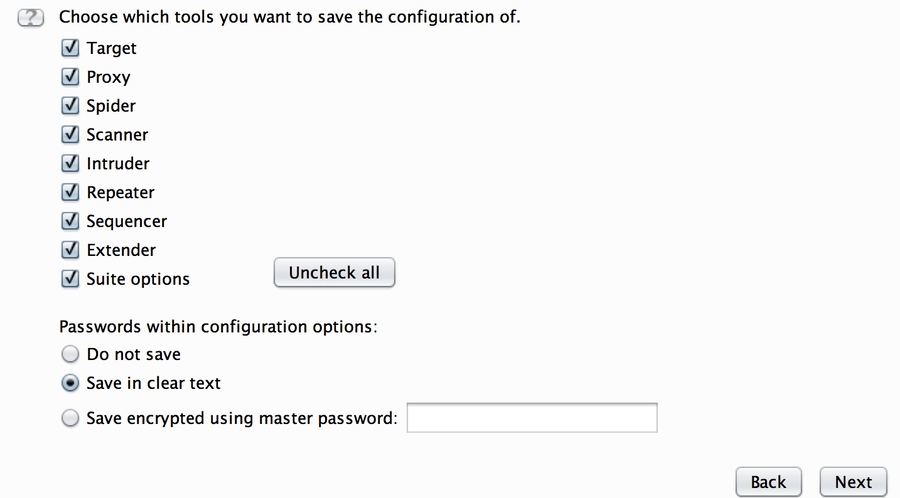
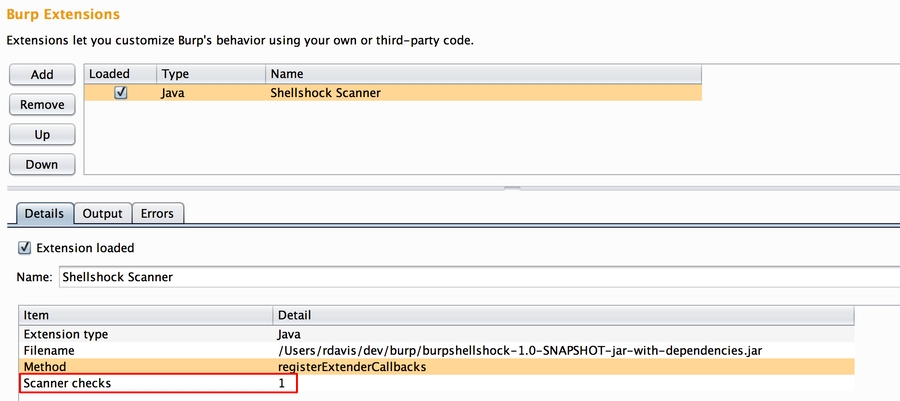
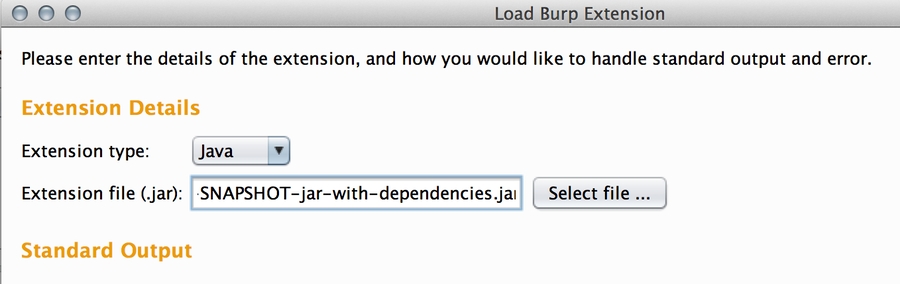

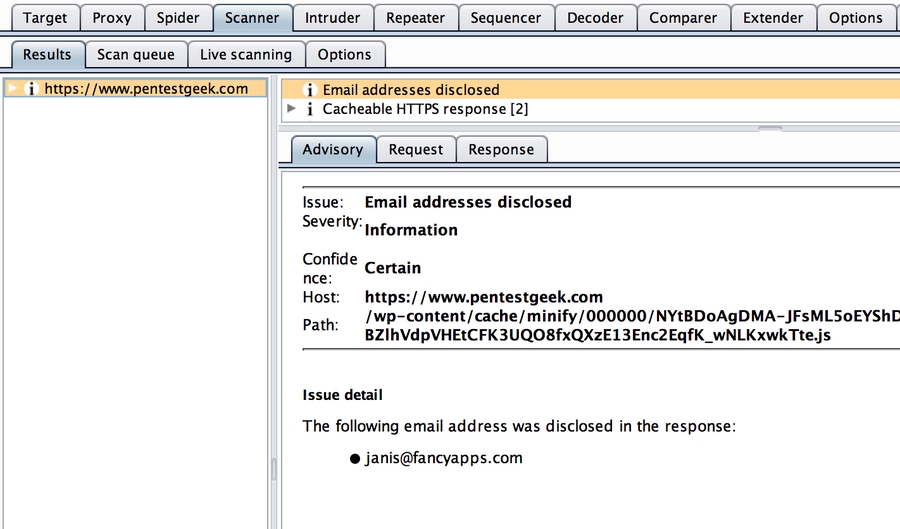

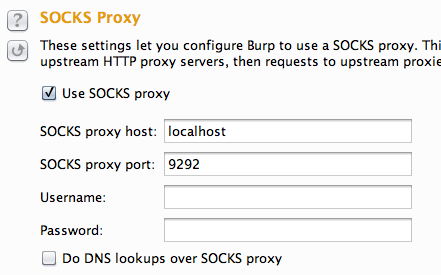
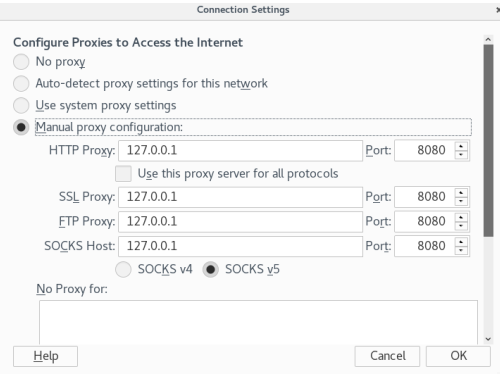
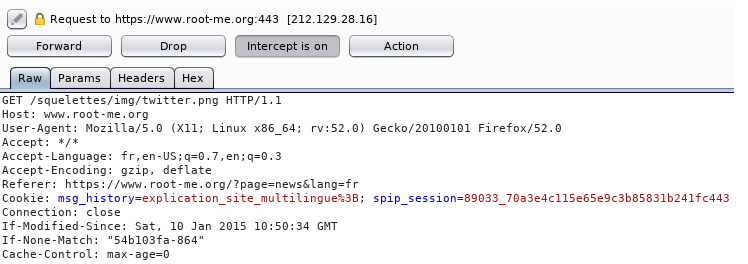
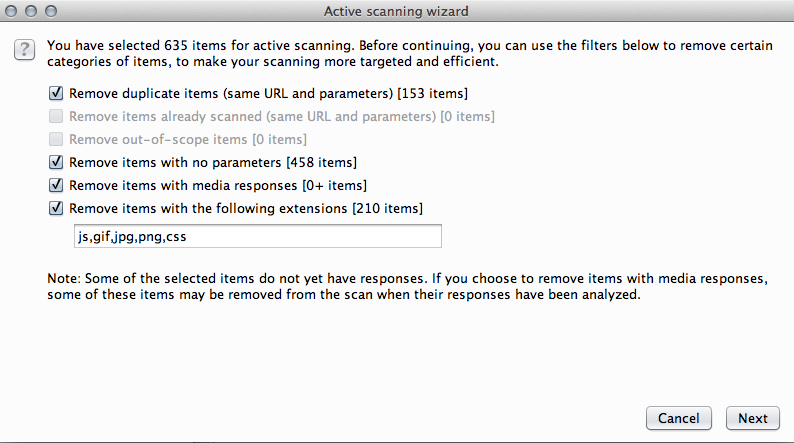
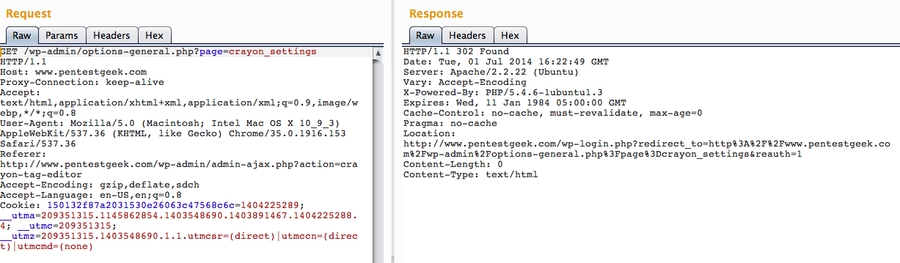
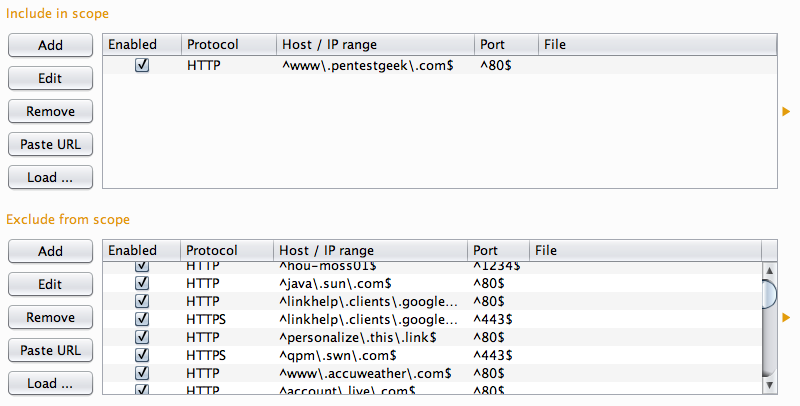
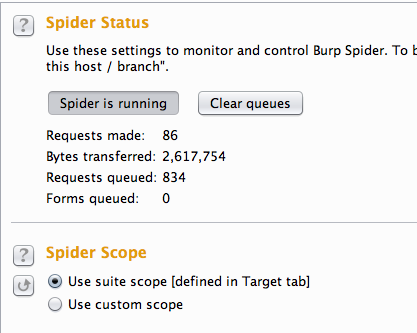
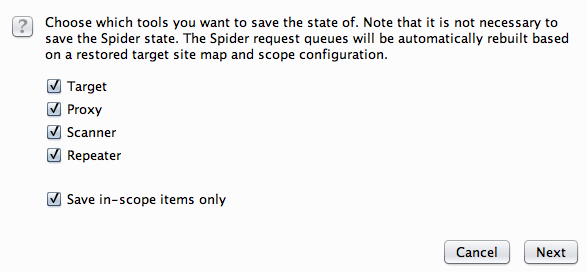


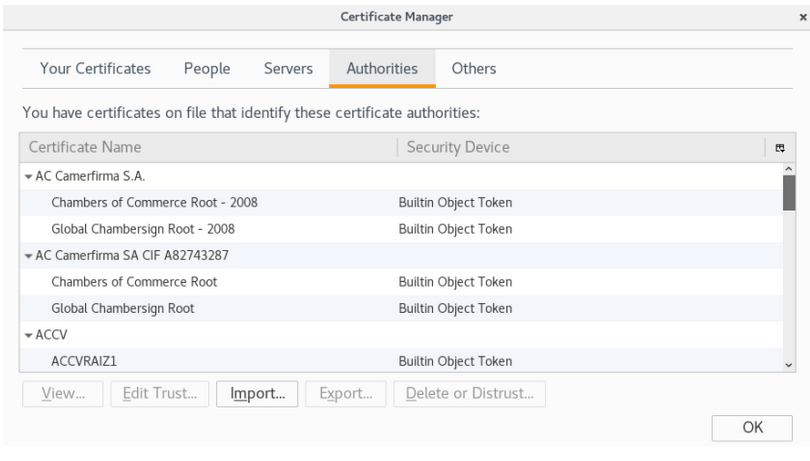
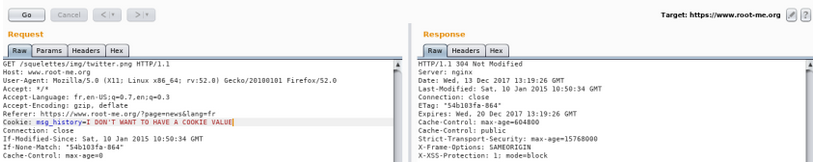
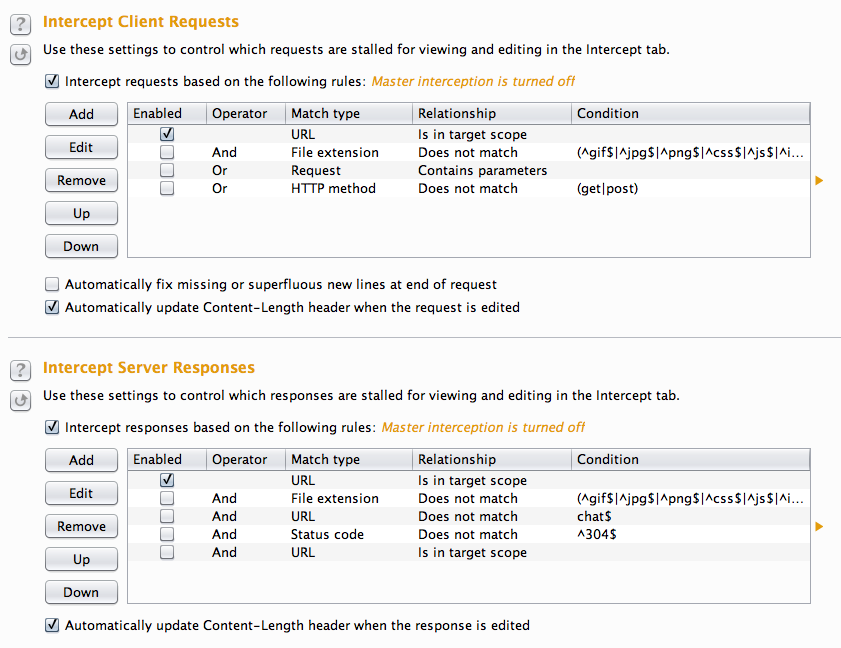
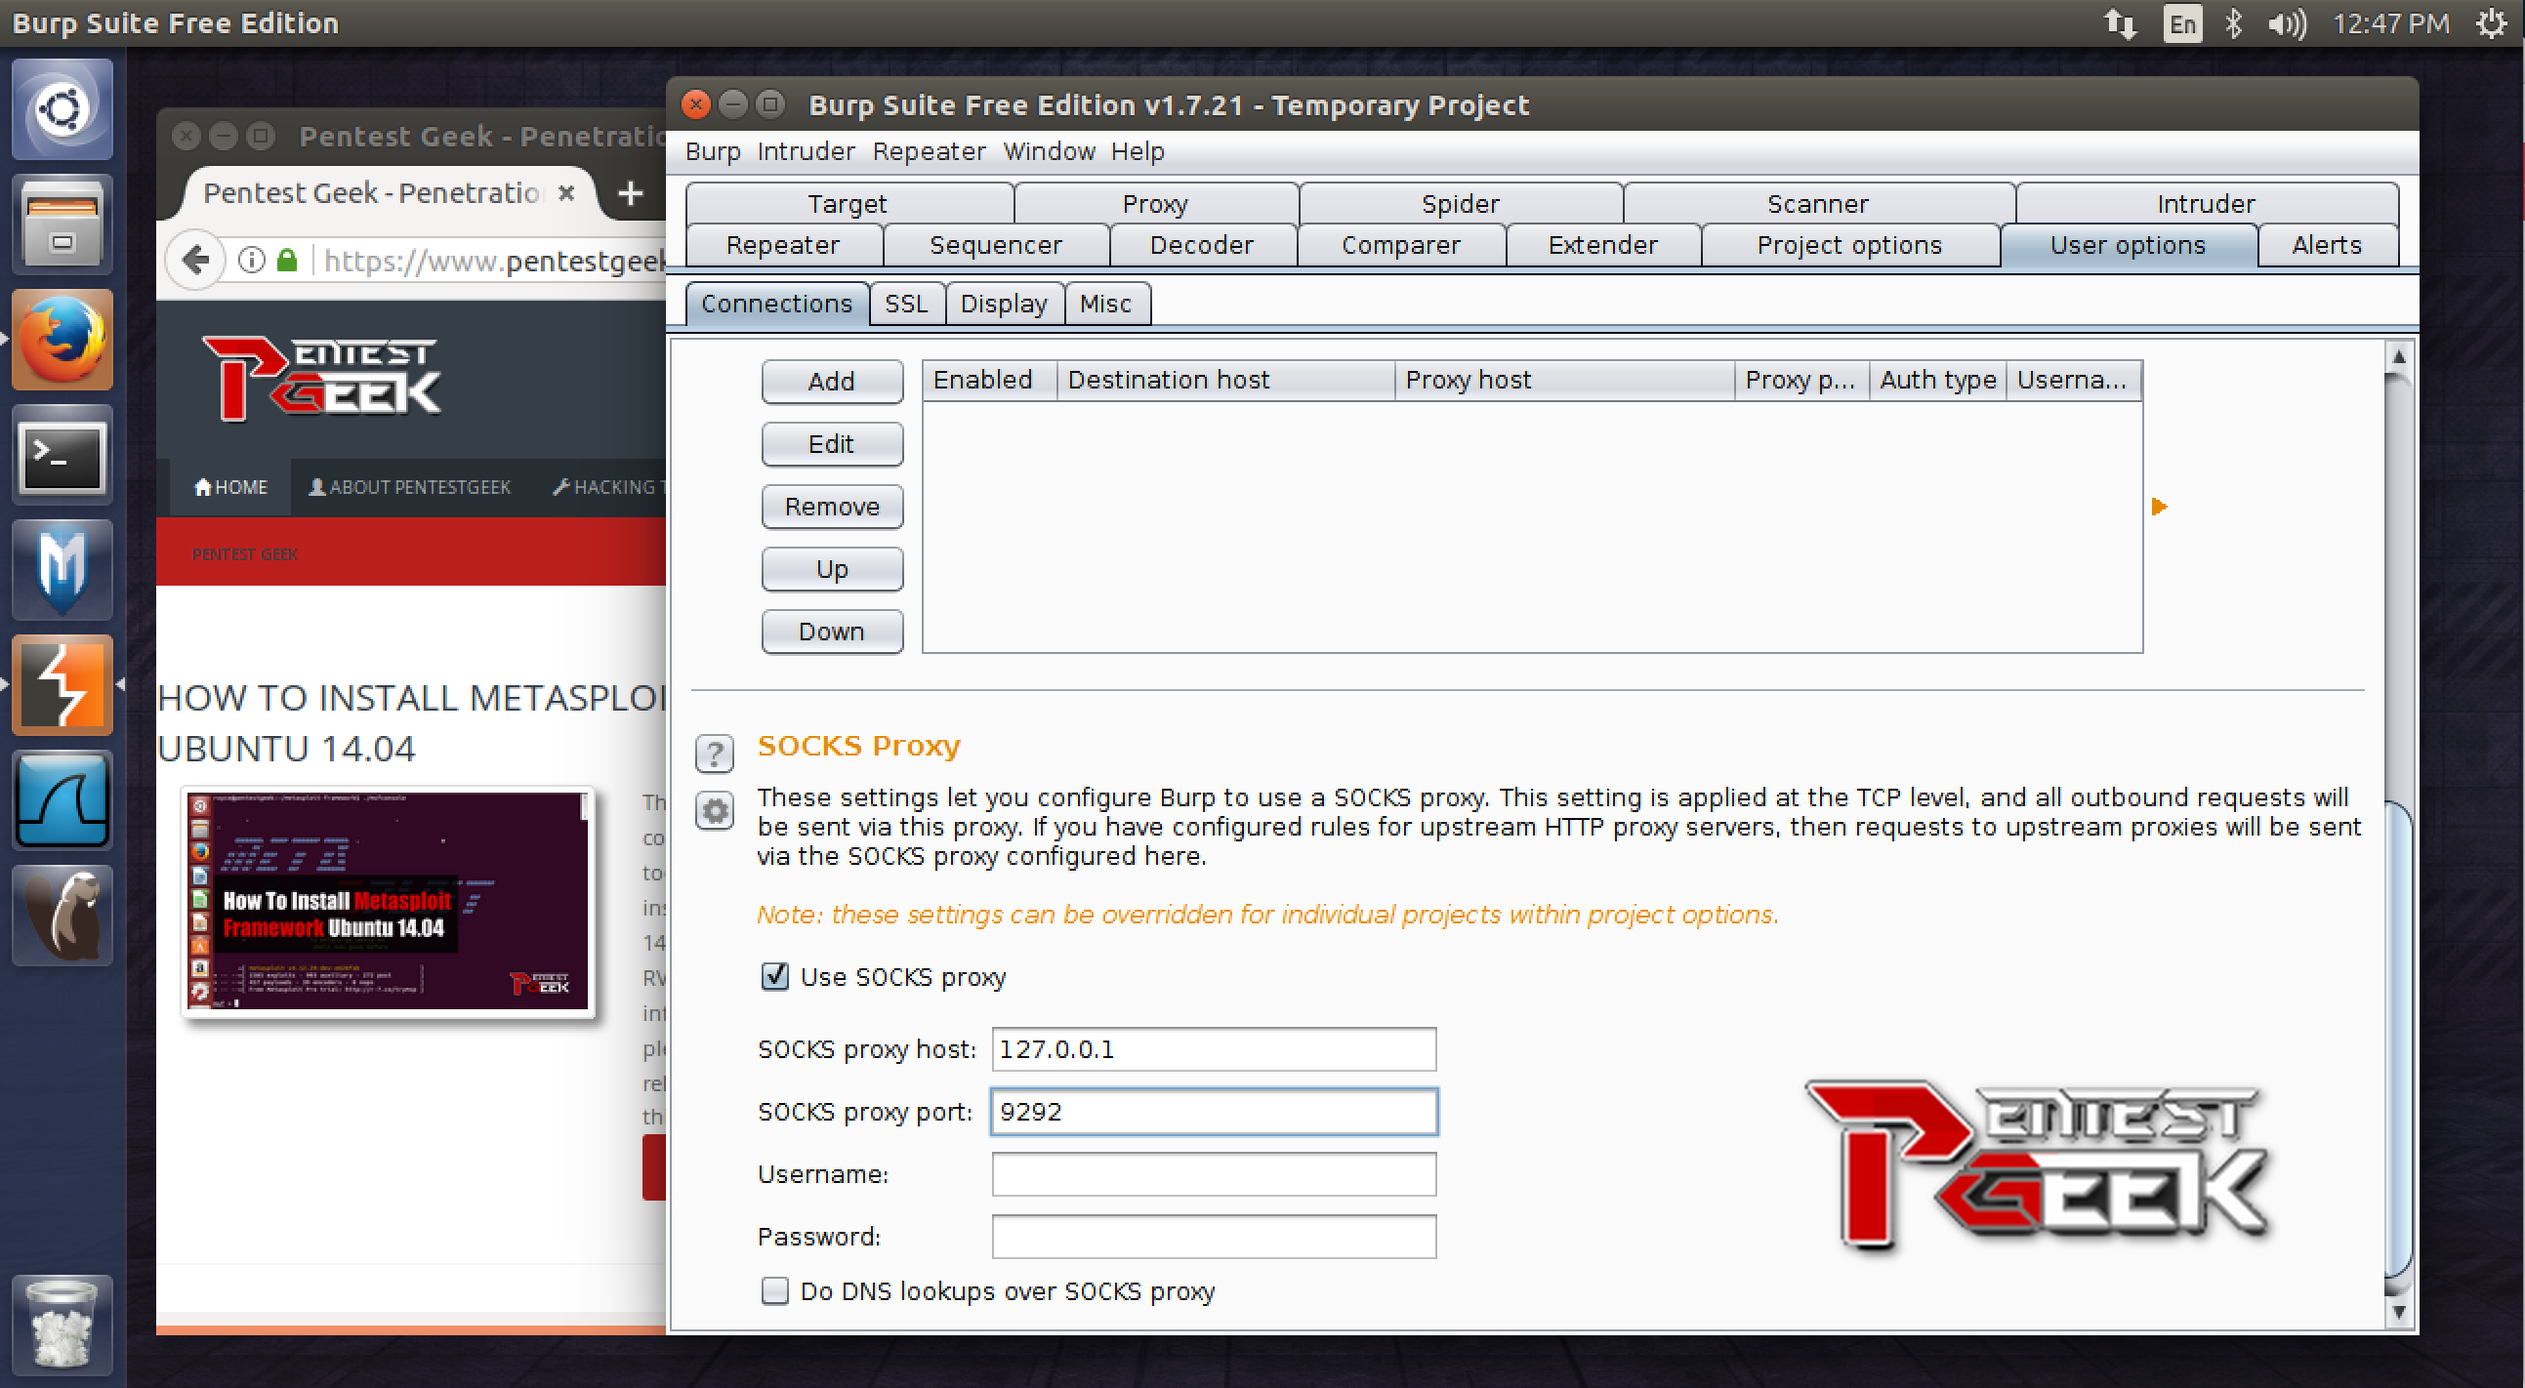
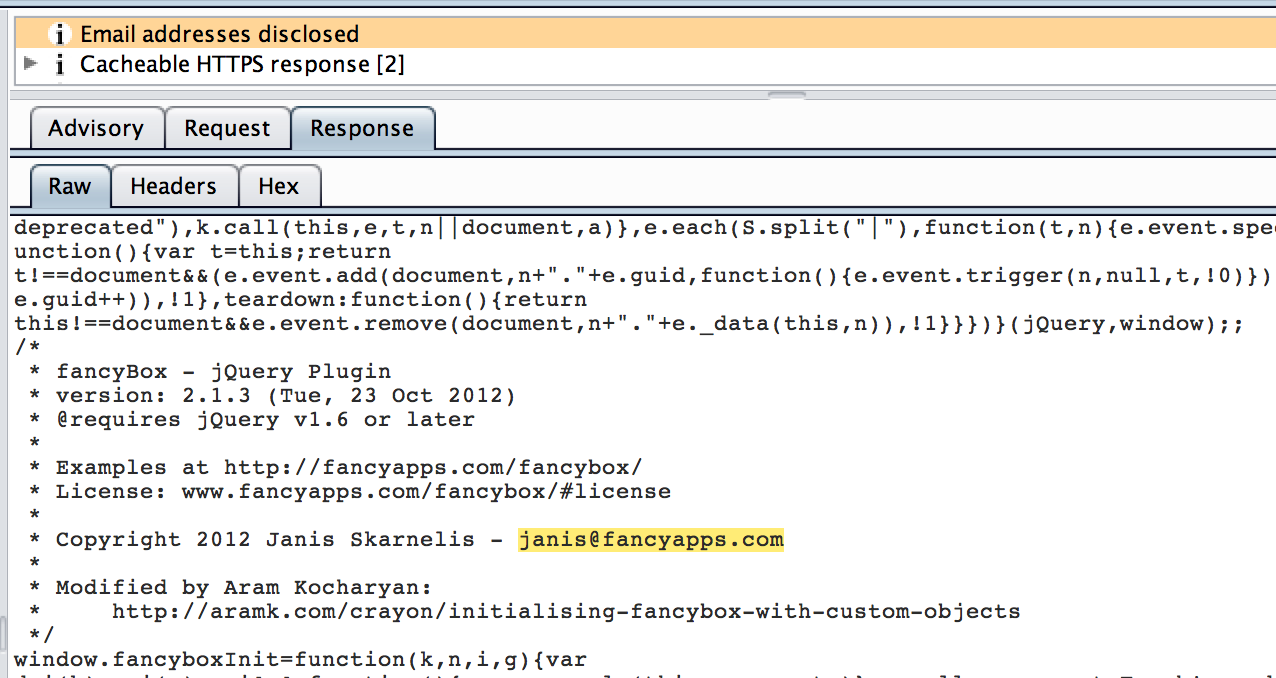
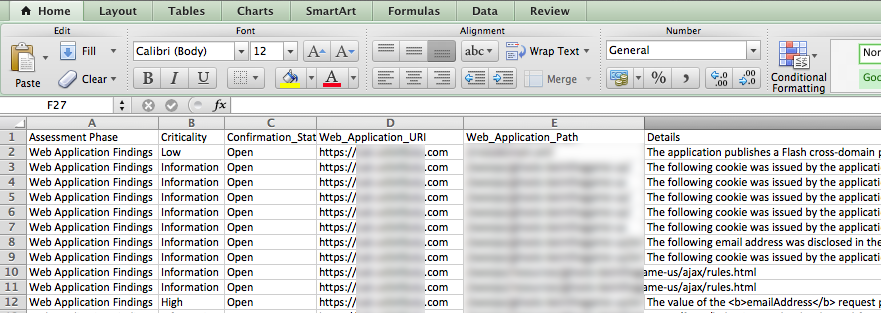
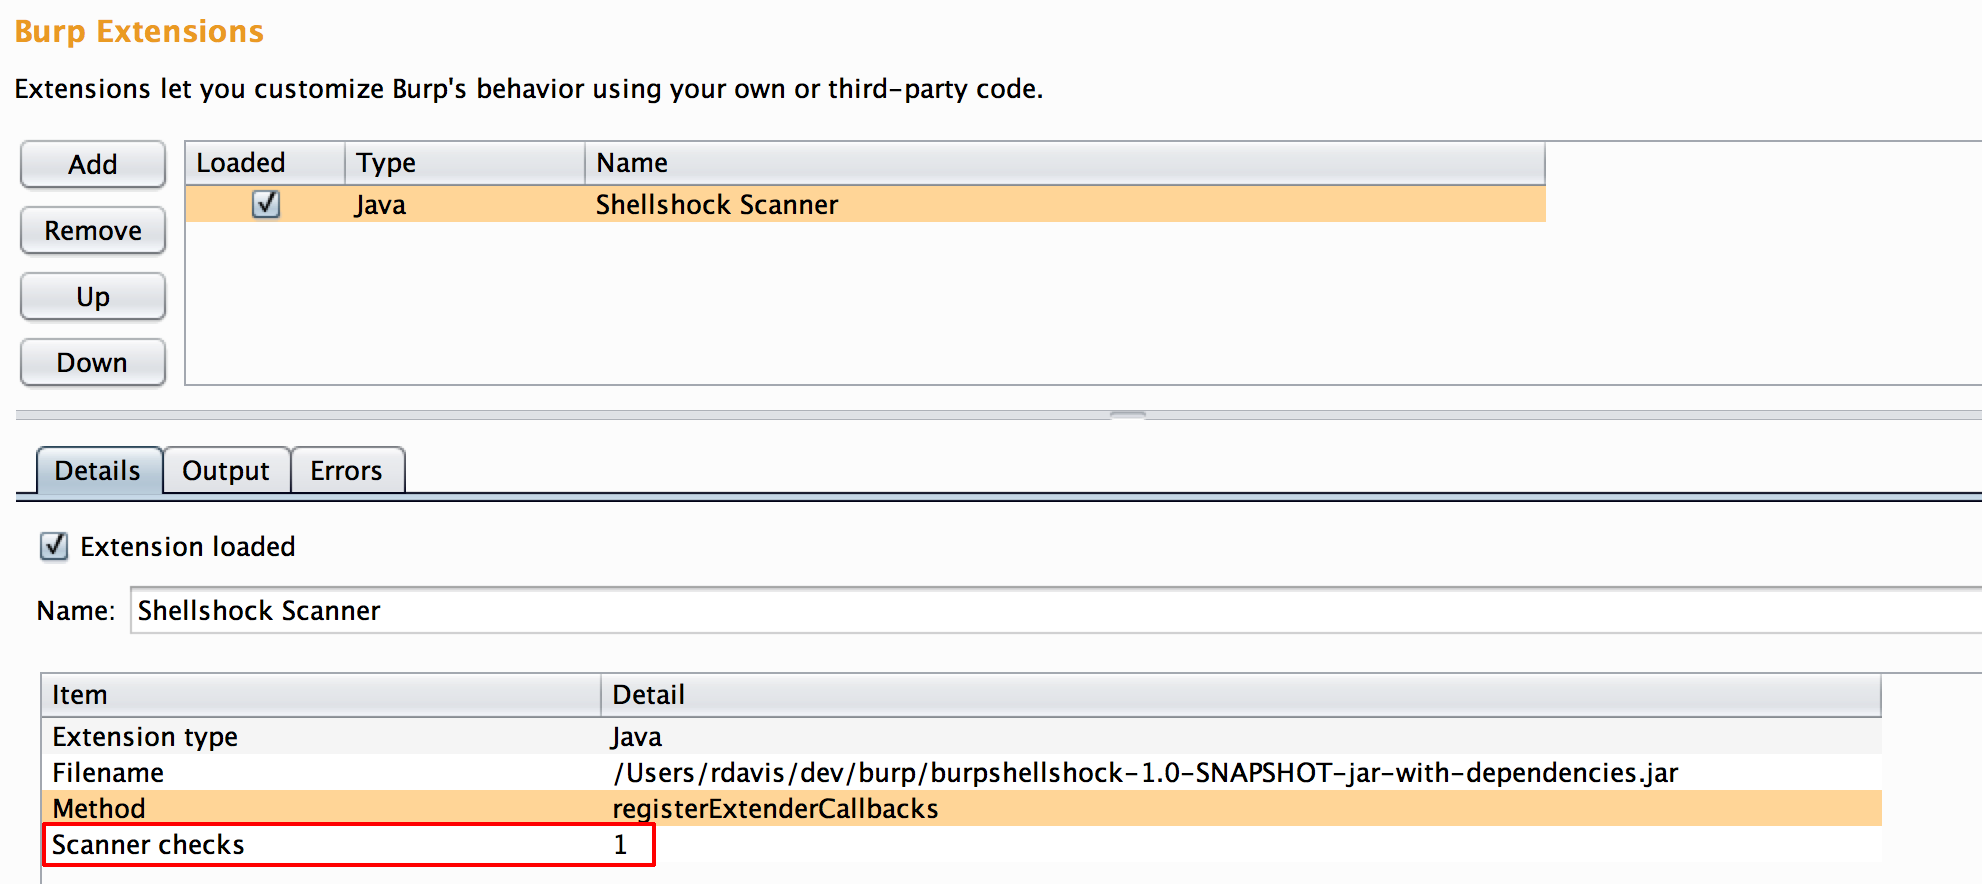